Porting Takua Renderer to 64-bit ARM- Part 2
Table of Contents
Introduction
This post is the second half of my two-part series about how I ported my hobby renderer (Takua Renderer) to 64-bit ARM and what I learned from the process. In the first part, I wrote about my motivation for undertaking a port to arm64 in the first place and described the process I took to get Takua Renderer up and running on an arm64-based Raspberry Pi 4B. I also did a deep dive into several topics that I ran into along the way, which included floating point reproducibility across different processor architectures, a comparison of arm64 and x86-64’s memory reordering models, and a comparison of how the same example atomic code compiles down to assembly in arm64 versus in x86-64. In this second part, I’ll write about developments and lessons learned after I got my initial arm64 port working correctly on Linux.
We’ll start with how I got Takua Renderer up and running on arm64 macOS, and discuss various interesting aspects of arm64 macOS, such as Universal Binaries and Apple’s Rosetta 2 binary translation layer for running x86-64 binaries on arm64 macOS. As noted in the first part of this series, my initial port of Takua Renderer to arm64 did not include Embree; after the initial port, I added Embree support using Syoyo Fujita’s embree-aarch64 project (which has since been superseded by official arm64 support in Embree v3.13.0). In this post I’ll look into how Embree, a codebase containing tons of x86-64 assembly and SSE and AVX intrinsics, was ported to arm64. I will also use this exploration of Embree as a lens through which to compare x86-64’s SSE vector extensions to arm64’s Neon vector extensions. Finally, I’ll wrap up with some additional important details to keep in mind when writing portable code between x86-64 and arm64, and I’ll also provide some more performance comparisons featuring the Apple M1 processor.
Porting to arm64 macOS
At WWDC 2020 last year, Apple announced that Macs would be transitioning from using x86-64 processors to using custom Apple Silicon chips over a span of two years. Apple Silicon chips package together CPU cores, GPU cores, and various other coprocessors and controllers onto a single die; the CPU cores implement arm64. Actually, Apple Silicon implements a superset of arm64; there are some interesting extra special instructions that Apple has added to their arm64 implementation, which I’ll get to a bit later. Similar to how Apple provided developers with preview hardware during the previous Mac transition from PowerPC to x86, Apple also announced that for this transition they would be providing Developer Transition Kits (DTKs) to developers in the form of special Mac Minis based on the iPad Pro’s A12Z chip. I had been anticipating a Mac transition to arm64 for some time, so I ordered a Developer Transition Kit as soon as they were made available.
Since I had already gotten Takua Renderer up and running on arm64 on Linux, getting Takua Renderer up and running on the Apple Silicon DTK was very fast! By far the most time consuming part of this process was just getting developer tooling set up and getting Takua’s dependencies built; once all of that was done, building and running Takua basically Just Worked™. The only reason that getting developer tooling set up and getting dependencies built took a bit of work at the time was because this was just a week and a half after the entire Mac arm64 transition had even been announced.
Interestingly, the main stumbling block I ran into for most things on Apple Silicon macOS wasn’t the change to arm64 under the hood at all; the main stumbling block was… the macOS version number! For the past 20 years, modern macOS (or Mac OS X as it was originally named) has used 10.x version numbers, but the first version of macOS to support arm64, macOS Big Sur, bumps the version number to 11.x. This version number bump threw off a surprising number of libraries and packages! Takua’s build system uses CMake and Ninja, and on macOS I get CMake and Ninja through MacPorts. At the time, a lot of stuff in MacPorts wasn’t expecting an 11.x version number, so a bunch of stuff wouldn’t build, but fixing all of this just required manually patching build scripts and portfiles to expect an 11.x version number. All of this pretty much got fixed within weeks of DTKs shipping out (and Apple actually contributed a huge number of patches themselves to various projects and stuff), but I didn’t want to wait at the time, so I just charged ahead.
Only three of Takua’s dependencies needed some minor patching to get working on arm64 macOS: TBB, OpenEXR, and Ptex.
TBB’s build script just had to be updated to detect arm64 as a valid architecture for macOS; I submitted a pull request for this fix to the TBB Github repo, but I guess Intel doesn’t really take pull requests for TBB.
It’s okay though; the fix has since shown up in newer releases of TBB.
OpenEXR ‘s build script had to be patched so that inlined AVX intrinsics wouldn’t be used when building for arm64 on macOS; I submitted a pull request for this fix to OpenEXR that got merged, although this fix was later rendered unnecessary by a fix in the final release of Xcode 12.
Finally, Ptex just needed an extra include to pick up the unlink() system call correctly from unistd.h on macOS 11.
This change in Ptex was needed going from macOS Catalina to macOS Big Sur, and it’s also merged into the mainline Ptex repository now.
Once I had all of the above out of the way, getting Takua Renderer itself building and running correctly on the Apple Silicon DTK took no time at all, thanks to my previous efforts to port Takua Renderer to arm64 on Linux.
At this point I just ran cmake and ninja and a minute later out popped a working build.
From the moment the DTK arrived on my doorstep, I only needed about five hours to get Takua Renderer’s arm64 version building and running on the DTK with all tests passing.
Considering that at that point, outside of Apple nobody had done any work to get anything ready yet, I was very pleasantly surprised that I had everything up and working in just five hours!
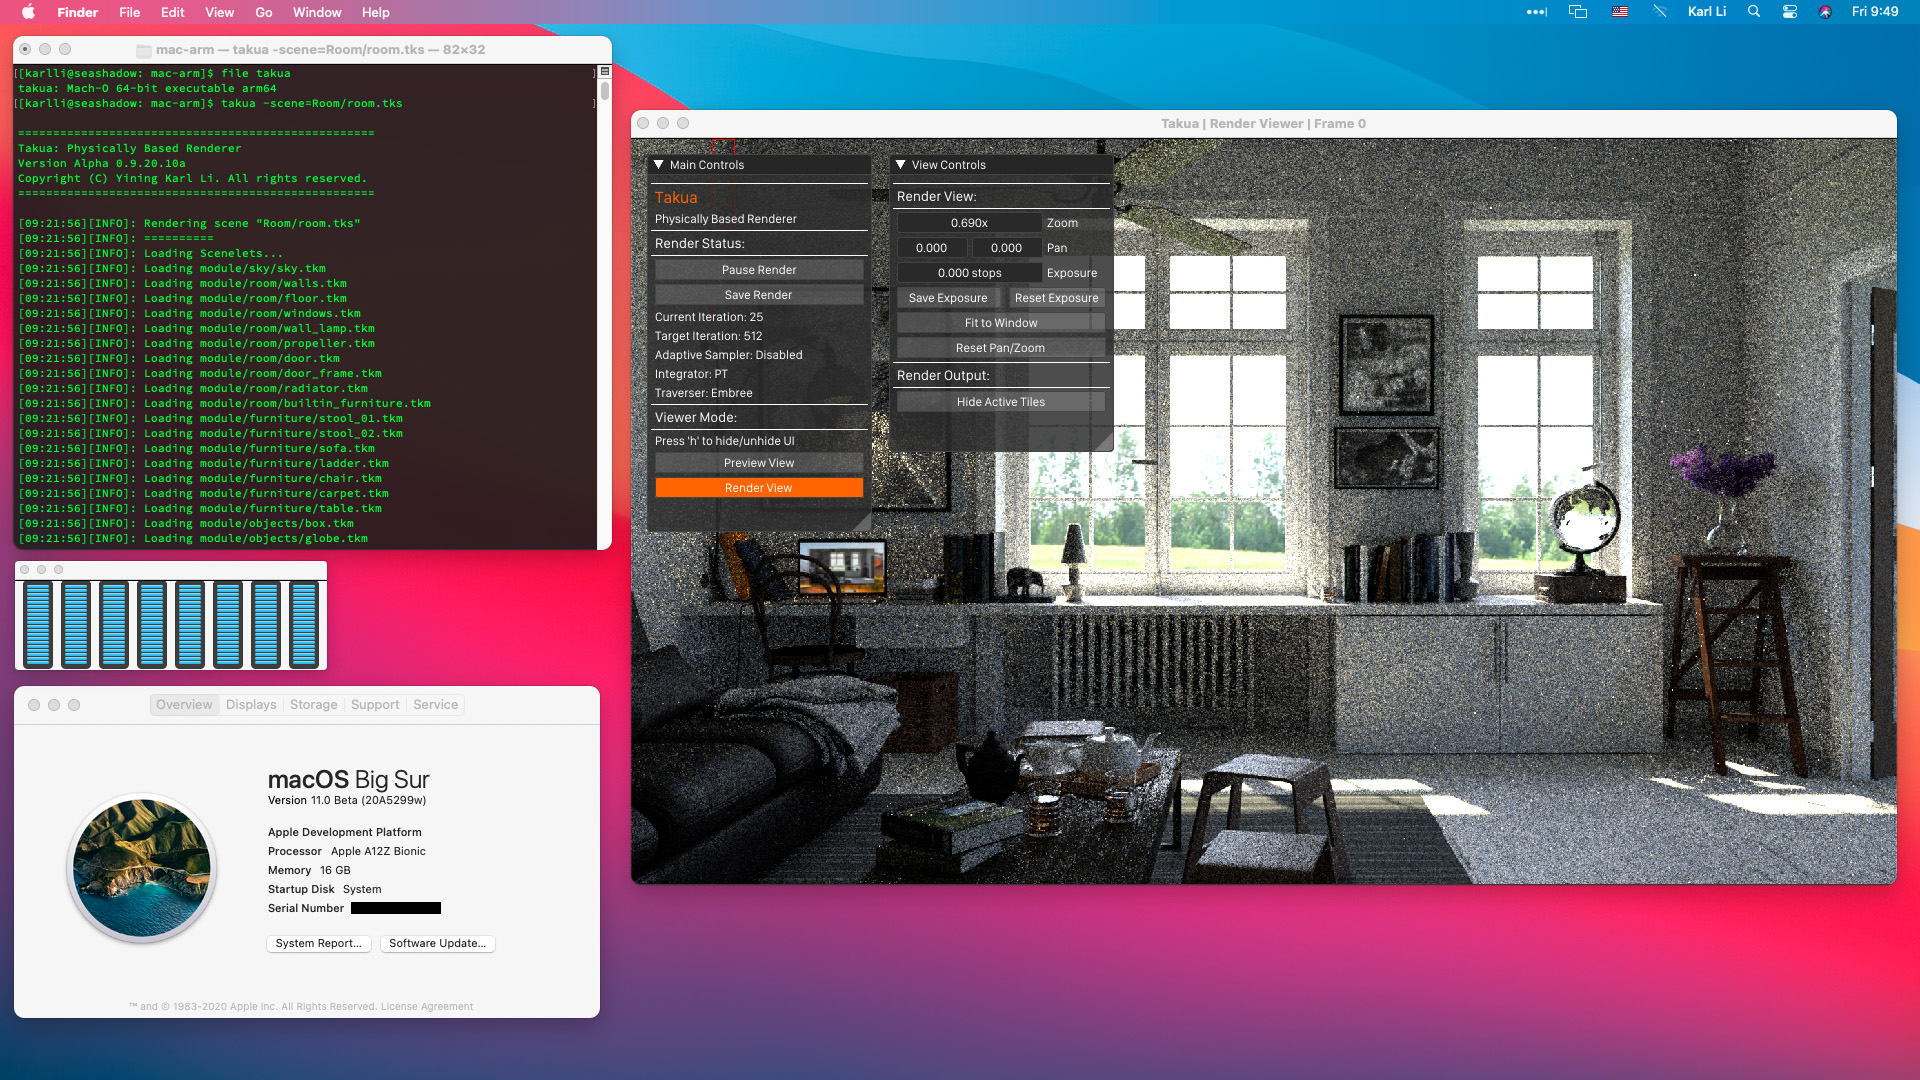
Figure 1 is a screenshot of Takua Renderer running on arm64 macOS Big Sur Beta 1 on the Apple Silicon DTK.
Universal Binaries
The Mac has now had three processor architecture migrations in its history; the Mac line began in 1984 based on Motorola 68000 series processors, transitioned from the 68000 series to PowerPC in 1994, transitioned again from PowerPC to x86 (and eventually x86-64) in 2006, and is now in the process of transitioning from x86-64 to arm64. Apple has used a similar strategy in all three of these processor architecture migrations to smooth the process. Apple’s general transition strategy consists of two major components: first, provide a “fat” binary format that packages code from both architectures into a single executable that can run on both architecture, and second, provide some way for binaries from the old architecture to run directly on the new architecture. I’ll look into the second part of this strategy a bit later; in this section, we are interested in Apple’s fat binary format. Apple calls their fat binary format Universal Binaries; specifically, Apple uses the name “Universal 2 “for the transition to arm64 since the original Universal Binary format was for the transition to x86.
Now that I had separate x86-64 and arm64 builds working and running on macOS, the next step was to modify Takua’s build system to automatically produce a single Universal 2 binary that could run on both Intel and Apple Silicon Macs. Fortunately, creating Universal 2 binaries is very easy! To understand why creating Universal 2 binaries can be so easy, we need to first understand at a high level how a Universal 2 binary works. There actually isn’t much special about Universal 2 binaries per se, in the sense that multi-architecture support is actually an inherent feature of the Mach-O binary executable code file format that Apple’s operating systems all use. A multi-architecture Mach-O binary begins with a header that declares the file as a multi-architecture file and declares how many architectures are present. The header is immediately followed by a list of architecture “slices”; each slice is a struct describing some basic information, such as what processor architecture the slice is for, the offset in the file that instructions begin at for the slice, and so on [Oakley 2020]. After the list of architecture slices, the rest of the Mach-O file is pretty much like normal, except each architecture’s segments are concatenated after the previous architecture’s segments. Also, Mach-O’s multi-architecture support allows for sharing non-executable resources between architectures.
So, because Universal 2 binaries are really just Mach-O multi-architecture binaries, and because Mach-O multi-architecture binaries don’t do any kind of crazy fancy interleaving and instead just concatenate each architecture after the previous one, all one needs to do to make a Universal 2 binary out of separate arm64 and x86-64 binaries is to concatenate the separate binaries into a single Mach-O file and set up the multi-architecture header and slices correctly.
Fortunately, a lot of tooling exists to do exactly the above!
The version of clang that Apple ships with Xcode natively supports building Universal Binaries by just passing in multiple -arch flags; one for each architecture.
The Xcode UI of course also supports building Universal 2 binaries by just adding x86-64 and arm64 to an Xcode project’s architectures list in the project’s settings.
For projects using CMake, CMake has a CMAKE_OSX_ARCHITECTURES flag; this flag defaults to whatever the native architecture of the current system is, but can be set to x86_64;arm64 to enable Universal Binary builds.
Finally, since the PowerPC to Intel transition, macOS has included a tool called lipo, which is used to query and create Universal Binaries; I’m fairly certain that the macOS lipo tool is based on the llvm-lipo tool that is part of the larger LLVM compiler project.
The lipo tool can combine any x86_64 Mach-O file with any arm64 Mach-O file to create a multi-architecture Universal Binary.
The lipo tool can also be used to “slim” a Universal Binary down into a single architecture by deleting architecture slices and segments from the Universal Binary.
Of course, when building a Universal Binary, any external libraries that have to be linked in also need to be Universal Binaries. Takua has a relatively small number of direct dependencies, but unfortunately some of Takua’s dependencies pull in many more indirect (relative to Takua) dependencies; for example, Takua depends on OpenVDB, which in turn pulls in Blosc, zlib, Boost, and several other dependencies. While some of these dependencies are built using CMake and are therefore very easy to build as Universal Binaries themselves, some other dependencies use older or bespoke build systems that can be difficult to retrofit multi-architecture builds into. Fortunately, this problem is where the lipo tool comes in handy. For dependencies that can’t be easily built as Universal Binaries, I just built arm64 and x86-64 versions separately and then combined the separate builds into a single Universal Binary using the lipo tool.
Once all of Takua’s dependencies were successfully built as Universal Binaries, all I had to do to get Takua itself to build as a Universal Binary was to add a check in my CMakeLists file to not use a couple of x86-64-specific compiler flags in the event of an arm64 target architecture.
Then I just set the CMAKE_OSX_ARCHITECTURES flag to x86_64;arm64, ran ninja, and out came a working Universal Binary!
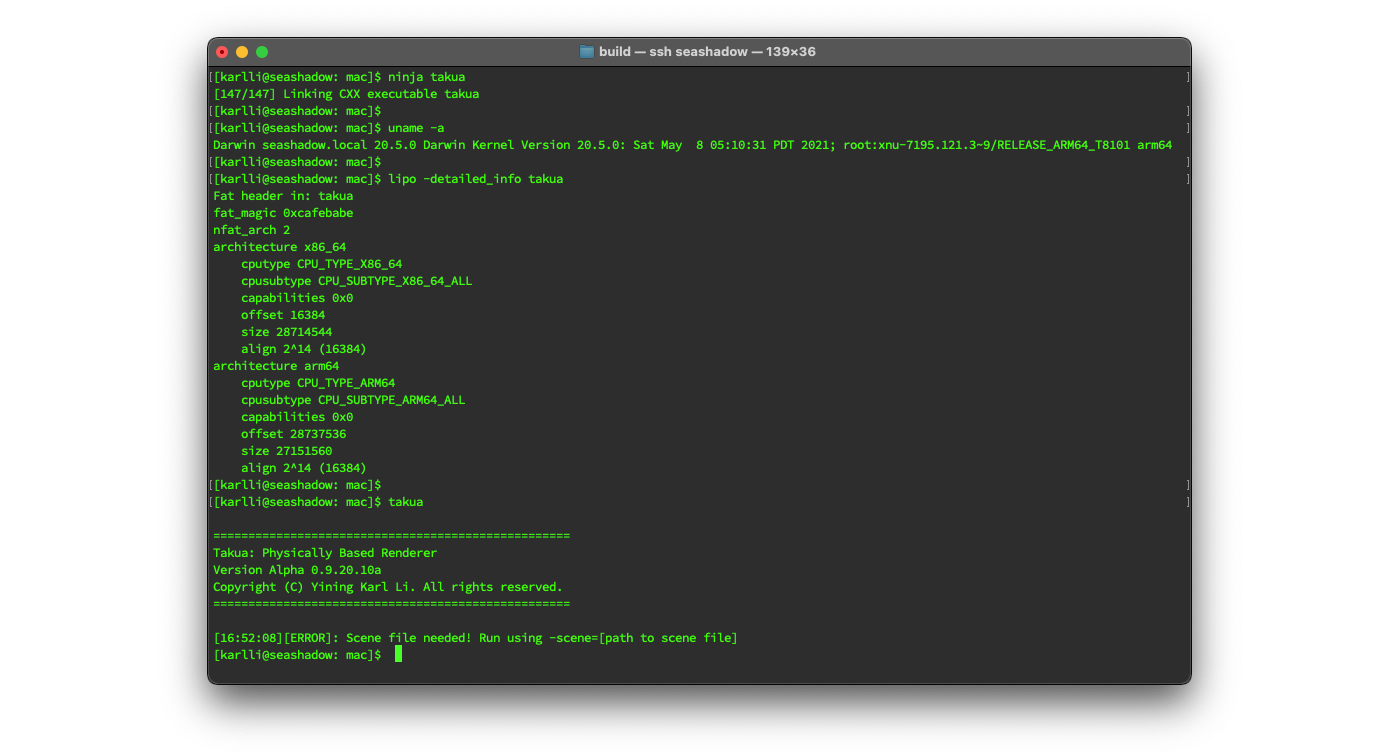
Figure 2 shows building Takua Renderer, checking that the current system architecture is an Apple Silicon Mac, using the lipo tool to see and confirm that the output Universal Binary contains both arm64 and x86-64 slices, and finally try running the Universal Binary Takua Renderer build:
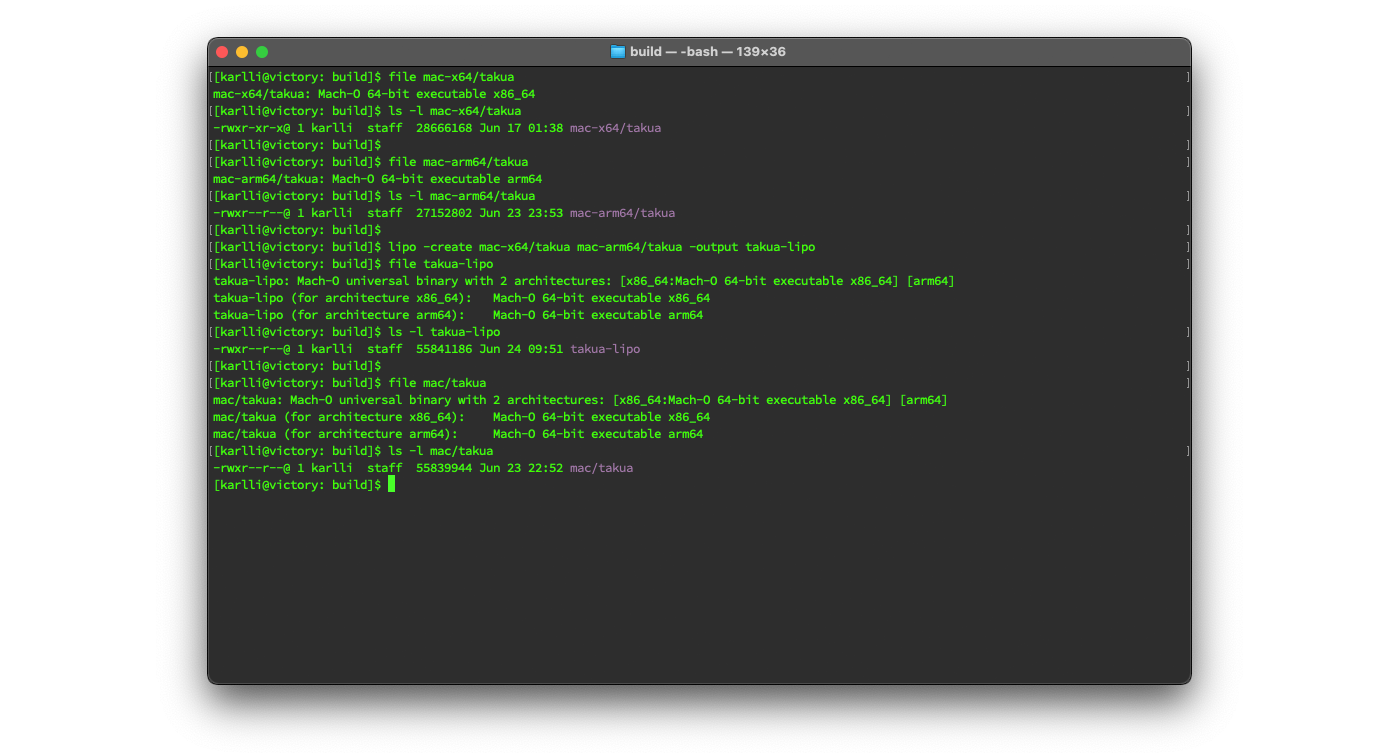
Out of curiosity, I also tried creating separate x86-64-only and arm64-only builds of Takua and assembling them into a Universal Binary using the lipo tool and comparing the result with the build of Takua that was natively built as a Universal Binary. In theory natively building as a Universal Binary should be able to produce a slightly more compact output binary compared with using the lipo tool, since a natively built Universal Binary should be able to share non-code resources between different architectures, whereas the lipo tool just blindly encapsulates two separate Mach-O files into a single multi-architecture Mach-O file. In fact, you can actually use the lipo tool to combine completely different programs into a single Universal Binary; after all, lipo has absolutely no way of knowing whether or not the arm64 and x86-64 code you want to combine is actually even from the same source code or implements the same functionality. Indeed, the native Universal Binary Takua is slightly smaller than the lipo-generated Universal Binary Takua. The size difference is tiny (basically negligible) though, likely because Takua’s binary contains very few non-code resources. Figure 3 shows creating a Universal Binary by combining separate x86-64 and arm64 builds of Takua together using the lipo tool versus a Universal Binary built natively as a Universal Binary; the lipo version is just a bit over a kilobyte larger than the native version, which is negligible relative to the overall size of the files.
Rosetta 2: Running x86-64 on Apple Silicon
While getting Takua Renderer building and running as a native arm64 binary on Apple Silicon only took me about five hours, actually running Takua for the first time in any form on Apple Silicon happened much faster! Before I did anything to get Takua’s arm64 build up and running on my Apple Silicon DTK, the first thing I did was just copy over the x86-64 macOS build of Takua to see if it would run on Apple Silicon macOS through Apple’s dynamic binary translation layer, Rosetta 2. I was very impressed to find that the x86-64 version of Takua just worked out-of-the-box through Rosetta 2, and even passed my entire test suite! I have now had Takua’s native arm64 build up and running as part of a Universal 2 binary for around a year, but I recently circled back to examine how Takua’s x86-64 build works through Rosetta 2. I wanted to get a rough idea of how Rosetta 2 works, and much like many of the detours that I took on the entire Takua arm64 journey, I stumbled into a good opportunity to compare x86-64 and arm64 and learn more about how the two are similar and how they differ.
For every processor architecture transition that the Mac had undertaken, Apple has provided some sort of mechanism to run binaries for the outgoing processor architecture on Macs based on the new architecture. During the 68000 to PowerPC transition, Apple’s approach was to emulate an entire 68000 system at the lowest levels of the operating system on PowerPC; in fact, during this transition, PowerPC Macs even allowed 68000 and PowerPC code to call back and forth to each other and be interspersed within the same binary. During the PowerPC to x86 transition, Apple introduced Rosetta, which worked by JIT-compiling blocks of PowerPC code into x86 on-the-fly at program runtime. For the x86-64 to arm64 transition, Rosetta 2 follows in the same tradition as in the previous two architecture transitions. Rosetta 2 has two modes: the first is an ahead-of-time recompiler that converts an entire x86-64 binary to arm64 upon first run of an x86-64 binary and caches the translated binary for later reuse. The second mode Rosetta 2 has is a JIT translator, which is used for cases where the target program itself is also JIT-generating x86-64 code; obviously in these cases the target program’s JIT output cannot be recompiled to arm64 through an ahead-of-time process.
Apple does not publicly provide much information at all about how Rosetta 2 works under the hood. Rosetta 2 is one of those pieces of Apple technology that basically “Just Works” well enough that the typical user never really has any need to know much about how it works internally, which is great for users but unfortunate for anyone that is more curious. Fortunately though, Koh Nakagawa recently published a detailed analysis of Rosetta 2 produced through some careful reverse engineering work. What I was interested in examining was how Rosetta 2’s output arm64 assembly looks compared with natively compiled arm64 assembly, so I’ll briefly summarize the relevant parts of how Rosetta 2 generates arm64 code. There’s a lot more cool stuff about Rosetta 2, such as how the runtime and JIT mode works, that I won’t touch on here; if you’re interested, I’d highly recommend checking out Koh Nakagawa’s writeups.
When a user tries to run an x86-64 binary on an Apple Silicon Mac, Rosetta 2 first checks if this particular binary has already been translated by Rosetta 2 before; Rosetta 2 does this through a system daemon called oahd.
If Rosetta 2 has never encountered this particular binary before, oahd kicks off a new process called oahd-helper that carries out the ahead-of-time (AOT) binary translation process and caches the result in a folder located at /var/db/oah; cached AOT arm64 binaries are stored in subfolders named using a SHA-256 hash calculated from the contents and path of the original x86-64 binary.
If Rosetta 2 has encountered a binary before, as determined by finding an SHA-256 hash collision in /var/db/oah, then oahd just loads the cached AOT binary from before.
So what do these cached AOT binaries look like?
Unfortunately, /var/db/oah is by default not accessible to users at all, not even admin and root users.
Fortunately, like with all protected components of macOS, access can be granted by disabling System Integrity Protection (SIP).
I don’t recommend disabling SIP unless you have a very good reason to, since SIP is designed to protect core macOS files from getting damaged or modified, but for this exploration I temporarily disabled SIP just long enough to take a look in /var/db/oah.
Well, it turns out that the cached AOT binaries are just regular-ish arm64 Mach-O files named with an .aot extension; I say “regular-ish” because while the .aot files are completely normal Mach-O binaries, they cannot actually be executed on their own.
Attempting to directly run a .aot binary results in an immediate SIGKILL.
Instead, .aot binaries must be loaded by the Rosetta 2 runtime and require some special memory mapping to run correctly.
But that’s fine; I wasn’t interested in running the .aot file, I was interested in learning what it looks like inside, and since the .aot file is a Mach-O file, we can disassemble .aot files just like any other Mach-O file.
Let’s go through a simple example to compare how the same piece of C++ code compiles to arm64 natively, versus what Rosetta 2 generates from a x86-64 binary.
The simple example C++ code I’ll use here is the same basic atomic float addition implementation that I wrote about in my previous post; since that post already contains an exhaustive analysis of how this example compiles to both x86-64 and arm64 assembly, I figure that means I don’t need to go over all of that again and can instead dive straight into the Rosetta 2 comparison.
To make an actually executable binary though, I had to wrap the example addAtomicFloat() function in a simple main() function:
#include <atomic>

float addAtomicFloat(std::atomic<float>& f0, const float f1) {
    do {
        float oldval = f0.load();
        float newval = oldval + f1;
        if (f0.compare_exchange_weak(oldval, newval)) {
            return oldval;
        }
    } while (true);
}

int main() {
    std::atomic<float> t(0);
    addAtomicFloat(t, 1.0f);
    return 0;
}
addAtomicFloat() implementation and a very simple main() function to make a executable program. The addAtomicFloat() implementation is the same one from Listing 2 in my previous "Porting Takua Renderer to 64-bit ARM- Part 1" post.Modern versions of macOS’s Xcode Command Line Tools helpfully come with both otool and with LLVM’s version of objdump, both of which can be used to disassembly Mach-O binaries.
For this exploration, I used otool to disassemble arm64 binaries and objdump to disassembly x86-64 binaries.
I used different tools for disassembling x86-64 versus arm64 because of slightly different feature sets that I needed on each platform.
By default, Apple’s version of Clang uses newer ARMv8.1-A instructions like casal.
However, the version of objdump that Apple ships with the Xcode Command Line Tools only seems to support base ARMv8-a and doesn’t understand newer ARMv8.1-A instructions like casal, whereas otool does seem to know about ARMv8.1 instructions, hence using otool for arm64 binaries.
For x86-64 binaries, however, otool outputs x86-64 assembly using AT&T syntax, whereas I prefer reading x86-64 assembly in Intel syntax, which matches what Godbolt Compiler Explorer defaults to.
So, for x86-64 binaries, I used objdump, which can be set to output x86-64 assembly using Intel syntax with the -x86-asm-syntax=intel flag.
On both x86-64 and on arm64, I compiled the example in Listing 1 using the default Clang that comes with Xcode 12.5.1, which reports its version string as “Apple clang version 12.0.5 (clang-1205.0.22.11)”.
Note that Apple’s Clang version numbers have nothing to do with mainline upstream Clang version numbers; according to this table on Wikipedia, “Apple clang version 12.0.5” corresponds roughly with mainline LLVM/Clang 11.1.0.
Also, I compiled using the -O3 optimization flag.
Disassembling the x86-64 binary using objdump -disassemble -x86-asm-syntax=intel produces the following x86-64 assembly.
I’ve only included the assembly for the addAtomicFloat() function and not the assembly for the dummy main() function.
For readability, I have also replaced the offset for the jne instruction with a more readable label and added the label into the correct place in the assembly code:
<__Z14addAtomicFloatRNSt3__16atomicIfEEf>:     # f0 is dword ptr [rdi], f1 is xmm0
        push          rbp                      # save address of previous stack frame
        mov           rbp, rsp                 # move to address of current stack frame
        nop           word ptr cs:[rax + rax]  # multi-byte no-op, probably to align
                                               #    subsequent instructions better for
                                               #    instruction fetch performance
        nop                                    # no-op
.LBB0_1:
        mov           eax, dword ptr [rdi]     # eax = *arg0 = f0.load()
        movd          xmm1, eax                # xmm1 = eax = f0.load()
        movdqa        xmm2, xmm1               # xmm2 = xmm1 = eax = f0.load()
        addss         xmm2, xmm0               # xmm2 = (xmm2 + xmm0) = (f0 + f1)
        movd          ecx, xmm2                # ecx = xmm2 = (f0 + f1)
        lock cmpxchg  dword ptr [rdi], ecx     # if eax == *arg0 { ZF = 1; *arg0 = arg1 }
                                               #    else { ZF = 0; eax = *arg0 };
                                               #    "lock" means all done exclusively
        jne           .LBB0_1                  # if ZF == 0 goto .LBB0_1
        movdqa        xmm0, xmm1               # return f0 value from before cmpxchg
        pop           rbp                      # restore address of previous stack frame
        ret                                    # return control to previous stack frame address
        nop
addAtomicFloat() function from Listing 1 compiled to x86-64 using clang++ -O3 and disassembled using objdump -disassemble -x86-asm-syntax=intel, with some minor tweaks for formatting and readability. My annotations are also included as comments.If we compare the above code with Listing 5 in my previous post, we can see that the above code matches what we got from Clang in Godbolt Compiler Explorer. The only difference is the stack pointer pushing and popping code that happens in the beginning and end to make this function usable in a larger program; the core functionality in lines 8 through 18 of the above code matches the output from Clang in Godbolt Compiler Explorer exactly.
Next, here’s the assembly produced by disassembling the arm64 generated using Clang.
I disassembled the arm64 binary using otool -Vt; here’s the relevant addAtomicFloat() function with the same minor changes as in Listing 2 for more readable section labels:
__Z14addAtomicFloatRNSt3__16atomicIfEEf:
.LBB0_1:
        ldar      w8, [x0]          // w8 = *arg0 = f0, non-atomically loaded
        fmov      s1, w8            // s1 = w8 = f0
        fadd      s2, s1, s0        // s2 = s1 + s0 = (f0 + f1)
        fmov      w9, s2            // w9 = s2 = (f0 + f1)
        mov       x10, x8           // x10 (same as w10) = x8 (same as w8)
        casal     w10, w9, [x0]     // atomically read the contents of the address stored
                                    //    in x0 (*arg0 = f0) and compare with w10;
                                    //    if [x0] == w10:
                                    //       atomically set the contents of the
                                    //       [x0] to the value in w9
                                    //    else:
                                    //       w10 = value loaded from [x0]
        cmp       w10, w8           // compare w10 and w8 and store result in N
        cset      w8, eq            // if previous instruction's compare was true,
                                    //    set w8 = 1
        cmp       w8, #0x1          // compare if w8 == 1 and store result in N
        b.ne      .LBB0_1           // if N==0 { goto .LBB0_1 }
        mov.16b   v0, v1            // return f0 value from ldar
        ret
addAtomicFloat() function from Listing 1 compiled to arm64 using clang++ -O3 and disassembled using otool -Vt, with some minor tweaks for formatting and readability. My annotations are also included as comments.
Note the use of the ARMv8.1-A casal instruction.
Apple’s version of Clang defaults to using ARMv8.1-A instructions when compiling for macOS because the M1 chip implements ARMv8.4-A, and since the M1 chip is the first arm64 processor that macOS supports, that means macOS can safely assume a more advanced minimum target instruction set.
Also, the arm64 assembly output in Listing 3 looks almost exactly identical structurally to the Godbolt Compiler Explorer Clang output in Listing 9 from my previous post.
The only differences are in small syntactical differences with how the mov instruction in line 20 specifies a 16 byte (128 bit) SIMD register, some different register choices, and a different ordering of fmov and mov instructions in lines 6 and 7.
Finally, let’s take a look at the arm64 assembly that Rosetta 2 generates through the AOT process described earlier.
Disassembling the Rosetta 2 AOT file using otool -Vt produces the following arm64 assembly; like before, I’m only including the relevant addAtomicFloat() function.
Since the code below switches between x and w registers a lot, remember that in arm64 assembly, x0-x30 and w0-w30 are really the same registers; x just means use the full 64-bit register, whereas w just means use the lower 32 bits of the x register with the same register number.
Also, the v registers are 128-bit vector registers that are separate from the x/y set of registers; s registers are the bottom 32 bits of v registers.
In my annotations, I’ll use x for both x and w registers, and I’ll use v for both v and s registers.
__Z14addAtomicFloatRNSt3__16atomicIfEEf:
        str      x5, [x4, #-0x8]!         // store value at x5 to ((address in x4) - 8) and
                                          // write calculated address back into x4
        mov      x5, x4                   // x5 = address in x4
.LBB0_1
        ldr      w0, [x7]                 // x0 = *arg0 = f0, non-atomically loaded
        fmov     s1, w0                   // v1 = x0 = f0
        mov.16b  v2, v1                   // v2 = v1 = f0
        fadd     s2, s2, s0               // v2 = v2 + v0 = (f0 + f1)
        mov.s    w1, v2[0]                // x1 = v2 = (f0 + f1)
        mov      w22, w0                  // x22 = x0 = f0
        casal    w22, w1, [x7]            // atomically read the contents of the address stored
                                          //    in x7 (*arg0 = f0) and compare with x22;
                                          //    if [x7] == x22:
                                          //       atomically set the contents of the
                                          //       [x7] to the value in x1
                                          //    else:
                                          //       x22 = value loaded from [x7]
        cmp      w22, w0                  // compare x22 and x0 and store result in N
        csel     w0, w0, w22, eq          // if N==1 { x0 = x0 } else { x0 = x22 }
        b.ne     .LBB0_1                  // if N==0 { goto .LBB0_1 }
        mov.16b  v0, v1                   // v0 = v1 = f0
        ldur     x5, [x4]                 // x5 = value at address in x4, using unscaled load
        add      x4, x4, #0x8             // add 8 to address stored in x4
        ldr      x22, [x4], #0x8          // x22 = value at ((address in x4) + 8)
        ldp      x23, x24, [x21], #0x10   // x23 = value at address in x21 and
                                          // x24 = value at ((address in x21) + 8)
        sub      x25, x22, x23            // x25 = x22 - x23
        cbnz     x25, .LBB0_2             // if x22 != x23 { goto .LBB0_2 }
        ret      x24
.LBB0_2
        bl       0x4310                   // branch (with link) to address 0x4310
otool -Vt, with some minor tweaks for formatting and readability. My annotations are also included as comments.In some ways, we can see similarities between the Rosetta 2 arm64 assembly in Listing 4 and the natively compiled arm64 assembly in Listing 3, but there are also a lot of things in the Rosetta 2 arm64 assembly that look very different from the natively compiled arm64 assembly.
The core functionality in lines 9 through 21 of Listing 4 bear a strong resemblance to the core functionality in lines 5 through 19 of of Listing 3; both versions use a fadd, followed by a casal instruction to implement the atomic comparison, then follow with a cmp to compare the expected and actual outcomes, and then have some logic about whether or not to jump back to the top of the loop.
However, if we look more closely at the core functionality in the Rosetta 2 version, we can see some oddities.
In preparing for the fadd instruction on line 9, the Rosetta 2 version does a fmov followed by a 16-bit mov into register v2, and then the fadd takes a value from v2, adds the value to what is in v0, and stores the result back into v2.
The 16-bit move is pointless!
Instead of two mov instructions and an fadd where the first source registers and destination registers are the same, a better version would be to omit the second mov instruction and instead just do fadd s2 s1 s0.
In fact, in Listing 3 we can see that the natively compiled version does in fact just use a single mov and do fadd s2 s1 s0.
So, what’s going on here?
Things begin to make more sense once we look at the x86-64 assembly that the Rosetta 2 version is translated from.
In Listing 2’s x86-64 version, the addss instruction only has two inputs because the first source register is always also the destination register.
So, the x86-64 version has no choice but to use a few extra mov instructions to make sure values that are needed later aren’t overwritten by the addss instruction; whatever value needs to be in xmm2 during the addss instruction must also be squirreled away in a second location if that value is still needed after addss is executed.
Since the Rosetta 2 arm64 assembly is a direct translation from the x86-64 assembly, the extra mov needed in the x86-64 version gets translated into the extraneous mov.16b in Listing 4, and the two-operand x86-64 addss gets translated into a strange looking fadd where the same register is duplicated for the first source and destination operands; this duplication is a direct one-to-one mapping to what addss does.
I think from the above we can see two very interesting things about Rosetta 2’s translation. On one hand, the fact that the overall structure of the core functionality in the Rosetta 2 and natively compiled versions is so similar is very impressive, especially when considering that Rosetta 2 had absolutely no access to the original high-level C++ source code! I guess my example function here is a very simple test case, but nonetheless I was impressed that Rosetta 2’s output overall isn’t too bad. On the other hand though, the Rosetta 2 version does have small oddities and inefficiencies that arise from doing a direct mechanical translation from x86-64. Since Rosetta 2 has no access to the original source code, no context for what the code does, and has no ability to build any kind of higher-level syntactic understanding, the best Rosetta 2 really can do is a direct mechanical translation with a relatively high level of conservatism with respect to preserving what the original x86-64 code is doing on an instruction-by-instruction basis. I don’t think that this is actually a fault in Rosetta 2; I think it’s actually pretty much the only reasonable solution. I don’t know how Rosetta 2’s translator is actually implemented internally, but my guess is that the translator is parsing the x86-64 machine code, generating some kind of IR, and then lowering that IR back to arm64 (who knows, maybe it’s even LLIR). But, even if Rosetta 2 is generating some kind of IR, that IR at best can only correspond well to the IR that was generated by the last optimization pass in the original compilation to x86-64, and in any last optimization pass, a huge amount of higher level context is likely already lost from the original source program. Short of doing heroic amounts of program analysis, there’s nothing Rosetta 2 can do about this lost higher level context, and even if implementing all of that program analysis was worthwhile (Which it almost certainly is not) there’s only so much that static analysis can do anyway. I guess all of the above is a long way of saying: looking at the above example, I think Rosetta 2’s output is really impressive and surprisingly more optimal than I would have guessed before, but at the same time the inherent advantage that natively compiling to arm64 has is obvious.
However, all of the above is just looking at the core functionality of the original function.
If we look at the arm64 assembly surrounding this core functionality in Listing 4 though, we can see some truly strange stuff.
The Rosetta 2 version is doing a ton of pointer arithmetic and moving around addresses and stuff, and operands seem to be passed into the function using the wrong registers (x7 instead of x0).
What is this stuff all about?
The answer lies in how the Rosetta 2 runtime works, and in what makes a Rosetta 2 AOT Mach-O file different from a standard macOS Mach-O binary.
One key fundamental difference between Rosetta 2 AOT binaries and regular arm64 macOS binaries is that Rosetta 2 AOT binaries use a completely different ABI from standard arm64 macOS.
On Apple platforms, the ABI used for normal arm64 Mach-O binaries is largely based on the standard ARM-developed arm64 ABI [ARM Holdings 2015], with some small differences [Apple 2020] in function calling conventions and how some data types are implemented and aligned.
However, Rosetta 2 AOT binaries use an arm64-ized version of the System V AMD64 ABI, with a direct mapping between x86_64 and arm64 registers [Nakagawa 2021].
This different ABI means that intermixing native arm64 code and Rosetta 2 arm64 code is not possible (or at least not at all practical), and this difference is also the explanation for why the Rosetta 2 assembly uses unusual registers for passing parameters into the function.
In the standard arm64 ABI calling convention, registers x0 through x7 are used to pass function arguments 0 through 7, with the rest going on the stack.
In the System V AMD64 ABI calling convention, function arguments are passed using registers rdi, rsi, rdx, rcx, r8, and r9 for arguments 0 through 5 respectively, with everything else on the stack in reverse order.
In the arm64-ized version of the System V AMD64 ABI that Rosetta 2 AOT uses, the x86-64 rdi, rsi, rdx, rcx, r8, and r9 registers map to the arm64 x7, x6, x2, x1, x8, and x9, respectively [Nakagawa 2021].
So, that’s why in line 6 of Listing 4 we see a load from an address stored in x7 instead of x0, because x7 maps to x86-64’s rdi register, which is the first register used for passing arguments in the System V AMD64 ABI [OSDev 2018].
If we look at the corresponding instruction on line 9 of Listing 2, we can see that the x86-64 code does indeed use a mov instruction from the address stored in rdi to get the first function argument.
As for all of the pointer arithmetic and address trickery in lines 23 through 28 of Listing 4, I’m not 100% sure what it is for, but I have a guess.
Earlier I mentioned that .aot binaries cannot run like a normal binary and instead require some special memory mapping to work; I think all of this pointer arithmetic may have to do with that.
The way that the Rosetta 2 runtime interacts with the AOT arm64 code is that both the runtime and the AOT arm64 code are mapped into the same memory space at startup and the program counter is set to the entry point of the Rosetta 2 runtime; while running, the AOT arm64 code frequently can jump back into the Rosetta 2 runtime because the Rosetta 2 runtime is what handles things like translating x86_64 addresses into addresses in the AOT arm64 code [Nakagawa 2021].
The Rosetta 2 runtime also directs system calls to native frameworks, which helps improve performance; this property of the Rosetta 2 runtime means that if an x86-64 binary does most of its work by calling macOS frameworks, the translated Rosetta 2 AOT binary can still run very close to native speed (as an interesting aside: Microsoft is adding a much more generalized version of this concept to Windows 11’s counterpart to Rosetta 2: Windows 11 on Arm will allow arbitrary mixing of native arm64 code and translated x86-64 code [Sweetgall 2021].
Finally, when a Rosetta 2 AOT binary is run, not only the arm64 and Rosetta 2 runtime are mapped into the running program memory; the original x86-64 binary is mapped in as well.
The AOT binary that Rosetta 2 generates does not actually contain any constant data from the original x86-64 binary; instead, the AOT file references the constant data from the x86-64 binary, which is why the x86-64 binary also needs to be loaded in.
My guess is that the pointer arithmetic stuff happening in the end of Listing 4 is possibly either to calculate offsets to stuff in the x86-64 binary, or to calculate offsets into the Rosetta 2 runtime itself.
Now that we have a better understanding of what Rosetta 2 is actually doing under the hood and how good the translated arm64 code is compared with natively compiled arm64 code, how does Rosetta 2 actually perform in the real world? I compared Takua Renderer running as native arm64 code versus as x86-64 code running through Rosetta 2 on four different scenes, and generally running through Rosetta 2 yielded about 65% to 70% of the performance of running as native arm64 code. The results section at the end of this post contains the detailed numbers and data. Generally, I’m very impressed with this amount of performance for emulating x86-64 code on an arm64 processor, especially when considering that with high-performance code like Takua Renderer, Rosetta 2 has close to zero opportunities to provide additional performance by calling into native system frameworks. As can be seen in the data in the results section, even more impressive is the fact that even running at 70% of native speed, x86-64 Takua Renderer running on the M1 chip through Rosetta 2 is often on-par with or even faster than x86-64 Takua Renderer running natively on a contemporaneous current-generation 2019 16-inch MacBook Pro with a 6-core Intel Core i7-9750H processor!
TSO Memory Ordering on the M1 Processor
As I covered extensively in my previous post, one major crucial architectural difference between arm64 and x86-64 is in memory ordering: arm64 is a weakly ordered architecture, whereas x86-64 is a strongly ordered architecture [Preshing 2012]. Any system emulating x86-64 binaries on an arm64 processor needs to overcome this memory ordering difference, which means emulating strong memory ordering on a weak memory architecture. Unfortunately, doing this memory ordering emulation in software is extremely difficult and extremely inefficient. since emulating strong memory ordering on a weak memory architecture means providing stronger memory ordering guarantees than the hardware actually provides. This memory ordering emulation is widely understood to be one of the main reasons why Microsoft’s x86 emulation mode for Windows on Arm incurs a much higher performance penalty compared with Rosetta 2, even though the two systems have broadly similar architectures [Hickey et al. 2021] at a high level.
Apple’s solution to the difficult problem of emulating strong memory ordering in software was to… just completely bypass the problem altogether. Rosetta 2 does nothing whatsoever to emulate strong memory ordering in software; instead, Rosetta 2 provides strong memory ordering through hardware. Apple’s M1 processor has an unusual feature for an ARM processor: the M1 processor has optional total store memory ordering (TSO) support! By default, the M1 processor only provides the weak memory ordering guarantees that the arm64 architecture specifies, but for x86-64 binaries running under Rosetta 2, the M1 processor is capable of switching to strong memory ordering in hardware on a core-by-core basis. This capability is a great example of the type of hardware-software integration that Apple is able to accomplish by owning and building the entire tech stack from the software all the way down to the silicon.
Actually, the M1 is not the first Apple Silicon chip to have TSO support. The A12Z chip that was in the Apple Silicon DTK also has TSO support, and the A12Z is known to be a re-binned but otherwise identical variant of the A12X chip from 2018, so we can likely safely assume that the TSO hardware support has been present (albeit unused) as far back as the 2018 iPad Pro! However, the M1 processor’s TSO implementation does have a significant leg up on the implementation in the A12Z. Both the M1 and the A12Z implement a version of ARM’s big.LITTLE technology, where the processor contains two different types of CPU cores: lower-power energy-efficient cores, and high-power performance cores. On the A12Z, hardware TSO support is only implemented in the high-power performance cores, whereas in the M1, hardware TSO support is implement on both the efficiency and performance cores. As a result, on the A12Z-based Apple Silicon DTK, Rosetta 2 can only use four out of eight total CPU cores on the chip, whereas on M1-based Macs, Rosetta 2 can use all eight CPU cores.
I should mentioned here that, interestingly, the A12Z and M1 are actually not the first ARM CPUs to implement TSO as the memory model [Threedots 2021]. Remember, when ARM specifies weak ordering in the architecture, what this actually means is that any arm64 implementation can actually choose to have any kind of stronger memory model since code written for a weaker memory model should also work correctly on a stronger memory model; only going the other way doesn’t work. NVIDIA’s Denver and Carmel CPU microarchitectures (found in various NVIDIA Tegra and Xaviar system-on-a-chips) are also arm64 designs that implement a sequentially consistency memory model. If I had to guess, I would guess that Denver and Carmel’s sequential consistency memory model is a legacy of the Denver Projects’s origins as a project to build an x86-64 CPU; the project was shifted to arm64 before release. Fujitsu’s A64FX processor is another arm64 design that implements TSO as its memory model, which makes sense since the A64FX processor is meant for use in supercomputers as a successor to Fujitsu’s previous SPARC-based supercomputer processors, which also implemented TSO. However, to the best of my knowledge, Apple’s A12Z and M1 are unique in their ability to execute in both the usual weak ordering mode and TSO mode.
To me, probably the most interesting thing about hardware TSO support in Apple Silicon is that switching ability.
Even more interesting is that the switching ability doesn’t require a reboot or anything like that- each core can be independently switched between strong and weak memory ordering on-the-fly at runtime through software.
On Apple Silicon processors, hardware TSO support is enabled by modifying a special register named actlr_el1; this register is actually defined by the arm64 specification as an implementation-defined auxiliary control register.
Since actlr_el1 is implementation-defined, Apple has chosen to use it for toggling TSO and possibly for toggling other, so far publicly unknown special capabilities.
However, the actlr_el1 register, being a special register, cannot be modified by normal code; modifications to actlr_el1 can only be done by the kernel, and the only thing in macOS that the kernel enables TSO for is Rosetta 2…
…at least by default!
Shortly after Apple started shipping out Apple Silicon DTKs last year, Saagar Jha figured out how to allow any program to toggle TSO mode through a custom kernel extension.
The way the TSOEnabler kext works is extremely clever; the kext searches through the kernel to find where the kernel is modifying actlr_el1 and then traces backwards to figure out what pointer the kernel is reading a flag from for whether or not to enable TSO mode.
Instead of setting TSO mode itself, the kext then intercepts the pointer to the flag and writes to it, allowing the kernel to handle all of the TSO mode setup work since there’s some other stuff that needs to happen in addition to modifying actlr_el1.
Out of sheer curiosity, I compiled the TSOEnabler kext and installed it on my M1 Mac Mini to give it a try!
I don’t suggest installing and using TSOEnabler casually, and definitely not for normal everyday use; installing a custom self-compiled, unsigned kext on modern macOS requires disabling SIP.
However, I already had SIP disabled due to my earlier Rosetta 2 AOT exploration, and so I figured why not give this a shot before I reset everything and reenable SIP.
The first thing I wanted to try was a simple test to confirm that the TSOEnabler kext was working correctly.
In my last post, I wrote about a case where weak memory ordering was exposing a bug in some code written around incrementing an atomic integer; the “canonical” example of this specific type of situation is Jeff Preshing’s multithreaded atomic integer incrementer example using std::memory_order_relaxed.
I adapted Jeff Preshing’s example for my test; in this test, two threads both increment a shared integer counter 1000000 times, with exclusive access to the integer guarded using an atomic integer flag.
Operations on the atomic integer flag use std::memory_order_relaxed.
On strongly-ordered CPUs, using std::memory_order_relaxed works fine and at the end of the program, the value of the shared integer counter is always 2000000 as expected.
However, on weakly-ordered CPUs, weak memory ordering means that two threads can end up in a race condition to increment the shared integer counter; as a result, on weakly-ordered CPUs, at the end of the program the value of the shared integer counter is very often something slightly less than 2000000.
The key modification I made to this test program was to enable the M1 processor’s hardware TSO mode for each thread; if hardware TSO mode is correctly enabled, then the value of the shared integer counter should always end up being 2000000.
If you want to try for yourself, Listing 5 below includes the test program in its entirety; compile using c++ tsotest.cpp -std=c++11 -o tsotest.
The test program takes a single input parameter: 1 to enable hardware TSO mode, and anything else to leave TSO mode disabled.
Remember, to use this program, you must have compiled and installed the TSOEnabled kernel extension mentioned above.
#include <atomic>
#include <iostream>
#include <thread>
#include <sys/sysctl.h>

static void enable_tso(bool enable_) {
    int enable = int(enable_);
    size_t size = sizeof(enable);
    int err = sysctlbyname("kern.tso_enable", NULL, &size, &enable, size);
    assert(err == 0);
}

int main(int argc, char** argv) {
    bool useTSO = false;
    if (argc > 1) {
        useTSO = std::stoi(std::string(argv[1])) == 1 ? true : false;
    }
    std::cout << "TSO is " << (useTSO ? "enabled" : "disabled") << std::endl;

    std::atomic<int> flag(0);
    int sharedValue = 0;
    auto counter = [&](bool enable) {
        enable_tso(enable);
        int count = 0;
        while (count < 1000000) {
            int expected = 0;
            if (flag.compare_exchange_strong(expected, 1, std::memory_order_relaxed)) {
                // Lock was successful
                sharedValue++;
                flag.store(0, std::memory_order_relaxed);
                count++;
            }
        }
    };

    std::thread thread1([&]() { counter(useTSO); });
    std::thread thread2([&]() { counter(useTSO); });
    thread2.join();
    thread1.join();

    std::cout << sharedValue << std::endl;
}
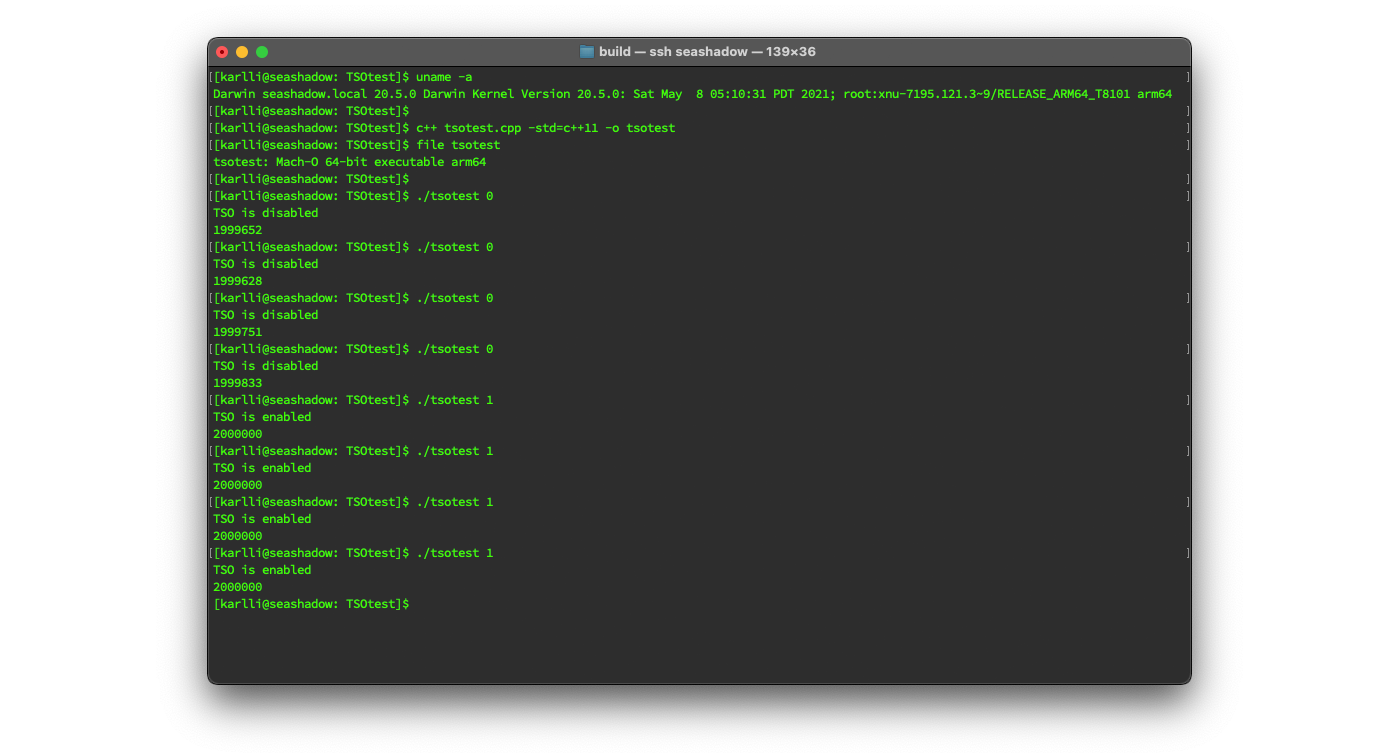
Running my test program indicated that the kernel extension was working properly! In the screenshot below, I check that the Mac I’m running on has an arm64 processor, then I compile the test program and check that the output is a native arm64 binary, and then I run the test program four times each with and without hardware TSO mode enabled. As expected, with hardware TSO mode disabled, the program counts slightly less than 2000000 increments on the shared atomic counter, whereas with hardware TSO mode enabled, the program counts exactly 2000000 increments every time:
Being able to enable hardware TSO mode in a native arm64 binary outside of Rosetta 2 actually does have some practical uses. After I confirmed that the kernel extension was working correctly, I temporarily hacked hardware TSO mode into Takua Renderer’s native arm64 version, which allowed me to further verify that everything was working correctly with all of the various weakly ordered atomic fixes that I described in my previous post. As mentioned in my previous post, comparing renders across different processor architectures is difficult for a variety of reasons, and previously comparing Takua Renderer running on a weakly ordered CPU versus on a strongly ordered CPU required comparing renders made on arm64 versus renders made on x86-64. Using the M1’s hardware TSO mode though, I was able to compare renders made on exactly the same processor, which confirmed that everything works correctly! After doing this test, I then removed the hardware TSO mode from Takua Renderer’s native arm64 version.
One silly idea I tried was to disable hardware TSO mode from inside of Rosetta 2, just to see what would happen.
Rosetta 2 does not support running x86-64 kernel extensions on arm64; all macOS kernel extensions must be native to the architecture they are running on.
However, as mentioned earlier, the Rosetta 2 runtime bridges system framework calls from inside of x86-64 binaries to their native arm64 counterparts, and this includes sysctl calls!
So we can actually call sysctlbyname("kern.tso_enable") from inside of an x86-64 binary running through Rosetta 2, and Rosetta 2 will pass the call along correctly to the native TSOEnabler kernel extension, which will then properly set hardware TSO mode.
For a simple test, I added a bit of code to test if a binary is running under Rosetta 2 or not and compiled the test program from Listing 5 for x86-64.
For the sake of completeness, here is how to check if a process is running under Rosetta 2; this code sample was provided by Apple in a WWDC 2020 talk about Apple Silicon:
// Use "sysctl.proc_translated" to check if running in Rosetta

// Returns 1 if running in Rosetta
int processIsTranslated() {
    int ret = 0;
    size_t size = sizeof(ret);
    // Call the sysctl and if successful return the result
    if (sysctlbyname("sysctl.proc_translated", &ret, &size, NULL, 0) != -1)
            return ret;
    // If "sysctl.proc_translated" is not present then must be native
    if (errno == ENOENT)
            return 0;
    return -1;
}
In Figure 5, I build the test program from Listing 5 as an x86-64 binary, with the Rosetta 2 detection function from Listing 6 added in. I then check that the system architecture is arm64 and that the compiled program is x86-64, and run the test program with TSO disabled from inside of Rosetta 2. The program reports that it is running through Rosetta 2 and reports that TSO is disabled, and then proceeds to report slightly less than 2000000 increments to the shared atomic counter:
Of course, being able to disable hardware TSO mode from inside of Rosetta 2 is only a curiosity; I can’t really think of any practical reason why anyone would ever want to do this. I guess one possible answer is to try to claw back some performance whilst running through Rosetta 2, since the hardware TSO mode does have a tangible performance impact, but this answer isn’t actually valid, since there is no guarantee that x86-64 binaries running through Rosetta 2 will work correctly with hardware TSO mode enabled. The simple example here only works precisely because it is extremely simple; I also tried hacking disabling hardware TSO mode into the x86-64 version of Takua Renderer and running that through Rosetta 2. The result was that this hacked version of Takua Renderer would run for only a fraction of a second before running into a hard crash from somewhere inside of TBB. More complex x86-64 programs with hardware TSO mode not working correctly or even crashing shouldn’t be surprising, since the x86-64 code itself can have assumptions about strong memory ordering baked into whatever optimizations the code was compiled with. As mentioned earlier, running a program written and compiled with weak memory ordering assumptions on a stronger memory model should work correctly, but running a program written and compiled with strong memory ordering assumptions on a weaker memory model can cause problems.
Speaking of the performance of hardware TSO mode, the last thing I tried was measuring the performance impact of enabling hardware TSO mode. I hacked enabling hardware TSO mode into the native arm64 version of Takua Renderer, with the idea being that by comparing the Rosetta 2, custom TSO-enabled native arm64, and default TSO-disabled native arm64 versions of Takua Renderer, I could get a better sense of exactly how much performance cost there is to running the M1 with TSO enabled, and how much of the performance cost of Rosetta 2 comes from less efficient translated arm64 code versus from TSO-enabled mode. The results section at the end of this post contains the exact numbers and data for the four scenes that I tested; the general trend I found was that native arm64 code with hardware TSO enabled ran about 10% to 15% slower than native arm64 code with hardware TSO disabled. When comparing with Rosetta 2’s overall performance, I think we can reasonably estimate that on the M1 chip, hardware TSO is responsible for somewhere between a third to a half of the performance discrepancy between Rosetta 2 and native weakly ordered arm64 code.
Apple Silicon’s hardware TSO mode is a fascinating example of Apple extending the base arm64 architecture and instruction set to accelerate application-specific needs. Hardware TSO mode to support and accelerate Rosetta 2 is just the start; Apple Silicon is well known to already contain some other interesting custom extensions as well. For example, Apple Silicon contains an entire new, so far undocumented arm64 ISA extension centered around doing fast matrix operations for Apple’s “Accelerate” framework, which supports various deep learning and image procesing applications [Johnson 2020]. This extension, called AMX (for Apple Matrix coprocessor), is separate but likely related to the “Neural Engine” hardware [Engheim 2021] that ships on the M1 chip alongside the M1’s arm64 processor and custom Apple-designed GPU. Recent open-source code releases from Apple also hint at future Apple Silicon chips having dedicated built-in hardware for doing branch predicion around Objective C’s objc_msgSend, which would considerably accelerate message passing in Cocoa apps.
Embree on arm64 using sse2neon
As mentioned earlier, porting Takua and Takua’s dependencies was relatively easy and straightforward and in large part worked basically out-of-the-box, because Takua and most of Takua’s dependencies are written in vanilla C++. Gotchas like memory-ordering correctness in atomic and multithreaded code aside, porting vanilla C++ code between x86-64 and arm64 largely just involves recompiling, and popular modern compilers such as Clang, GCC, and MSVC all have mature, robust arm64 backends today. However, for code written using inline assembly or architecture-specific vector SIMD intrinsics, recompilation is not enough to get things working on a different processor architecture.
A huge proportion of the raw compute power in modern processors is actually located in vector SIMD instruction set extensions, such as the various SSE and AVX extensions found in modern x86-64 processors and the NEON and upcoming SVE extensions found in arm64. For workloads that can benefit from vectorization, using SIMD extensions means up to a 4x speed boost over scalar code when using SSE or NEON, and potentially even more using AVX or SVE. One way to utilize SIMD extensions is just to write scalar C++ code like normal and let the compiler auto-vectorize the code at compile-time. However, relying on auto-vectorization to leverage SIMD extensions in practice can be surprisingly tricky. In order for compilers to be able to efficiently auto-vectorize code that was written to be scalar, compilers need to be able to deduce and infer an enormous amount of context and knowledge about what the code being compiled actually does, and doing this kind of work is extremely difficult and extremely prone to defeat by edge cases, complex scenarios, or even just straight up implementation bugs. The end result is that getting scalar C++ code to go through auto-vectorization well in practice ends up requiring a lot of deep knowledge about how the compiler’s auto-vectorization implementation actually works under the hood, and small innocuous changes can often suddenly lead to the compiler falling back to generating completely scalar assembly. Without a robust performance test suite, these fallbacks can happen unbeknownst to the programmer; I like the term that my friend Josh Filstrup uses for these scenarios: “real rugpull moments”. Most high-performance applications that require good vectorization usually rely on at least one of several other options: write code directly in assembly utilizing SIMD instructions, write code using SIMD intrinsics, or write code for use with ISPC: the Intel SPMD Program Compiler.
Writing SIMD code directly in assembly is more or less just like writing regular assembly, just with different instructions and wider registers; SSE uses XMM registers and many SSE instructions end in either SS or PS, AVX uses ZMM registers, and NEON uses D and Q registers.
Since writing directly in assembly is often not desirable for a variety of readability and ease-of-use reasons, writing vector code directly in assembly is not nearly as common as writing vector code in normal C or C++ using vector intrinsics.
Vector intrinsics are functions that look like regular functions from the outside, but within the compiler have a direct one-to-one or near one-to-one mapping to specific assembly instructions.
For SSE and AVX, vector intrinsics are typically found in headers named using the pattern *mmintrin.h, where * is a letter of the alphabet corresponding to a specific subset or version of either SSE of AVX (for example, x for SSE, e for SSE2, n for SSE4.2, i for AVX, etc.).
For NEON, vector intrinsics are typically found in arm_neon.h.
Vector intrinsics are commonly found in many high-performance codebases, but another powerful and increasingly popular way to vectorize code is by using ISPC.
ISPC compiles a special variant of the C programming language using a SPMD, or single-program-multiple-data, programming model compiled to run on SIMD execution units; the idea is that an ISPC program describes what a single lane in a vector unit does, and ISPC itself takes care of making that program run across all of the lanes of the vector unit [Pharr and Mark 2012].
While this may sound superficially like a form of auto-vectorization, there’s a crucial difference that makes ISPC far more reliable in outputting good vectorized assembly: ISPC bakes a vectorization-friendly programming model directly into the language itself, whereas normal C++ has no such affordances that C++ compilers can rely on.
This SPMD model is broadly very similar to how writing a GPU kernel works, although there are some key differences between SPMD as a programming model and the SIMT model that GPU run on (namely, a SPMD program can be at a different point on each lane, whereas a SIMT program keeps the progress across all lanes in lockstep).
A big advantage of using ISPC over vector intrinsics or vector assembly is that ISPC code is basically just normal C code; in fact, ISPC programs can often compile as normal scalar C code with little to no modification.
Since the actual transformation to vector assembly is up to the compiler, writing code for ISPC is far more processor architecture independent than vector intrinsics are; ISPC today includes backends to generate SSE, AVX, and NEON binaries.
Matt Pharr has a great blog post series that goes into much more detail about the history and motivations behind ISPC and the benefits of using ISPC.
In general, graphics workloads tend to fit the bill well for vectorization, and as a result, graphics libraries often make extensive use of SIMD instructions (actually, a surprisingly large number of problem types can be vectorized, including even JSON parsing). Since SIMD intrinsics are architecture-specific, I didn’t fully expect all of Takua’s dependencies to compile right out of the box on arm64; I expected that a lot of them would contain chunks of code written using x86-64 SSE and/or AVX intrinsics! However, almost all of Takua’s dependencies compiled without a problem either because they provided arm64 NEON or scalar C++ fallback codepaths for every SSE/AVX codepath, or because they rely on auto-vectorization by the compiler instead of using intrinsics directly. OpenEXR is an example of the former, while OpenVDB and OpenSubdiv are examples of the latter. Embree was the notable exception: Embree is heavily vectorized using code implemented directly using SSE and/or AVX intrinsics with no alternative scalar C++ or arm64 NEON fallback, and Embree also provides an ISPC interfaces. Starting with Embree v3.13.0, Embree now provides an arm64 NEON codepath as well, but at the time I first ported Takua to arm64, Embree didn’t come with anything other than SSE and AVX implementations.
Fortunately, Embree is actually written in such a way that porting Embree to different processor architectures with different vector intrinsics is, at least in theory, relatively straightforward.
The Embree codebase internally is written as several different “layers”, where the bottommost layer is located in embree/common/simd/ in the Embree source tree.
As one might be able to guess from the name, this bottommost layer is where all of the core SIMD functionality in Embree is implemented; this part of the codebase implements SIMD wrappers for things like 4/8/16 wide floats, SIMD math operations, and so on.
The rest of the Embree codebase doesn’t really contain many direct vector intrinsics at all; the parts of Embree that actually implement BVH construction and traversal and ray intersection all call into this base SIMD library.
As suggested by Ingo Wald in a 2018 blog post, porting Embree to use something other than SSE/AVX mostly requires just reimplementing this base SIMD wrapper layer, and the rest of the Embree should more or less “just work”.
In his blog post, Ingo mentioned experimenting with replacing all of Embree’s base SIMD layer with scalar implementations of all of the vectorized code.
Back in early 2020, as part of my effort to get Takua up and running on arm64 Linux, I actually tried doing a scalar rewrite of the base SIMD layer of Embree as well as a first attempt at porting to arm64.
Overall the process to rewrite to scalar was actually very straightforward; most things were basically just replacing a function that did something with float4 inputs using SSE instructions with a simple loop that iterates over the four floats in a float4.
I did find that in addition to rewriting all of the SIMD wrapper functions to replace SSE intrinsics with scalar implementations, I also had to replace some straight-up inlined x86-64 assembly with equivalent compiler intrinsics; basically all of this code lives in common/sys/intrinsics.h.
None of the inlined assembly replacement was very complicated either though, most of it was things like replacing an inlined assembly call to x86-64’s bsf bit-scan-forward instruction with a call to the more portable __builtin_ctz() integer trailing zero counter builin compiler function.
Embree’s build system also required modifications; since I was just doing this as an initial test, I just did a terribly hack-job on the CMake scripts and, with some troubleshooting, got things building and running on arm64 Linux.
Unfortunately, the performance of my quick-and-rough scalar Embree port was… very disappointing.
I had hoped that the compiler would be able to do a decent job of autovectorizing the scalar reimplementations of all of the SIMD code, but overall my scalar Embree port on x86-64 was basically between three to four times slower than standard SSE Embree, which indicated that the compiler basically hadn’t effectively autovectorized anything at all.
This level of performance regression basically meant that my scalar Embree port wasn’t actually significantly faster than Takua’s own internal scalar BVH implementation; the disappointing performance combined with how hacky and rough my scalar Embree port was led me to abandon using Embree on arm64 Linux for the time being.
A short while later in the spring of 2020 though, I remembered that Syoyo Fujita had already succesfully ported Embree to arm64 with vectorization support!
Actually, Syoyo had started his Embree-aarch64 fork three years earlier in 2017 and had kept the project up-to-date with each new upstream official Embree release; I had just forgotten about the project until it popped up in my Twitter feed one day.
The approach that Syoyo took to getting vectorization working in the Embree-aarch64 fork was by using the sse2neon project, which implements SSE intrinsics on arm64 using NEON instructions and serves as a drop-in replacement for the various x86-64 *mmintrin.h headers.
Using sse2neon is actually the same strategy that had previously been used by Martin Chang in 2017 to port Embree 2.x to work on arm64; Martin’s earlier effort provided the proof-of-concept that paved the way for Syoyo to fork Embree 3.x into Embree-aarch64.
Building the Embree-aarch64 fork on arm64 worked out-of-the-box, and on my Raspberry Pi 4, using Embree-aarch64 with Takua’s Embree backend produced a performance increase over Takua’s internal BVH implementation that was in the general range of what I expected.
Taking a look at the process that was taken to get Embree-aarch64 to a production-ready state with results that matched x86-64 Embree exactly provides a lot of interesting insights into how NEON works versus how SSE works.
In my previous post I wrote about how getting identical floating point behavior between different processor architectures can be challenging for a variety of reasons; getting floating point behavior to match between NEON and SSE is even harder!
Various NEON instructions such as rcp and rsqt have different levels of accuracy from their corresponding SSE counterparts, which required the Embree-aarch64 project to implement more accurate versions of some SSE intrinsics than what sse2neon provided at the time; a lot of these improvements were later contributed back to sse2neon.
I originally was planning to include a deep dive into comparing SSE, NEON, ISPC, sse2neon, and SSE instructions running on Rosetta 2 as part of this post, but the writeup for that comparison has now gotten so large that it’s going to have to be its own post as a later follow-up to this post; stay tuned!
As a bit of an aside: the history of the sse2neon project is a great example of a community forming to build an open-source project around a new need. The sse2neon project was originally started by John W. Ratcliff at NVIDIA along with a few other NVIDIA folks and implemented only a small subset of SSE that was just enough for their own needs. However, after posting the project to Github with the MIT license, a community gradually formed around sse2neon and fleshed it out into a full project with full coverage of MMX and all versions of SSE from SSE1 all the way through SSE4.2. Over the years sse2neon has seen contributions and improvements from NVIDIA, Amazon, Google, the Embree-aarch64 project, the Blender project, and recently Apple as part of Apple’s larger slew of contributions to various projects to improve arm64 support for Apple Silicon.
Starting with Embree v3.13.0, released in May 2021, the official main Embree project now has also gained full support for arm64 NEON; I have since switched Takua Renderer’s arm64 builds from using the Embree-aarch64 fork to using the new official arm64 support in Embree v3.13.0. The approach the official Embree project takes is directly based off of the work that Syoyo Fujita and others did in the Embree-aarch64 fork; sse2neon is used to emulate SSE, and the same math precision improvements that were made in Embree-aarch64 were also adopted upstream by the official Embree project. Much like Embree-aarch64, the arm64 NEON backend for Embree v3.13.0 does not include ISPC support, even though ISPC has an arm64 NEON backend as well; maybe this will come in the future. Brecht Van Lommel from the Blender project seems to have done most of the work to upstream Embree-aarch64’s changes, with additional work and additional optimizations from Sven Woop on the Intel Embree team. Interestingly and excitingly, Apple also recently submitted a patch to the official Embree project that adds AVX2 support on arm64 by treating each 8-wide AVX value as a pair of 4-wide NEON values.
(More) Differences in arm64 versus x86-64
In my previous post and in this post, I’ve covered a bunch of interesting differences and quirks that I ran into and had to take into account while porting from x86-64 to arm64. There are, of course, far more differences that I didn’t touch on. However, in this small section, I thought I’d list a couple more small but interesting differences that I ran into and had to think about.
- arm64 and x86-64 handle float-to-int conversions slightly differently for some edge cases. Specifically, for edge values such as a uint32_t set to
INF, arm64 will make a best attempt to find the nearest possible integer to convert to, which would be 4294967295. x86-64, on the other hand, treats theINFcase as basically undefined behavior and defaults to just zero. In path tracing code where occasional infinite values need to be handled for things like edge cases in sampling Dirac distributions, some care needs to be taken to make sure that the renderer is understanding and processingINFvalues correctly on both arm64 and x86-64. - Similarly, implicit conversion from signed integers to unsigned integers can have some different behavior between the two platforms. On arm64, negative signed integers get trimmed to zero when implicitly converted to an unsigned integer; for code that must cast between signed and unsigned integers, care must be taken to make sure that all conversions are explicitly cast and that the edge case behavior on arm64 and x86-64 are accounted for.
- The signedness of
charis platform specific and defaults to being signed on x86-64 but defaults to being unsigned on ARM architectures [Harmon 2003], including arm64. For custom string processing functions, this may have to be taken into account. - x86-64 is always little-endian, but arm64 is a bi-endian architecture that can be either little-endian or big-endian, as set by the operating system at startup time. Most Linux flavors, including Fedora, default to little-endian on arm64, and Apple’s various operating systems all exclusively use little-endian mode on arm64 as well, so this shouldn’t be too much of a problem for most use cases. However, for software that does expect to have to run on both little and big endian systems, endianess has to be taken into account for reading/writing/handling binary data. For example, Takua has a checkpointing system that basically dumps state information from the renderer’s memory straight to disk; these checkpoint files would need to have their endianess checked and handled appropriately if I were to make Takua bi-endian. However, since I don’t expect to ever run my own hobby stuff on a big-endian system, I just have Takua check the endianess at startup right now and refuse to run if the system is big-endian.
For more details to look out for when porting x86-64 code to arm64 code on macOS specifically, Apple’s developer documentation has a whole article covering various things to consider. Another fantastic resource for diving into arm64 assembly is Howard Oakley’s “Code in ARM Assembly” series, which covers arm64 assembly programming on Apple Silicon in extensive detail (the bottom of each article in Howard Oakley’s series contains a table of contents linking out to all of the previous articles in the series).
(More) Performance Testing
In my previous post, I included performance testing results from my initial port to arm64 Linux, running on a Raspberry Pi 4B. Now that I have Takua Renderer up and running on a much more powerful M1 Mac Mini with 16 GB of memory, how does performance look on “big” arm64 hardware? Last time around the machines / processors I compared were a Raspberry Pi 4B, which uses a Broadcom BCM2711 CPU with 4 Cortex-A72 cores dating back to 2015, a 2015 MacBook Air with a 2 core / 4 thread Intel Core i5-5250U CPU, and as an extremely unfair comparison point, my personal workstation with dual Intel Xeon E5-2680 CPUs from 2012 with 8 cores / 16 threads each (16 cores / 32 threads total). The conclusion last time was that even though the Raspberry Pi 4B’s arm64 processor basically lost in terms of render time on almost every test, the Raspberry Pi 4B was actually the absolute winner by a wide margin when it came to total energy usage per render job.
This time around, since my expectation is that Apple’s M1 chip should be able to perform extremely well, I think my dual-Xeon personal workstation should absolutely be a fair competitor. In fact, I think the comparison might actually be kind of unfair towards the dual-Xeon workstation, since the processors are from 2012 and were manufactured on the now-ancient 32 nm process, whereas the M1 is made on TSMC’s currently bleeding edge 5 nm process. So, to give x86-64 more of a fighting chance, I’m also including a 2019 16 inch MacBook Pro with a 6 core / 8 thread Intel Core i7-9750H processor and 32 GB of memory, a.k.a. one of the fastest Intel-based laptops that Apple currently sells.
The first three test scenes are the same as last time: a standard Cornell Box, the glass teacup with ice seen in my Nested Dielectrics post, and the bedroom scene from my Shadow Terminator in Takua post. Last time these three scenes were chosen since they fit in the 4 GB memory constraint that the Raspberry Pi 4B and the 2015 MacBook Air both have. This time though, since the M1 Mac Mini has a much more modern 16 GB of memory, I’m including one more scene: my Scandinavian Room scene, as seen in Figure 1 of this post. The Scandinavian Room scene is a much more realistic example of the type of complexity found in a real production render, and has much more interesting and difficult light transport. Like before, the Cornell Box is rendered to 16 SPP using unidirectional path tracing and at 1024x1024 resolution, the Tea Cup is rendered to 16 SPP using VCM and at 1920x1080 resolution, and the Bedroom is rendered to 16 SPP using unidirectional path tracing and at 1920x1080 resolution. Because the Scandinavian Room scene takes much longer to render due to being a much more complex scene, I’m rendered the Scandinavian Room scene to 4 SPP using unidirectional path tracing and at 1920x1080 resolution. I left Takua Renderer’s texture caching system enabled for the Scandinavian Room scene, in order to test that the texture caching system was working correctly on arm64. Using the texture cache could alter the performance results slightly due to disk latency to fetch texture tiles to populate the texture cache, but the texture cache hit rate after the first SPP on this scene is so close to 100% that it basically doesn’t make a difference after the first SPP, so I actually rendered the Scandinavian Room scene to 5 spp and counted the times for the last 4 and threw out timings for the first SPP.
Each test’s recorded time below is the average of the three best runs, chosen out of five runs in total for each processor. For the M1 processor, I actually did three different types of runs, which are presented separately below. I did one test with the native arm64 build of Takua Renderer, a second test with a version of the native arm64 build hacked to run with the M1’s hardware TSO mode enabled, and a third test running the x86-64 build on the M1 through Rosetta 2. Also, for the Cornell Box, Tea Cup, and Bedroom scenes, I used Takua Renderer’s internal BVH implementation instead of Embree in order to match the tests from the last post, which were done before I had Embree working on arm64. The Scandinavian Room tests use Embree as the traverser instead.
Here are the results:
| CORNELL BOX | ||
|---|---|---|
| 1024x1024, PT | ||
| Processor: | Wall Time: | Core-Seconds: |
| Broadcom BCM2711: | 440.627 s | approx 1762.51 s |
| Intel Core i5-5250U: | 272.053 s | approx 1088.21 s |
| Intel Xeon E5-2680 x2: | 36.6183 s | approx 1139.79 s |
| Intel Core i7-9750H: | 41.7408 s | approx 500.890 s |
| Apple M1 Native: | 28.0611 s | approx 224.489 s |
| Apple M1 TSO-Enabled: | 32.5621 s | approx 260.497 s |
| Apple M1 Rosetta 2: | 42.5824 s | approx 340.658 s |
| TEA CUP | ||
|---|---|---|
| 1920x1080, VCM | ||
| Processor: | Wall Time: | Core-Seconds: |
| Broadcom BCM2711: | 2205.072 s | approx 8820.32 s |
| Intel Core i5-5250U: | 2237.136 s | approx 8948.56 s |
| Intel Xeon E5-2680 x2: | 174.872 s | approx 5593.60 s |
| Intel Core i7-9750H: | 158.729 s | approx 1904.75 s |
| Apple M1 Native: | 115.253 s | approx 922.021 s |
| Apple M1 TSO-Enabled: | 128.299 s | approx 1026.39 s |
| Apple M1 Rosetta 2: | 164.289 s | approx 1314.31 s |
| BEDROOM | ||
|---|---|---|
| 1920x1080, PT | ||
| Processor: | Wall Time: | Core-Seconds: |
| Broadcom BCM2711: | 5653.66 s | approx 22614.64 s |
| Intel Core i5-5250U: | 4900.54 s | approx 19602.18 s |
| Intel Xeon E5-2680 x2: | 310.35 s | approx 9931.52 s |
| Intel Core i7-9750H: | 362.29 s | approx 4347.44 s |
| Apple M1 Native: | 256.68 s | approx 2053.46 s |
| Apple M1 TSO-Enabled: | 291.69 s | approx 2333.50 s |
| Apple M1 Rosetta 2: | 366.01 s | approx 2928.08 s |
| SCANDINAVIAN ROOM | ||
|---|---|---|
| 1920x1080, PT | ||
| Processor: | Wall Time: | Core-Seconds: |
| Intel Xeon E5-2680 x2: | 119.16 s | approx 3813.18 s |
| Intel Core i7-9750H: | 151.81 s | approx 1821.80 s |
| Apple M1 Native: | 109.94 s | approx 879.55 s |
| Apple M1 TSO-Enabled: | 124.95 s | approx 999.57 s |
| Apple M1 Rosetta 2: | 153.66 s | approx 1229.32 s |
The first takeaway from these new results is that Intel CPUs have advanced enormously over the past decade! My wife’s 2019 16 inch MacBook Pro comes extremely close to matching my 2012 dual Xeon workstation’s performance on most tests and even wins on the Tea Cup scene, which is extremely impressive considering that the Intel Core i7-9750H cost around a tenth as much MSRP than the dual Intel Xeon E5-2680s would have cost new in 2012, and the Intel Core i7-9750H also uses 5 times less energy at peak than the dual Intel Xeon E5-2680s do at peak.
The real story though, is in the Apple M1 processor. Quite simply, the Apple M1 processor completely smokes everything else on the list, often by margins that are downright stunning. Depending on the test, the M1 processor beats the dual Xeons by anywhere between 10% and 30% in wall time and beats the 2019 MacBook Pro’s Core i7 by even more. In terms of core-seconds, which is a measure of the overall performance of each processor core that approximates how long the render would have taken completely single-threaded, the M1’s wins are simply stunning; each of the M1’s processor cores is somewhere betweeen 4 to 6 times faster than the dual Xeons’ individual cores and between 2 to 3 times faster than the more contemporaneous Intel Core i7-9750H’s individual cores. The even more impressive result from the M1 though, is that even running the x86-64 version of Takua Renderer using Rosetta 2’s dynamic translation system, the M1 still matches or beats the Intel Core i7-9750H.
Below is the breakdown of energy utilization for each test; the total energy used for each render is the wall clock render time multiplied by the maximum TDP of each processor to get watt-seconds, which is then divided by 3600 seconds per hour to get watt-hours. Maximum TDP is used since Takua Renderer pushes processor utilization to 100% during each render. As a point of comparison, I’ve also included all of the results from my previous post:
| CORNELL BOX | ||
|---|---|---|
| 1024x1024, PT | ||
| Processor: | Max TDP: | Total Energy Used: |
| Broadcom BCM2711: | 4 W | 0.4895 Wh |
| Intel Core i5-5250U: | 15 W | 1.1336 Wh |
| Intel Xeon E5-2680 x2: | 260 W | 2.6450 Wh |
| Intel Core i7-9750H: | 45 W | 0.5218 Wh |
| Apple M1 Native: | 15 W | 0.1169 Wh |
| Apple M1 TSO-Enabled: | 15 W | 0.1357 Wh |
| Apple M1 Rosetta 2: | 15 W | 0.1774 Wh |
| TEA CUP | ||
|---|---|---|
| 1920x1080, VCM | ||
| Processor: | Max TDP: | Total Energy Used: |
| Broadcom BCM2711: | 4 W | 2.4500 Wh |
| Intel Core i5-5250U: | 15 W | 9.3214 Wh |
| Intel Xeon E5-2680 x2: | 260 W | 12.6297 Wh |
| Intel Core i7-9750H: | 45 W | 1.9841 Wh |
| Apple M1 Native: | 15 W | 0.4802 Wh |
| Apple M1 TSO-Enabled: | 15 W | 0.5346 Wh |
| Apple M1 Rosetta 2: | 15 W | 0.6845 Wh |
| BEDROOM | ||
|---|---|---|
| 1920x1080, PT | ||
| Processor: | Max TDP: | Total Energy Used: |
| Broadcom BCM2711: | 4 W | 6.2819 Wh |
| Intel Core i5-5250U: | 15 W | 20.4189 Wh |
| Intel Xeon E5-2680 x2: | 260 W | 22.4142 Wh |
| Intel Core i7-9750H: | 45 W | 4.5286 Wh |
| Apple M1 Native: | 15 W | 1.0695 Wh |
| Apple M1 TSO-Enabled: | 15 W | 1.2154 Wh |
| Apple M1 Rosetta 2: | 15 W | 1.5250 Wh |
| SCANDINAVIAN ROOM | ||
|---|---|---|
| 1920x1080, PT | ||
| Processor: | Max TDP: | Total Energy Used: |
| Intel Xeon E5-2680 x2: | 260 W | 8.606 Wh |
| Intel Core i7-9750H: | 45 W | 1.8976 Wh |
| Apple M1 Native: | 15 W | 0.4581 Wh |
| Apple M1 TSO-Enabled: | 15 W | 0.5206 Wh |
| Apple M1 Rosetta 2: | 15 W | 0.6403 Wh |
Again the first takeaway from these results is just how much processor technology has improved overall in the past decade; the total energy usage by the modern Intel Core i7-9750H and Apple M1 is leaps and bounds better than the dual Xeons from 2012. Compared to what was essentially the most powerful workstation hardware that Intel sold a little under a decade ago, a modern Intel laptop chip can now do the same work in about the same amount of time for roughly 5x less energy consumption.
The M1 though, once again entirely lives in a class of its own. Running the native arm64 build, the M1 processor is 4 times more energy efficient than the Intel Core i7-9750H to complete the same task. The M1’s maximum TDP is only a third of the Intel Core i7-9750H’s maximum TDP, but the actual final energy utilization is a quarter because the M1’s faster performance means that the M1 runs for much less time than the Intel Core i7-9750H. In other words, running native code, the M1 is both faster and more energy efficient than the Intel Core i7-9750H. This result wouldn’t be impressive if the comparison was between the M1 and some low-end, power-optimized ultra-portable Intel chip, but that’s not what the comparison is with. The comparison is with the Intel Core i7-9750H, which is a high-end, 45 W maximum TDP part that MSRPs for $395. In comparison, the M1 is estimated to cost about $50, and the entire M1 Mac Mini only has a 39 W TDP total at maximum load; the M1 itself is reported to have a 15 W maximum TDP. Where the comparison between the M1 and the Intel Core i7-9750H gets even more impressive is when looking at the M1’s energy utilization running x86-64 code under Rosetta 2: the M1 is still about 3 times more energy efficient than the Intel Core i7-9750H to do the same work. Put another way, the M1 is an arm64 processor that can run emulated x86-64 code faster than a modern native x86-64 processor that cost 5x more and uses 3x more energy can.
Another interesting observation is that the for the same work, the M1 is actually more energy efficient than the Raspberry Pi 4B as well! In the case of the Raspberry Pi 4B comparison, while the M1’s maximum TDP is 3.75x higher than the Broadcom BCM2711’s maximum TDP, the M1 is also around 20x faster to complete each render; the M1’s massive performance uplift more than offsets the higher maximum TDP.
Another aspect of the M1 processor that I was curious enough about to test further is the M1’s big.LITTLE implementation. The M1 has four “Firestorm” cores and four “Icestorm” cores, where Firestorm cores are high-performance but also use a ton of energy, and Icestorm cores are extremely energy-efficient but are also commensurately less performant. I wanted to know just how much of the overall performance of the M1 was coming from the big Firestorm cores, and just how much slower the Icestorm cores are. So, I did a simple thread scaling test where I did successive renders using 1 all the way through 8 threads. I don’t know of a good way on the M1 to explicitly pin which kind of core a given thread runs on on; on the A12Z, the easy way to pin to the high-performance cores is to just enable hardware TSO mode since the A12Z only has hardware TSO on the high-performance cores, but this is no longer the case on the M1. But, I figured that the underlying operating system’s thread scheduler should be smart enough to notice that Takua Renderer is a job that pushes performance limits, and schedule any available high-performance cores before using the energy-efficiency cores too.
Here are the results on the Scandinavian Room scene for native arm64, native arm64 with TSO-enabled, and x86-64 running using Rosetta 2:
| M1 Native | ||||
|---|---|---|---|---|
| 1920x1080, PT | ||||
| Threads: | Wall Time: | WT Speedup: | Core-Seconds: | CS Multiplier: |
| 1 (1 big, 0 LITTLE) | 575.6787 s | 1.0x | 575.6786 s | 1.0x |
| 2 (2 big, 0 LITTLE) | 292.521 s | 1.9679x | 585.042 s | 0.9839x |
| 3 (3 big, 0 LITTLE) | 197.04 s | 2.9216x | 591.1206 s | 0.9738x |
| 4 (4 big, 0 LITTLE) | 148.9617 s | 3.8646x | 595.8466 s | 0.9661x |
| 5 (4 big, 1 LITTLE) | 137.6307 s | 4.1827x | 688.1536 s | 0.8365x |
| 6 (4 big, 2 LITTLE) | 128.9223 s | 4.4653x | 773.535 s | 0.7442x |
| 7 (4 big, 3 LITTLE) | 120.496 s | 4.7775x | 843.4713 s | 0.6825x |
| 8 (4 big, 4 LITTLE) | 109.9437 s | 5.2361x | 879.5476 s | 0.6545x |
| M1 TSO-Enabled | ||||
|---|---|---|---|---|
| 1920x1080, PT | ||||
| Threads: | Wall Time: | WT Speedup: | Core-Seconds: | CS Multiplier: |
| 1 (1 big, 0 LITTLE) | 643.9846 s | 1.0x | 643.9846 s | 1.0x |
| 2 (2 big, 0 LITTLE) | 323.8036 s | 1.9888x | 647.6073 s | 0.9944x |
| 3 (3 big, 0 LITTLE) | 220.4093 s | 2.9217x | 661.2283 s | 0.9739x |
| 4 (4 big, 0 LITTLE) | 168.9733 s | 3.8111x | 675.8943 s | 0.9527x |
| 5 (4 big, 1 LITTLE) | 153.849 s | 4.1858x | 769.2453 s | 0.8371x |
| 6 (4 big, 2 LITTLE) | 143.7426 s | 4.4801x | 862.4576 s | 0.7466x |
| 7 (4 big, 3 LITTLE) | 132.7233 s | 4.8520x | 929.0633 s | 0.6931x |
| 8 (4 big, 4 LITTLE) | 124.9456 s | 5.1541x | 999.5683 s | 0.6442x |
| M1 Rosetta 2 | ||||
|---|---|---|---|---|
| 1920x1080, PT | ||||
| Threads: | Wall Time: | WT Speedup: | Core-Seconds: | CS Multiplier: |
| 1 (1 big, 0 LITTLE) | 806.6843 s | 1.0x | 806.68433 s | 1.0x |
| 2 (2 big, 0 LITTLE) | 412.186 s | 1.9570x | 824.372 s | 0.9785x |
| 3 (3 big, 0 LITTLE) | 280.875 s | 2.8720x | 842.625 s | 0.9573x |
| 4 (4 big, 0 LITTLE) | 207.0996 s | 3.8951x | 828.39966 s | 0.9737x |
| 5 (4 big, 1 LITTLE) | 189.322 s | 4.2609x | 946.608 s | 0.8521x |
| 6 (4 big, 2 LITTLE) | 175.0353 s | 4.6086x | 1050.2133 s | 0.7681x |
| 7 (4 big, 3 LITTLE) | 166.1286 s | 4.8557x | 1162.9033 s | 0.6936x |
| 8 (4 big, 4 LITTLE) | 153.6646 s | 5.2496x | 1229.3166 s | 0.6562x |
In the above table, WT speedup is how many times faster that given test was than the baseline single-threaded render; WT speedup is a measure of multithreading scaling efficiency. The closer WT speedup is to the number of threads, the better the multithreading scaling efficiency; with perfect multithreading scaling efficiency, we’d expect the WT speedup number to be exactly the same as the number of threads. The CS Multiplier value is another way to measure multithreading scaling efficiency; the closer the CS Multiplier number is to exactly 1.0, the closer each test is to achieving perfect multithreading scaling efficiency.
Since this test ran Takua Renderer in unidirectional path tracing mode, and depth-first unidirectional path tracing is largely trivially parallelizable using a simple parallel_for (okay, it’s not so simple once things like texture caching and things like learned path guiding data structures come into play, but close enough for now), my expectation for Takua Renderer is that on a system with homogeneous cores, multithreading scaling should be very close to perfect (assuming a fair scheduler in the underlying operating system). Looking at the first four threads, which are all using the M1’s high-performance “big” Firestorm cores, close-to-perfect multithreading scaling efficiency is exactly what we see. Adding the next four threads though, which use the M1’s low-performance energy-efficient “LITTLE” Icestorm cores, the multithreading scaling efficiency drops dramatically. This drop in multithreading scaling efficiency is expected, since the Icestorm cores are far less performant than the Firestorm cores, but the amount that multithreading scaling efficiency drops by is what is interesting here, since that drop gives us a good estimate of just how less performant the Icestorm cores are. The answer is that the Icestorm cores are roughly a quarter as performant as the high-performance Firestorm cores. However, according to Apple, the Icestorm cores only use a tenth of the energy that the Firestorm cores do; a 4x performance drop for a 10x drop in energy usage is very impressive.
Conclusion to Part 2
There’s really no way to understate what a colossal achievement Apple’s M1 processor is; compared with almost every modern x86-64 processor in its class, it achieves significantly more performance for much less cost and much less energy. The even more amazing thing to think about is that the M1 is Apple’s low end Mac processor and likely will be the slowest arm64 chip to ever power a shipping Mac (the A12Z powering the DTK is slower, but the DTK is not a shipping consumer device); future Apple Silicon chips will only be even faster. Combined with other extremely impressive high-performance arm64 chips such as Fujistu’s A64FX supercomputer CPU, NVIDIA’s upcoming Grace GPU, Ampere’s monster 80-core Altra CPU, and Amazon’s Graviton2 CPU used in AWS, I think the future for high-end arm64 looks very bright.
That being said though, x86-64 chips aren’t exactly sitting still either. In the comparisons above I don’t have any modern AMD Ryzen chips, entirely because I personally don’t have access to any Ryzen-based systems at the moment. However, AMD has been making enormous advancements in both performance and energy efficiency with their Zen series of x86-64 microarchitectures, and the current Zen 3 microarchitecture thoroughly bests Intel in both performance and energy efficiency. Intel is not sitting still either, with ambitious plans to fight AMD for the x86-64 performance crown, and I’m sure both companies have no intention of taking the rising threat from arm64 lying down.
We are currently in a very exciting period of enormous advances in modern processor technology, with multiple large, well funded, very serious players competing to outdo each other. For the end user, no matter who comes out on top and what happens, the end result is ultimately a win- faster chips using less energy for lower prices. Now that I have Takua Renderer fully working with parity on both x86-64 and arm64, I’m ready to take advantage of each new advancement!
Acknowledgements
For both the last post and this post, I owe Josh Filstrup an enormous debt of gratitude for proofreading, giving plenty of constructive and useful feedback and suggestions, and for being a great discussion partner over the past year on many of the topics covered in this miniseries. Also an enormous thanks to my wife, Harmony Li, who was patient with me while I took ages with the porting work and then was patient again with me as I took even longer to get these posts written. Harmony also helped me brainstorm through various topics and provided many useful suggestions along the way. Finally, thanks to you, the reader, for sticking with me through these two giant blog posts!
References
Apple. 2020. Addressing Architectural Differences in Your macOS Code. Retrieved July 19, 2021.
Apple. 2020. Building a Universal macOS Binary. Retrieved June 22, 2021.
Apple. 2020. Explore the New System Architecture of Apple Silicon Macs. Retrieved June 15, 2011.
Apple. 2020. Writing ARM64 Code for Apple Platforms. Retrieved June 26, 2021.
ARM Holdings. 2015. Parameters in General-Purpose Registers. In ARM Cortex-A Series Programmer’s Guide for ARMv8-A. Retrieved June 26, 2021.
ARM Holdings. 2017. ACTLR_EL1, Auxiliary Control Register, EL1. In ARM Cortex-A55 Core Technical Reference Manual. Retrieved June 26, 2021.
Martin Chang. 2017. Porting Intel Embree to ARM. In MightyNotes: A Developer’s Blog. Retrieved July 18, 2021.
Erik Engheim. 2021. The Secret Apple M1 Coprocessor. Retrieved July 23, 2021.
Trevor Harmon. 2003. Portability & the ARM Processor. In Dr. Dobb’s. Retrieved July 19, 2021.
Shawn Hickey, Matt Wojiakowski, Shipa Sharma, David Coulter, Theano Petersen, Mike Jacobs, and Michael Satran. 2021. How x86 Emulation works on ARM. In Windows on ARM. Retrieved June 26, 2021.
Saagar Jha. 2020. TSOEnabler. Retrieved June 15, 2021.
Dougall Johnson. 2020. AMX: Apple Matrix Coprocessor. Retrieved July 23, 2021.
LLVM Project. 2021. llvm-lipo - LLVM Tool for Manipulating Universal Binaries. Retrieved June 22, 2021.
LLVM Project. 2021. llvm-objdump - LLVM’s object file dumper. Retrieved June 22, 2021.
Koh M. Nakagawa. 2021. Reverse-Engineering Rosetta 2 Part 1: Analyzing AOT Files and the Rosetta 2 Runtime. In Project Champollion. Retrieved June 23, 2021.
Koh M. Nakagawa. 2021. Reverse-Engineering Rosetta 2 Part 2: Analyzing Other aspects of Rosetta 2 Runtime and AOT Shared Cache Files. In Project Champollion. Retrieved June 23, 2021.
Howard Oakley. 2020. Universal Binaries: Inside Fat Headers. In The Eclectic Light Company. Retrieved June 22, 2021.
Howard Oakley. 2021. Code in ARM Assembly Series. In The Eclectic Light Company. Retrieved July 19, 2021.
OSDev. 2018. System V ABI. Retrieved June 26, 2021.
Matt Pharr. 2018. The Story of ISPC. In Matt Pharr’s Blog. Retrieved July 18, 2021.
Matt Pharr and William R. Mark. 2012. ispc: A SPMD compiler for high-performance CPU programming. In Proc. of nnovative Parallel Computing (InPar 2012). 184-196.
Jeff Preshing. 2012. This Is Why They Call It a Weakly-Ordered CPU. In Preshing on Programming. Retrieved March 20, 2021.
Marc Sweetgall. 2021. Announcing ARM64EC: Building Native and Interoperable Apps for Windows 11 on ARM. In Windows Developers Blog. Retrieved June 26, 2021.
Threedots. 2021. Arm CPUs with Sequential Consistency. In Random Blog. Retrieved June 26, 2021.
Ingo Wald. 2018. Cfl: Embree on ARM/Power/…?. In Ingo Wald’s Blog. Retrieved July 18, 2021.
Amy Williams, Steve Barrus, Keith Morley, and Peter Shirley. 2005. An Efficient and Robust Ray-Box Intersection Algorithm. _Journal of Graphics Tools) 10, 1 (Jan. 2005), 49-54.
Wikipedia. 2021. Endianess. Retrieved July 19, 2021.
Wikipedia. 2021. SIMD. Retrieved July 18, 2021.
Wikipedia. 2021. Single Instruction, Multiple Threads. Retrieved July 18, 2021.
Wikipedia. 2021. SPMD. Retrieved July 18, 2021.