Art Exercise: Lupine Forest Cabin
Table of Contents
Introduction
I recently did a small personal art exercise to experiment with building out a detailed forest type of environment. I have worked with a detailed forest scene before, when I used one while I was developing Takua Renderer’s mipmapping and texture caching system, but in that case I didn’t actually make the scene, I just took an off-the-shelf scene and ported it to Takua. I also made a forest for the background of my Woodville RenderMan Art Challenge piece, but to be honest, I wasn’t very happy with how that turned out. I think the background forest in my Woodville piece looks decent when viewed from a distance, as it is seen in that scene, but it doesn’t come even remotely close to holding up when viewed close up. Also, that forest was incredibly difficult to author. For the Woodville piece, I chose Maya’s MASH toolset over the XGen toolset to create the background forest; I chose MASH because MASH generally feels much more native to Maya and doesn’t have all of the extra file management that XGen requires. However, I found that MASH has performance problems when the things being instanced have really heavy geometry and there are a lot of instances, as is the case when instancing trees and bushes and the type of stuff generally found in forests. For this exercise, I wanted to focus on building a forest environment that would be detailed enough to hold up at closer distances, which means including things like leaf litter and twigs and small rocks on the ground, displacement-based bark on trees, moss on various surfaces, and so on. I also wanted to find a more efficient way to author these kinds of environments.
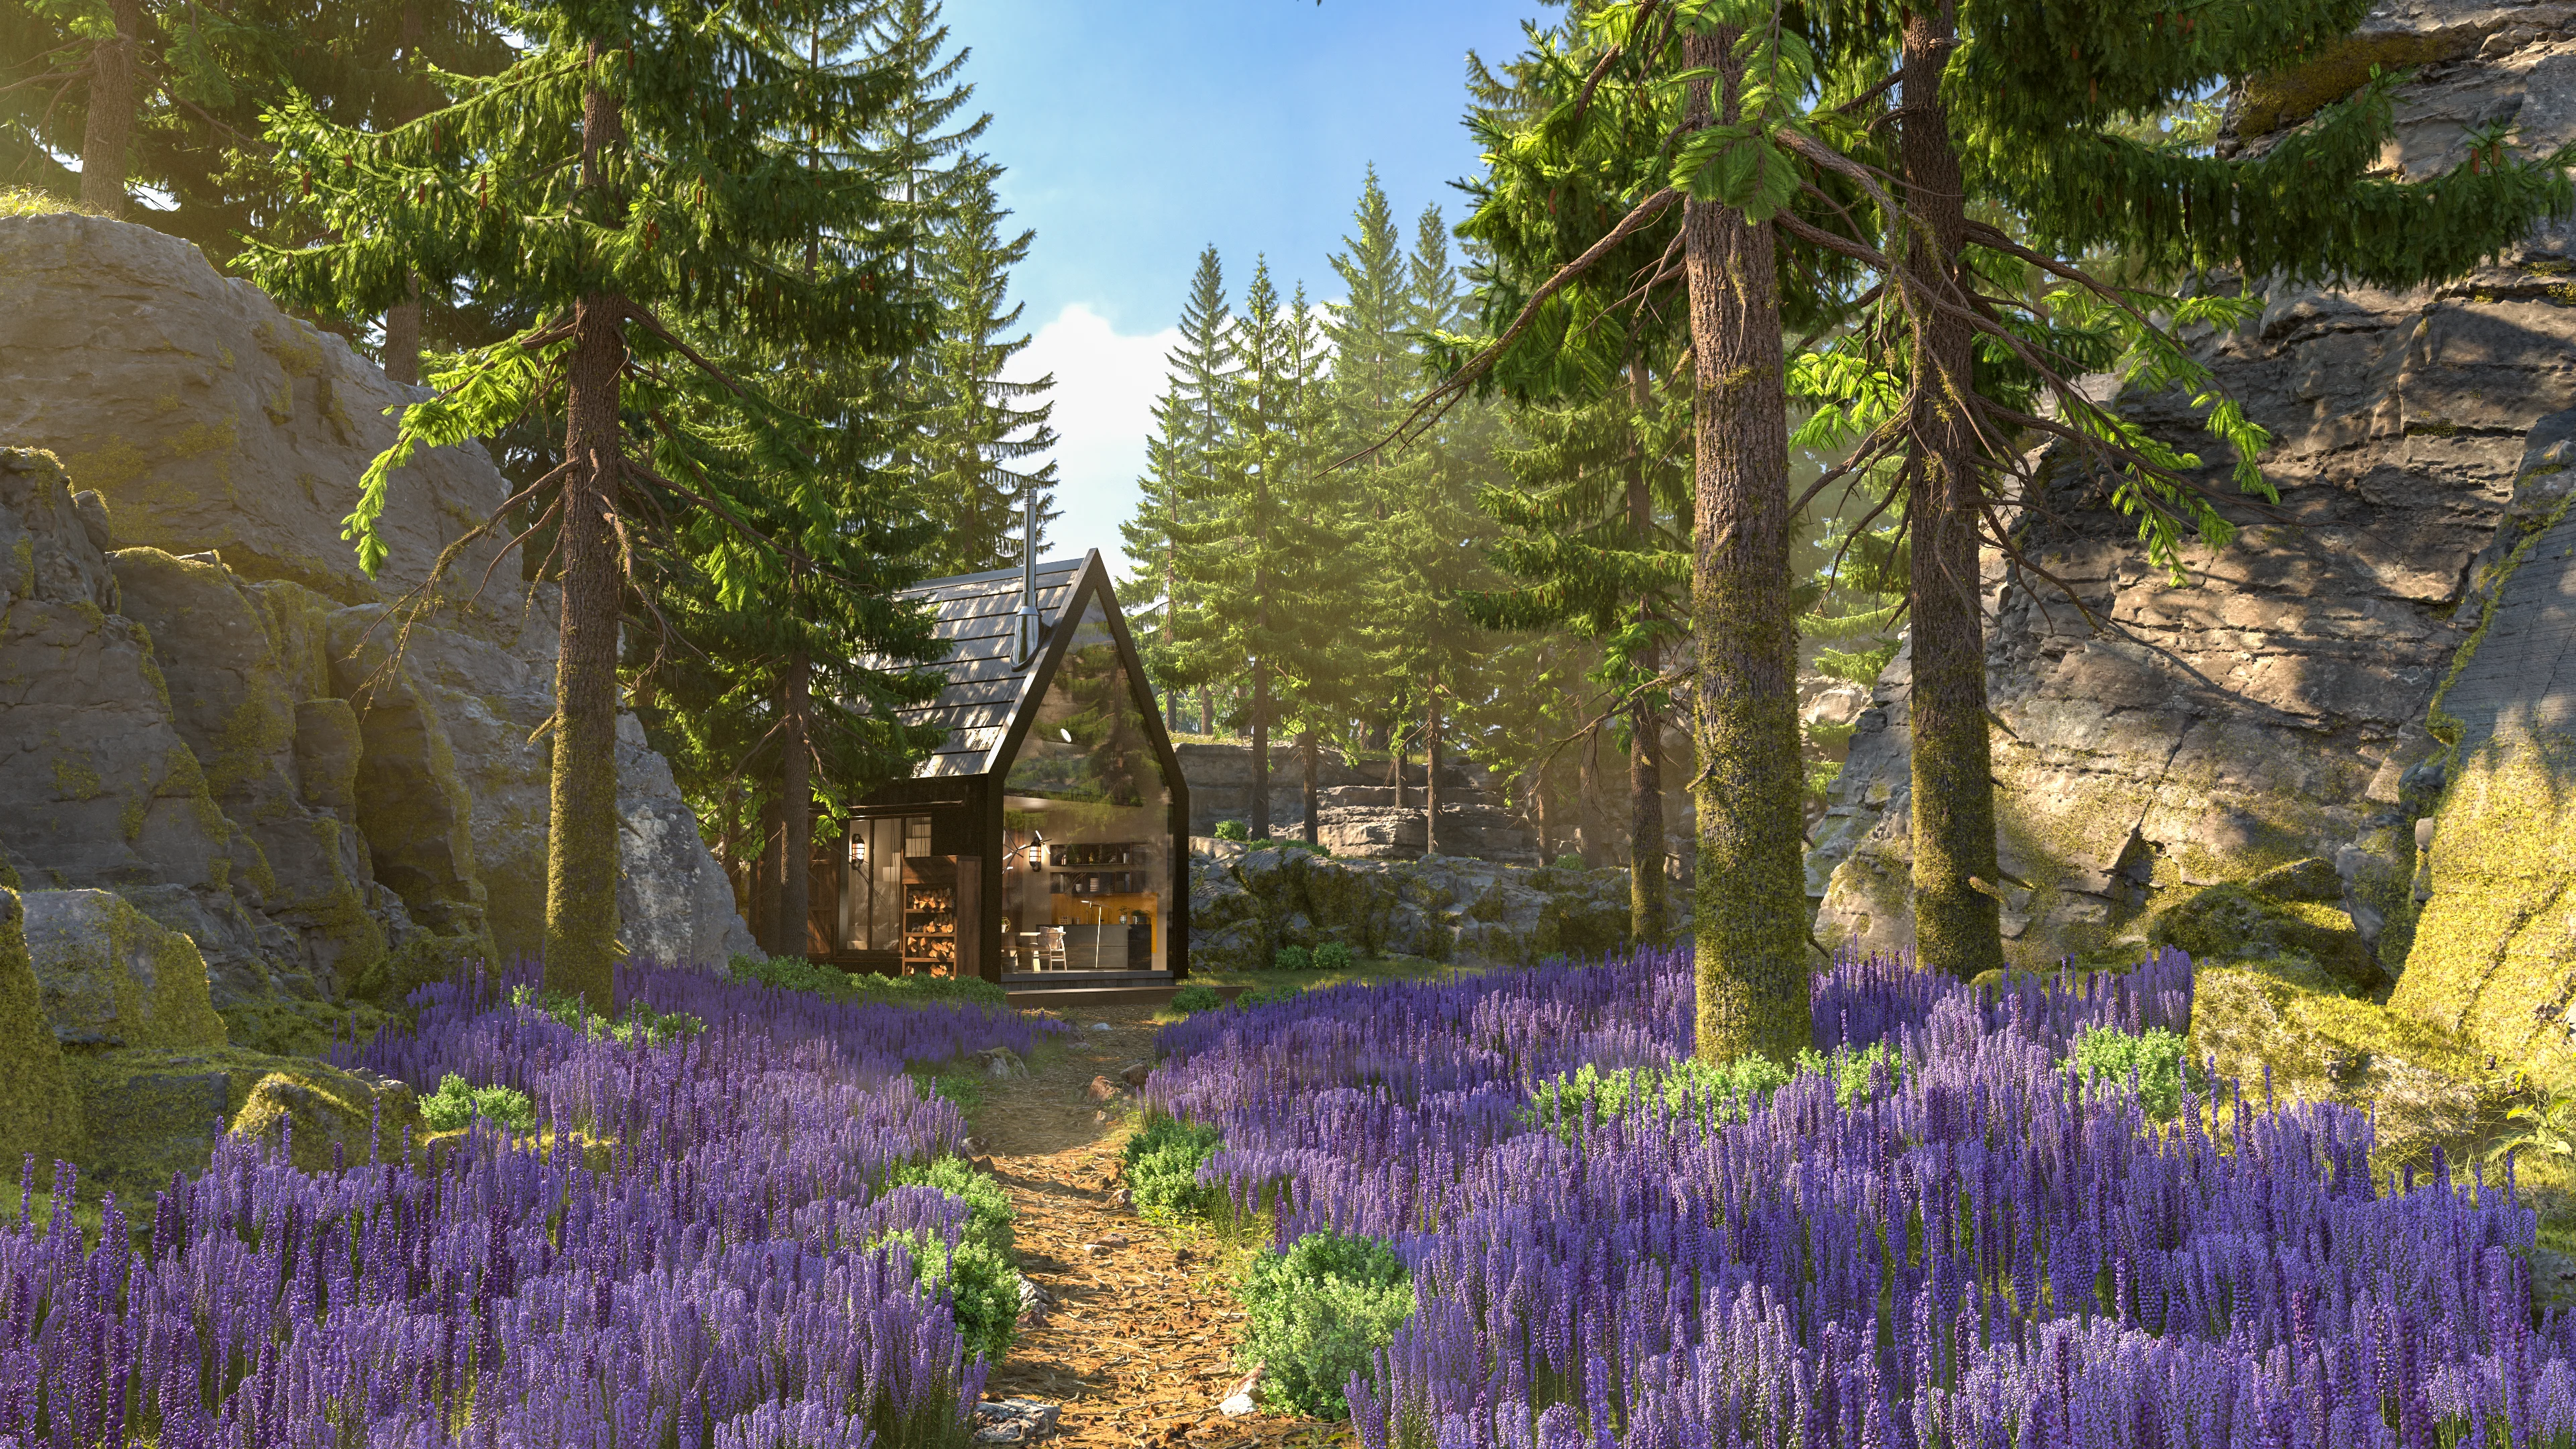
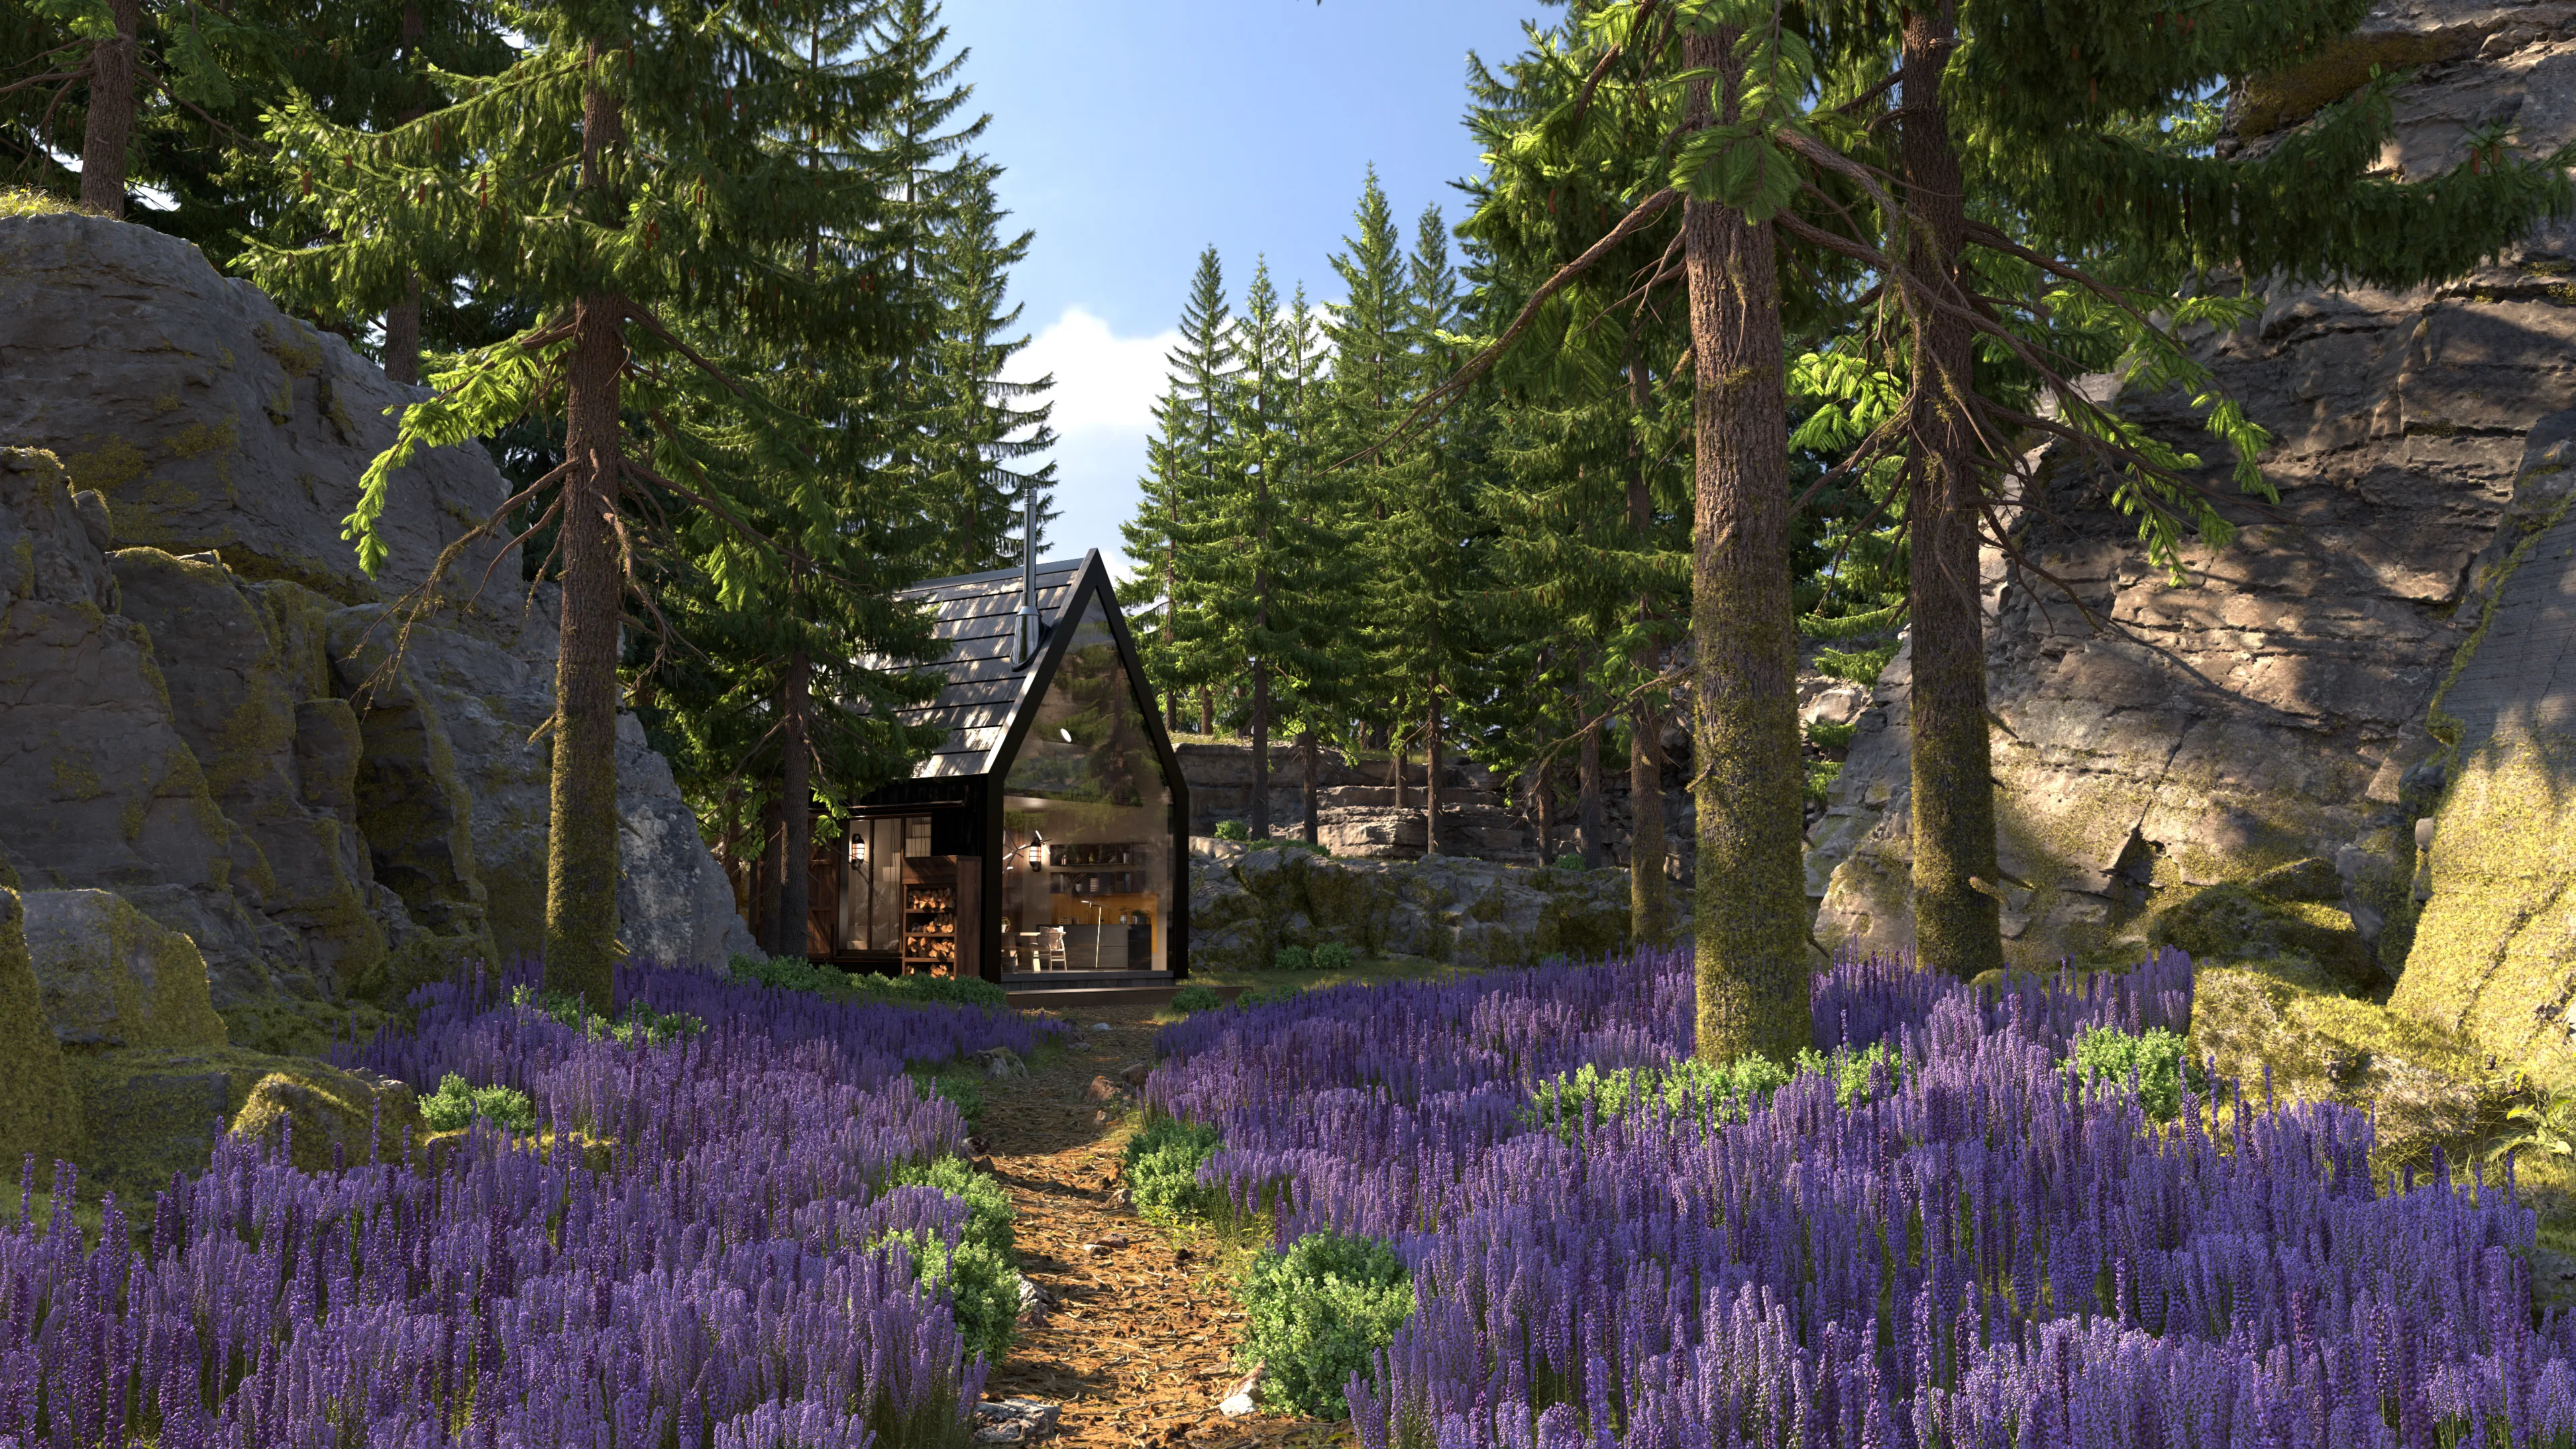
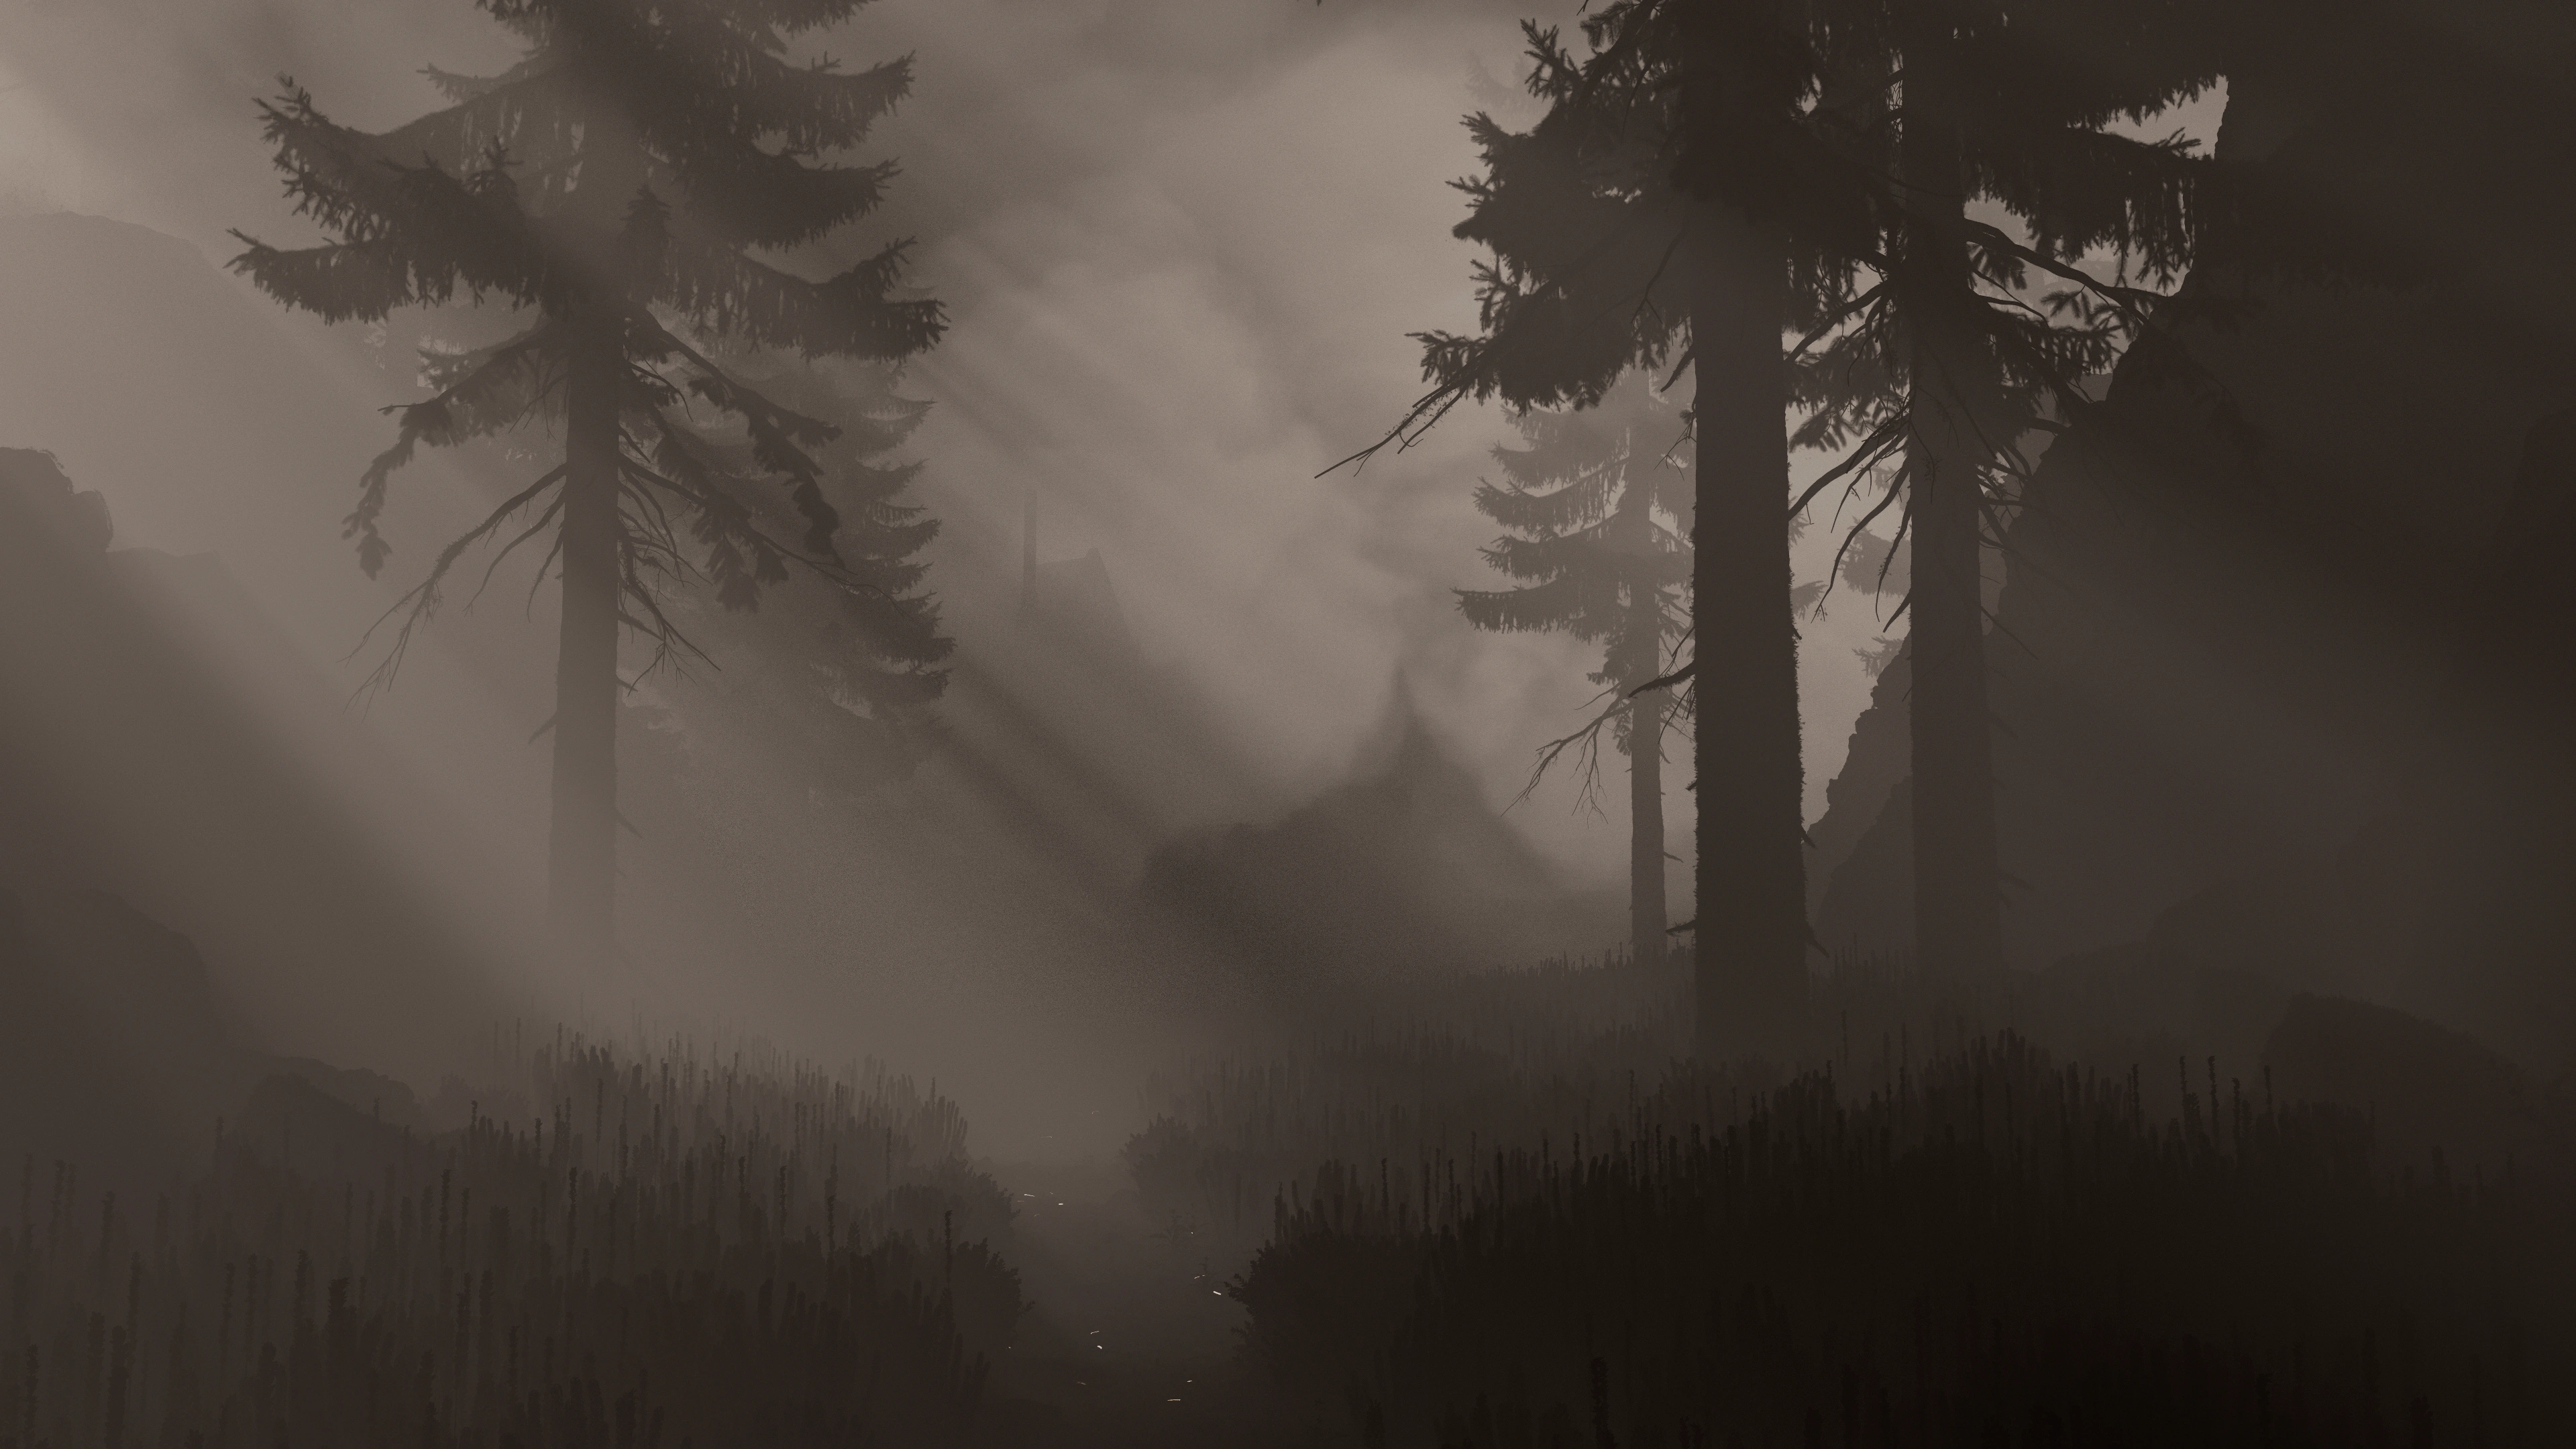
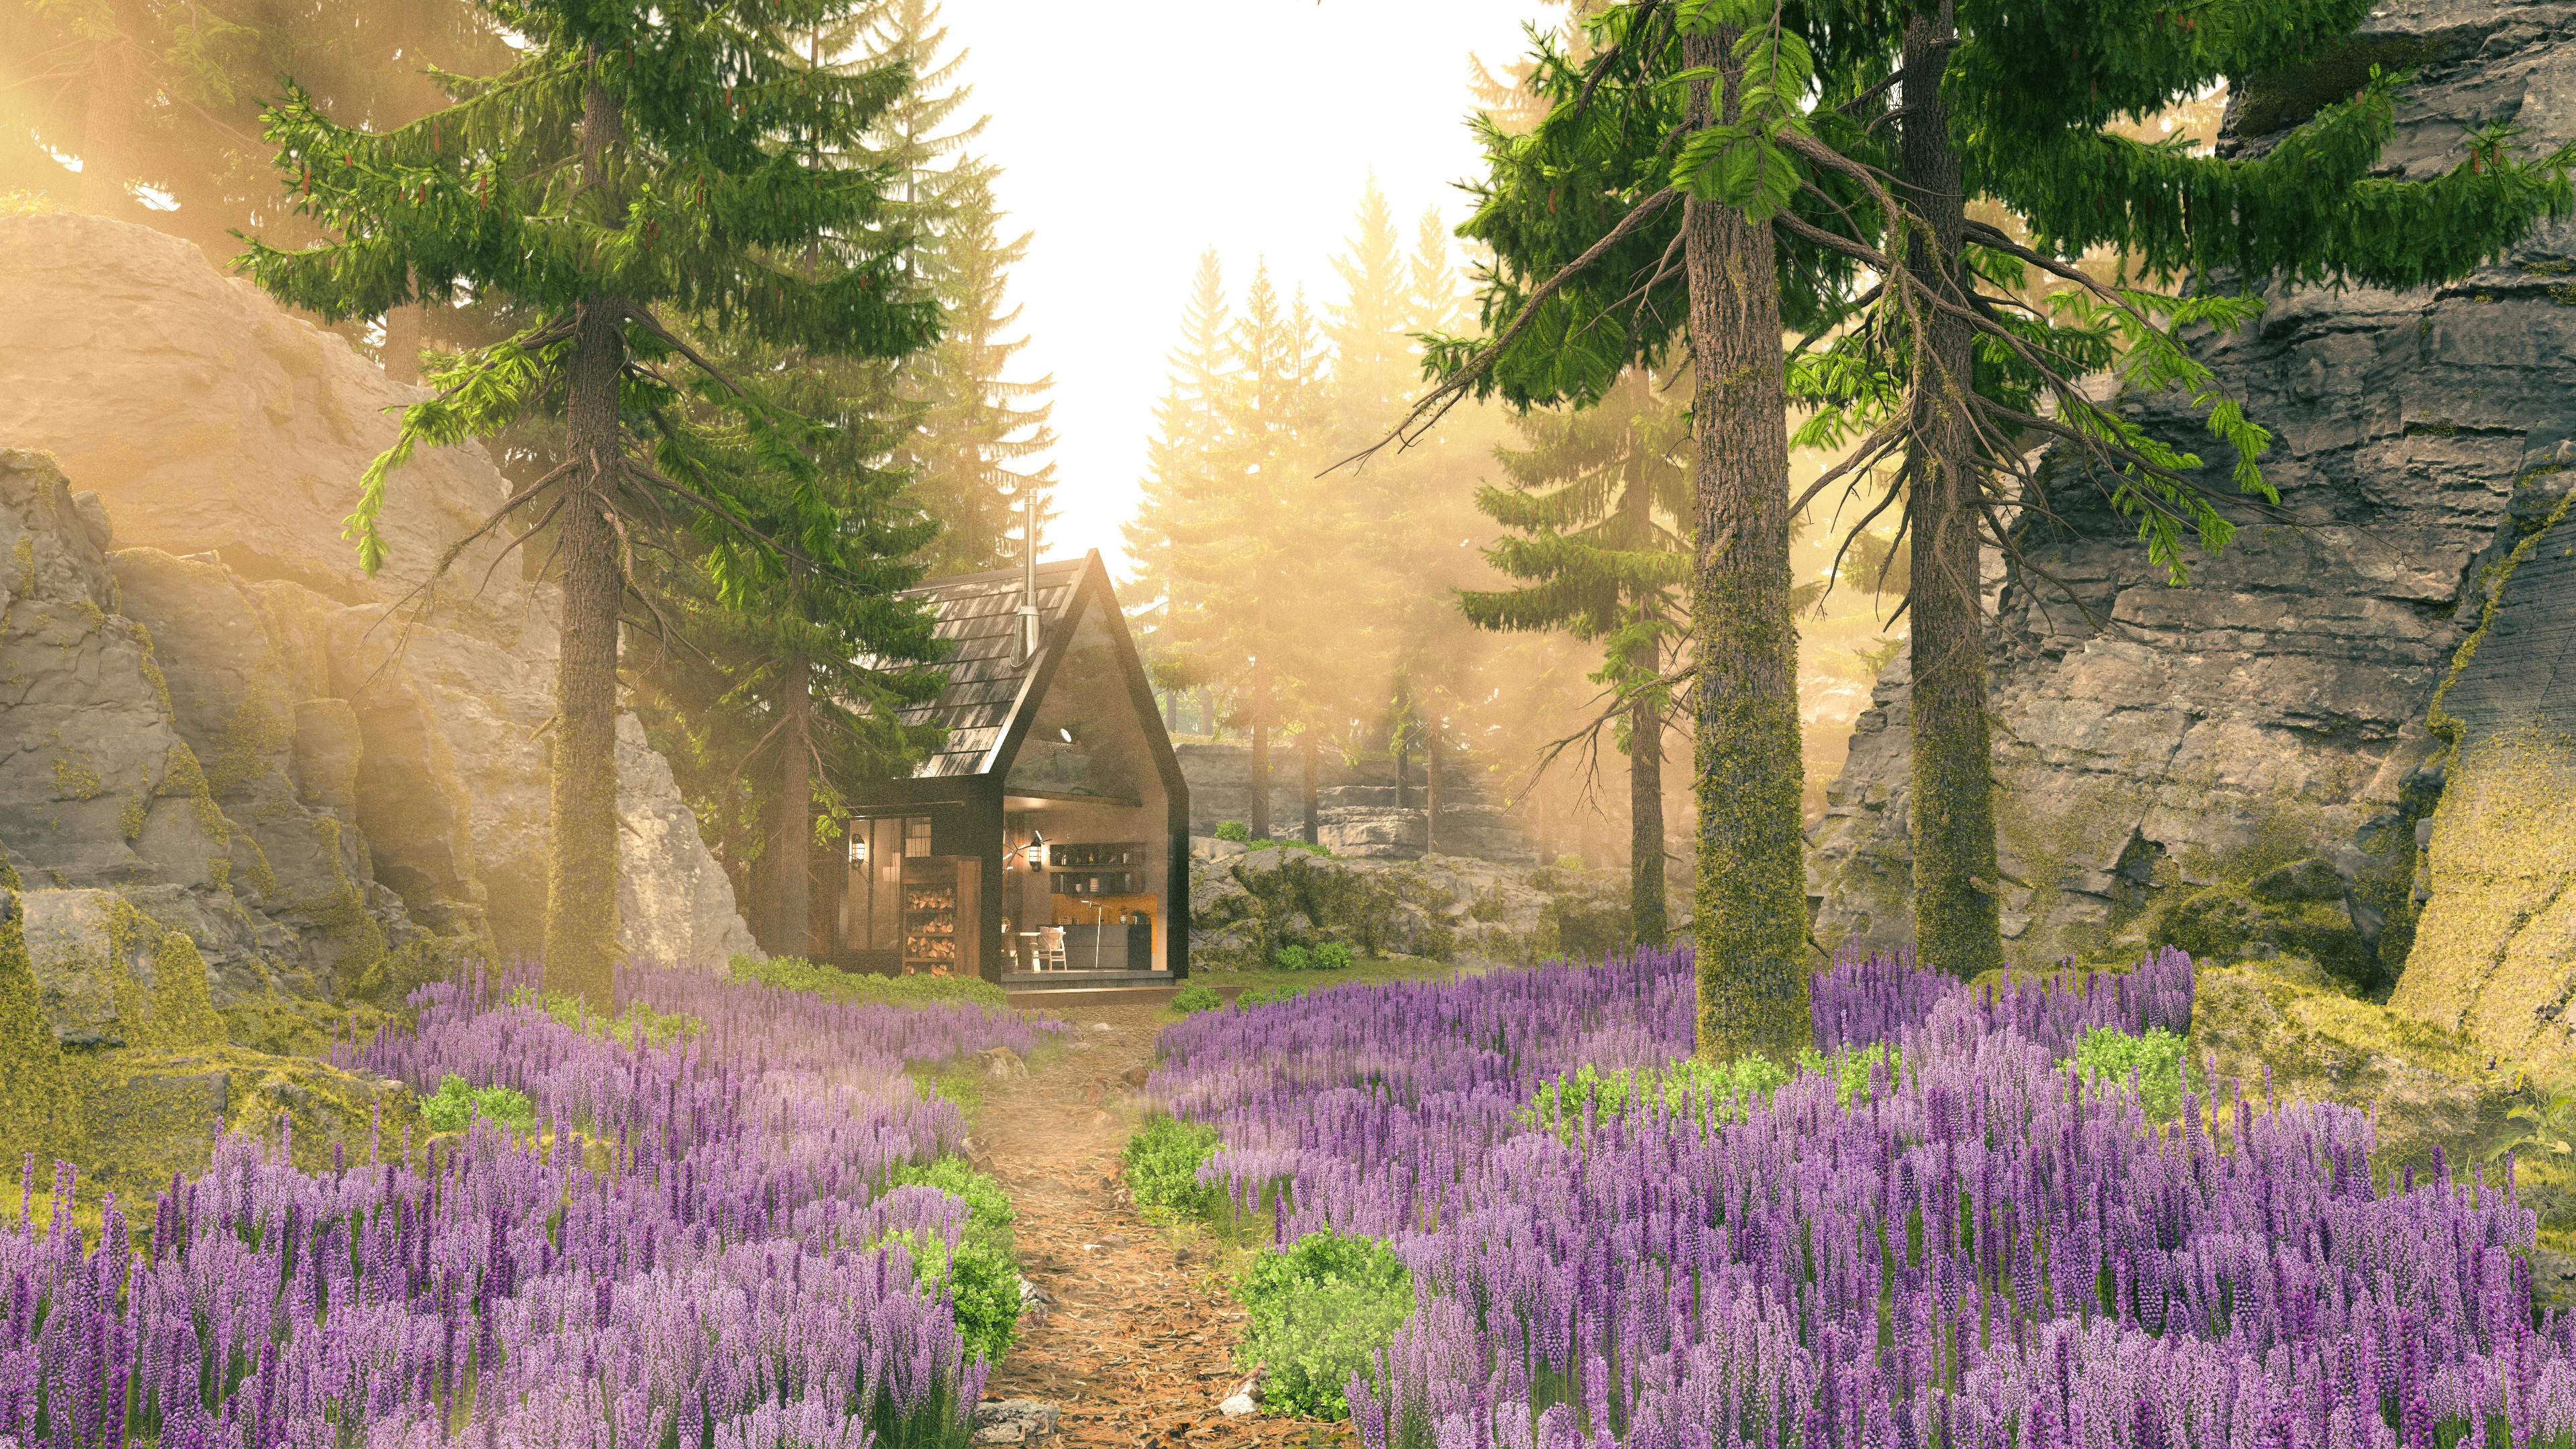
This post is essentially a collated version of my notes from this project, published here mostly because having them all in one place is useful for me to refer back to later but also in case anyone else finds this stuff interesting. Before I go into the details of how this project went, here’s what the final result looks like:
Initial Blocking
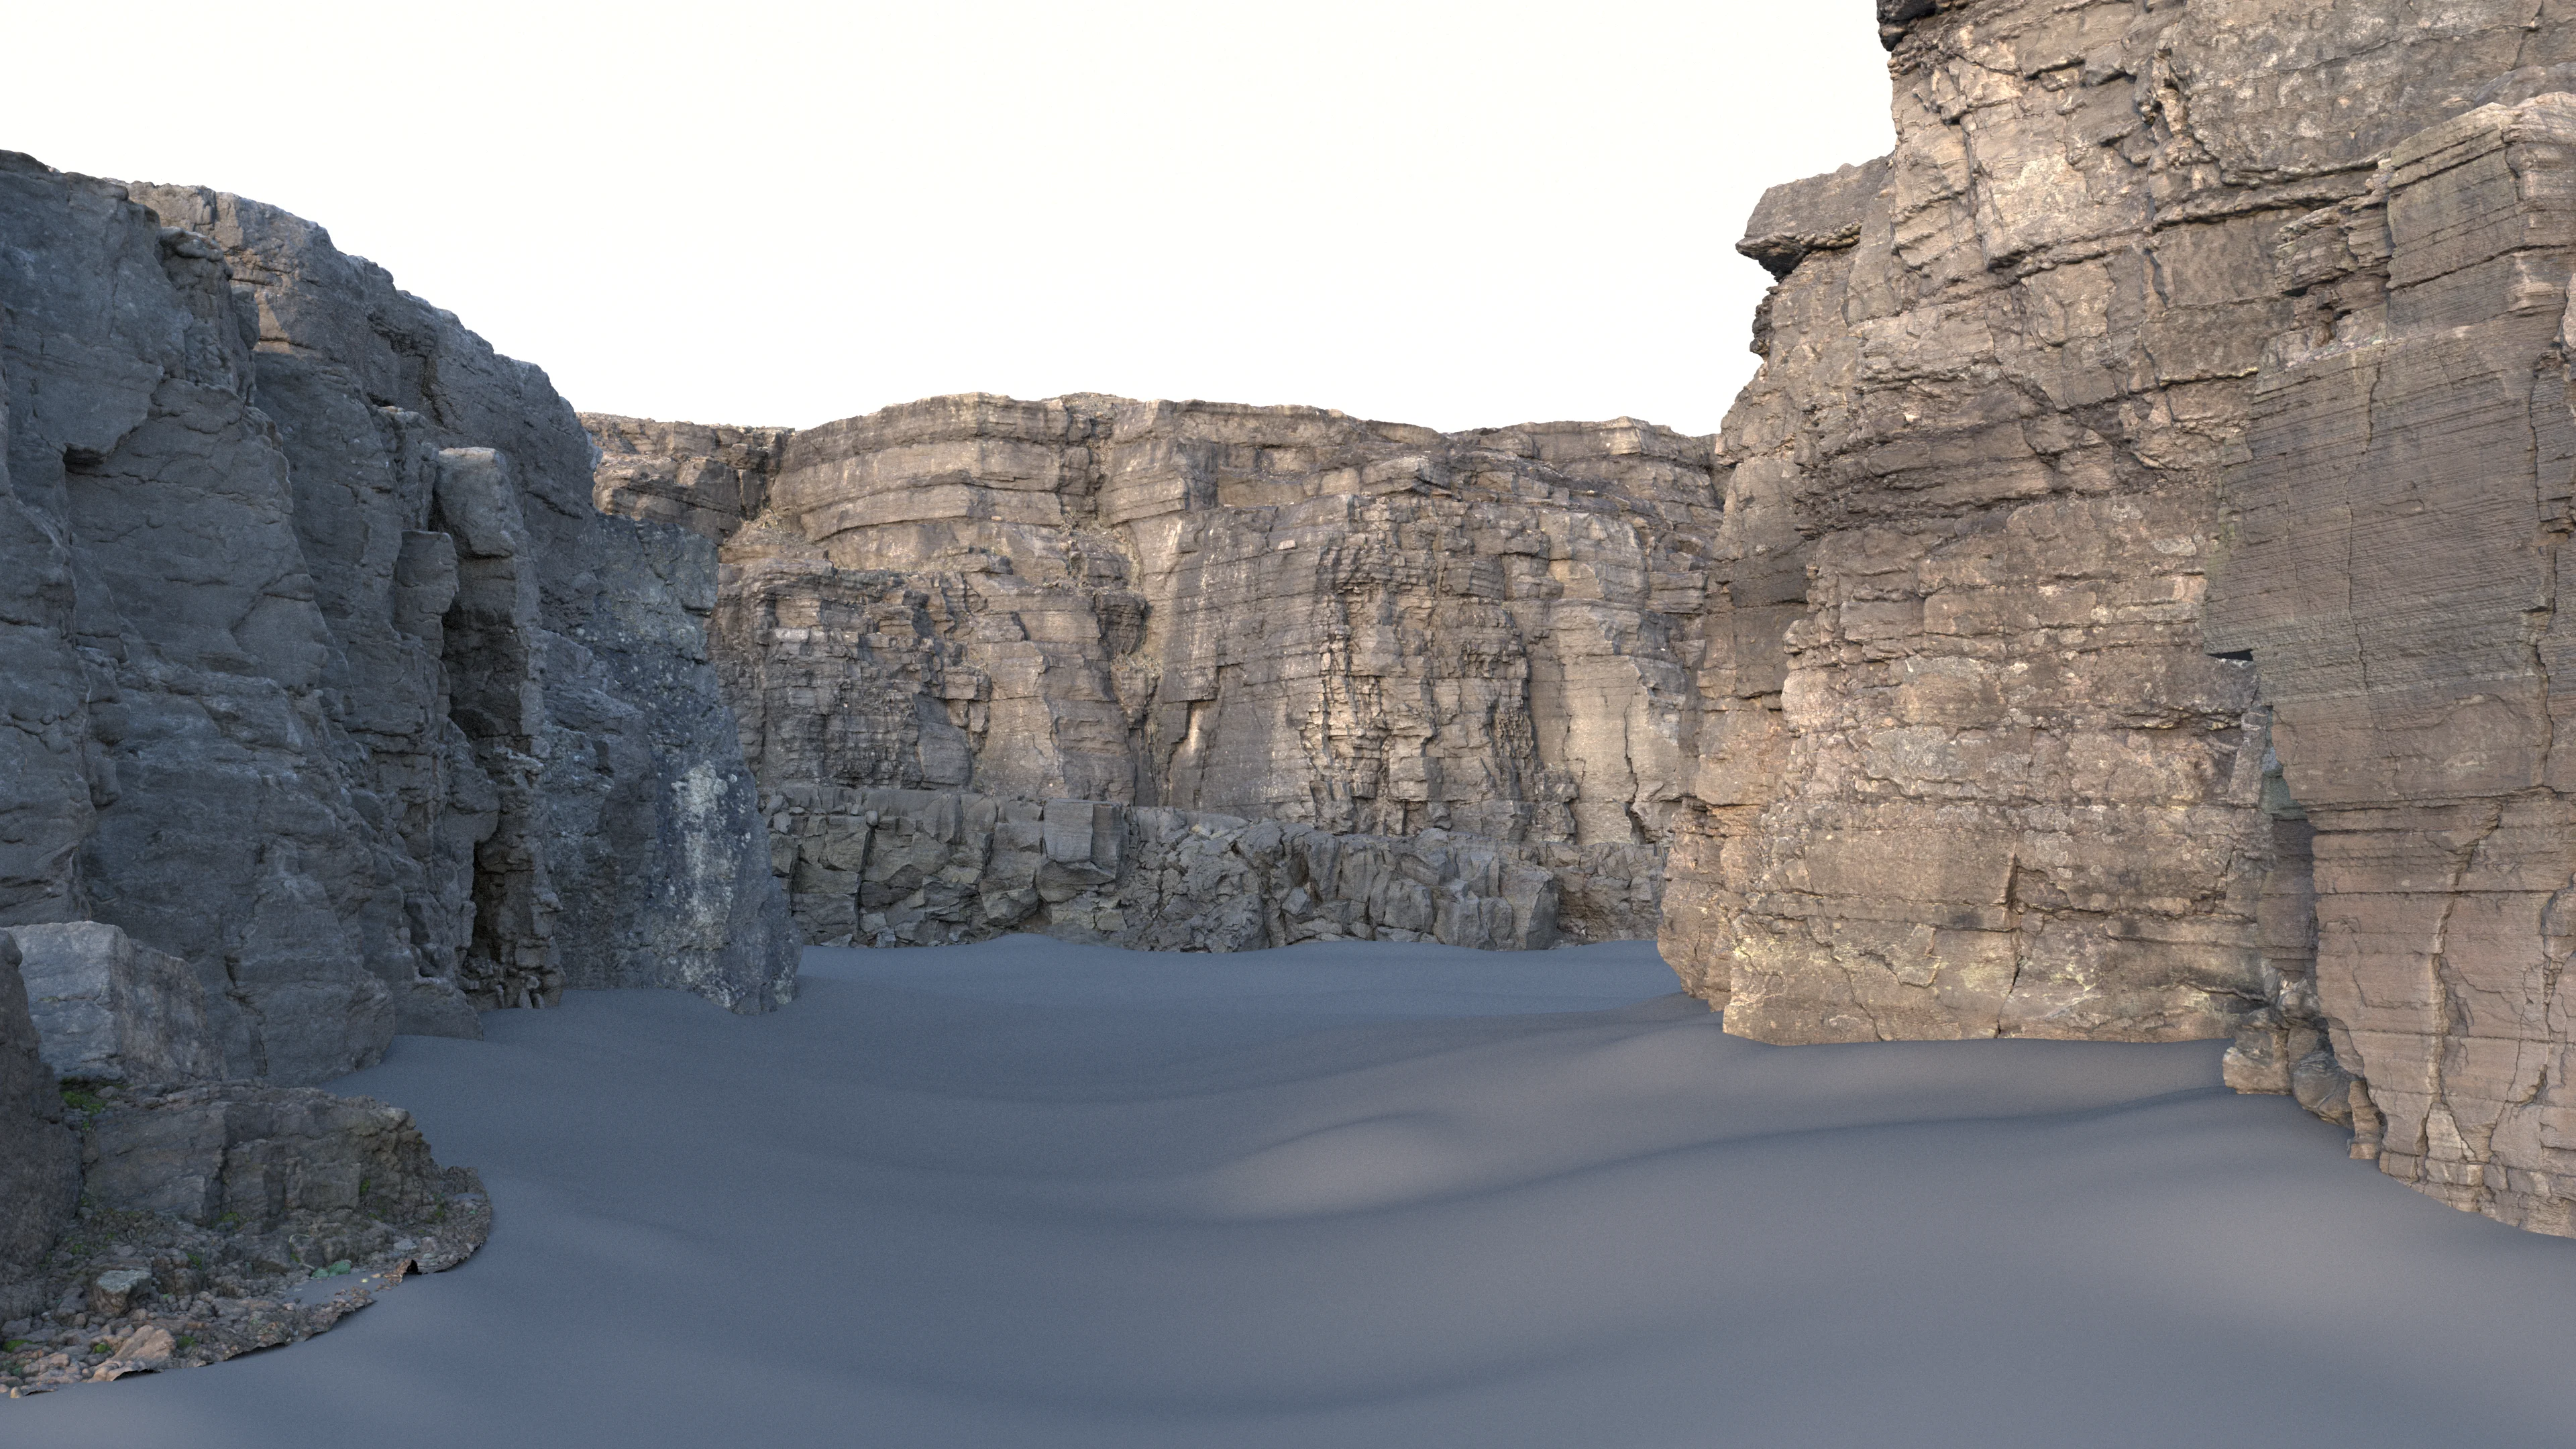
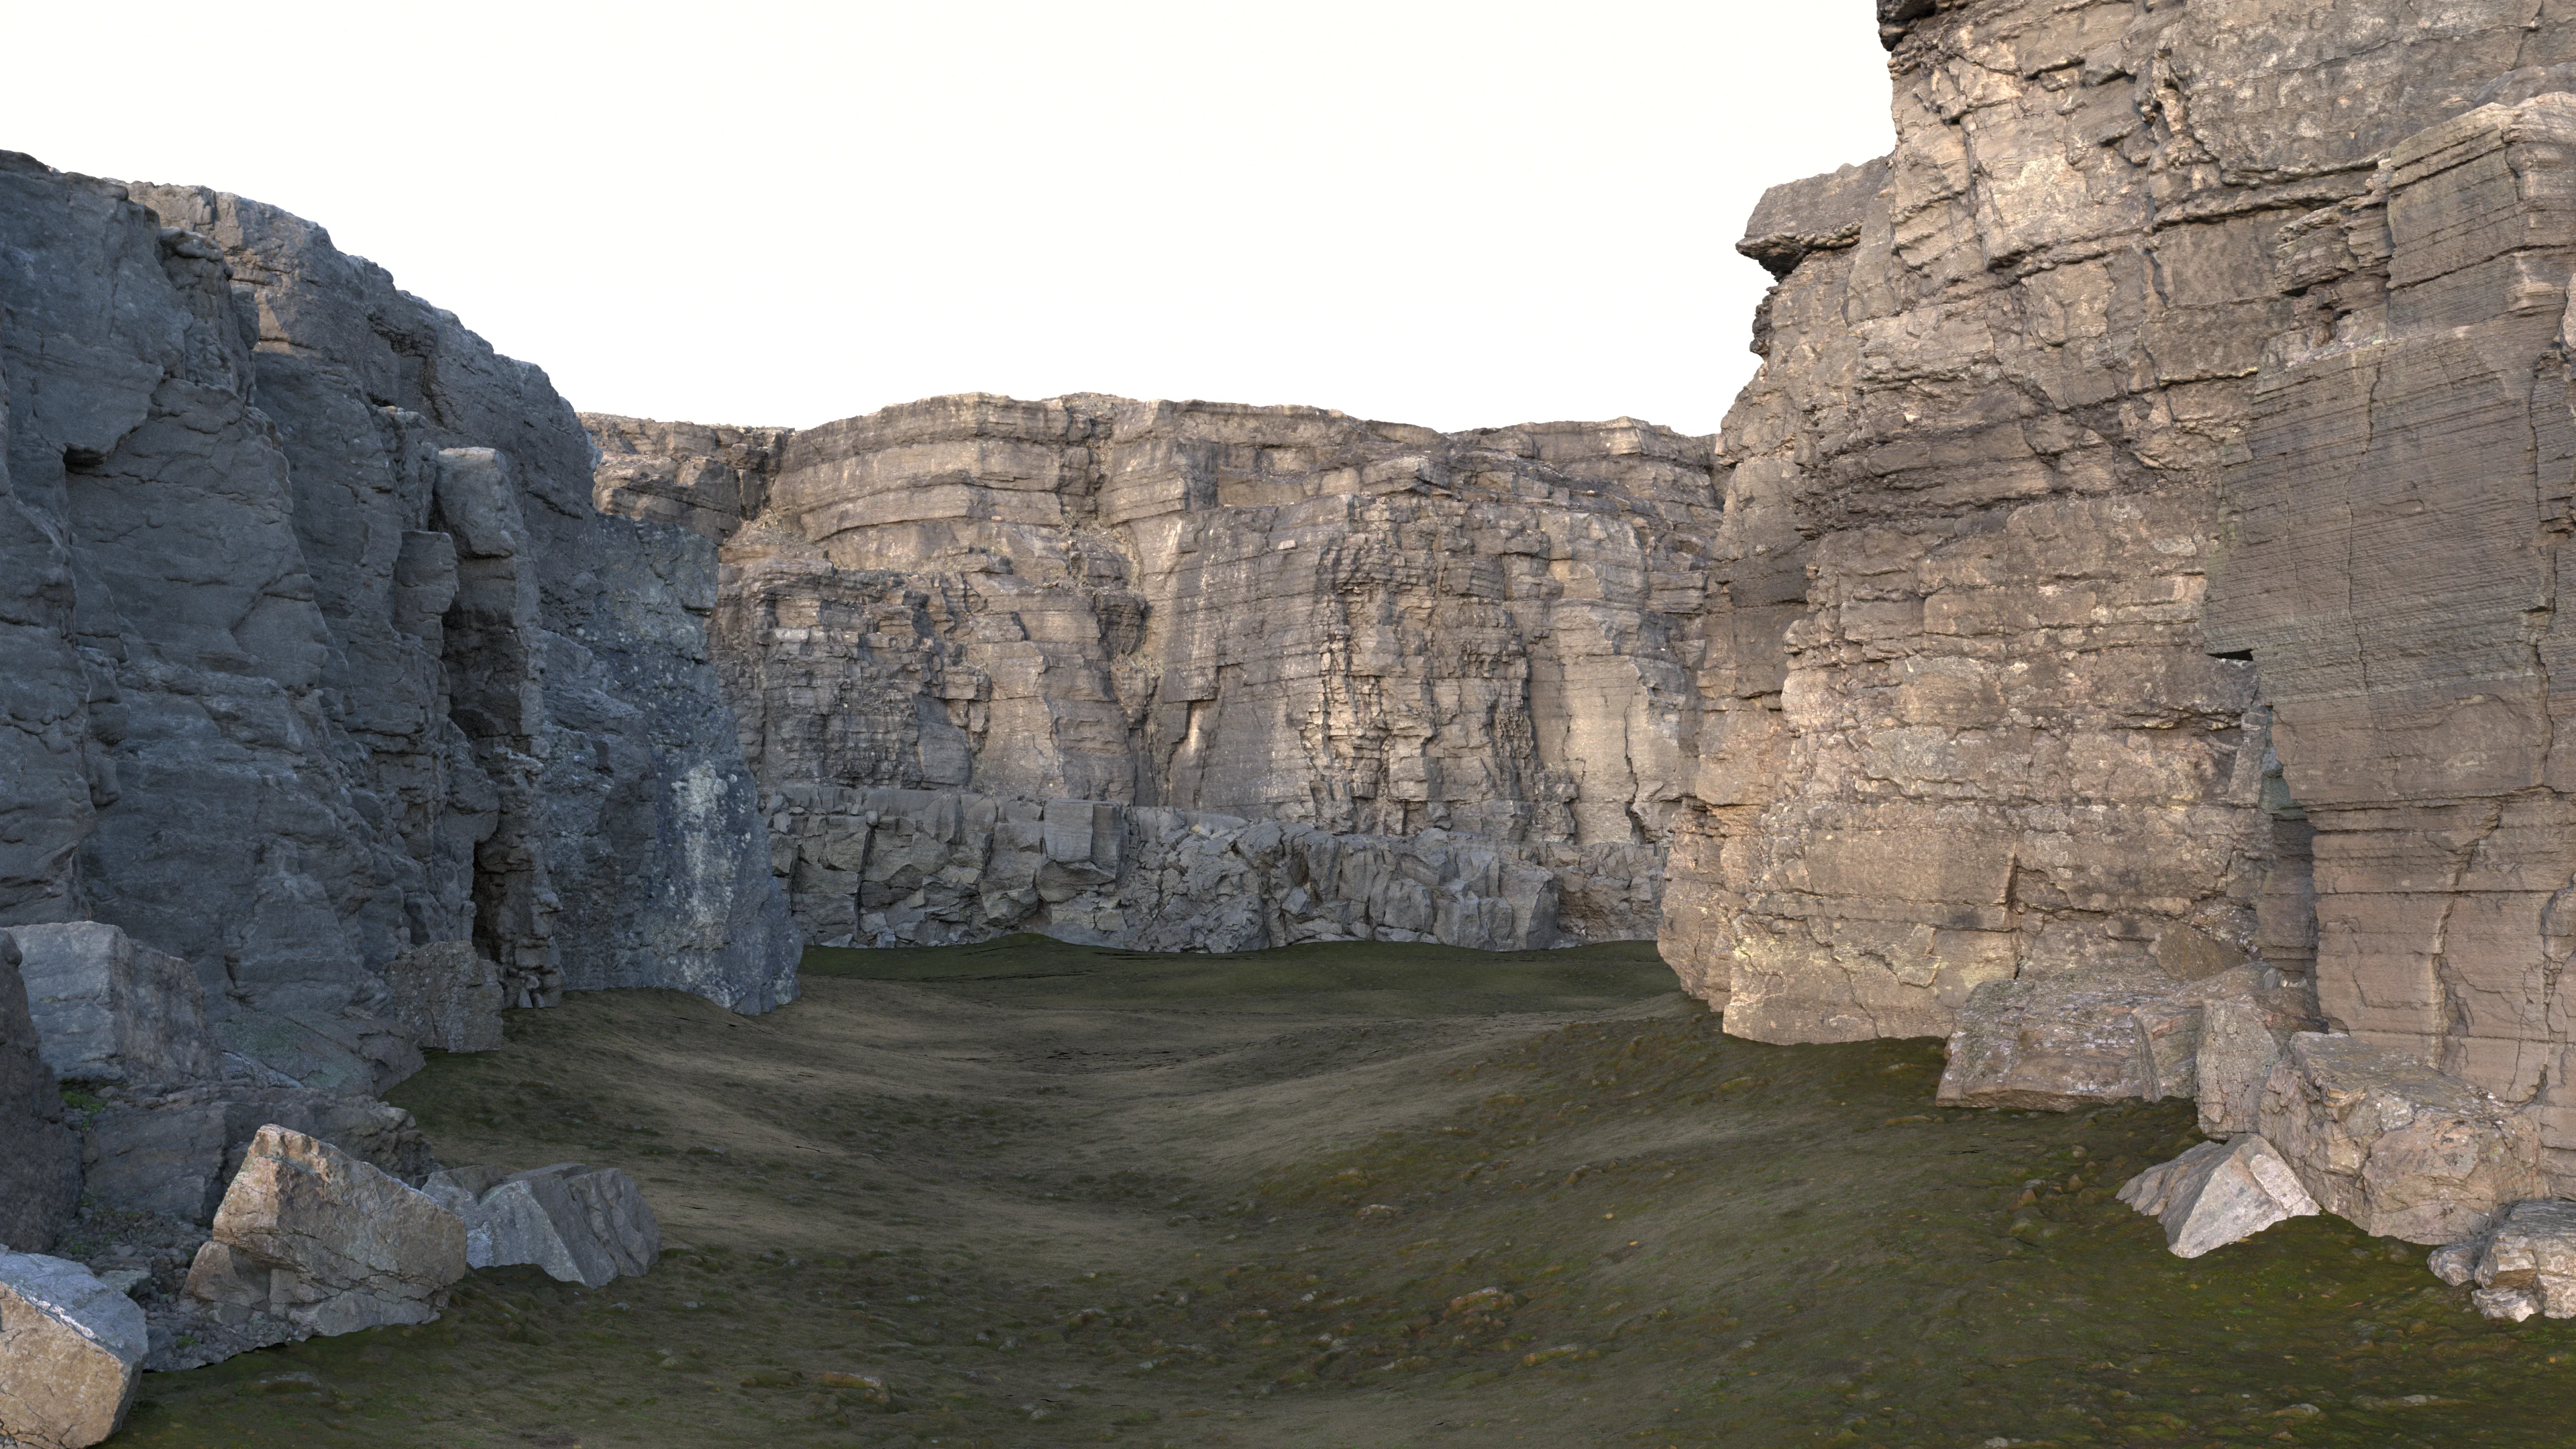
I didn’t really come into this project with much of a plan on what the final image would look like. To be honest, the goal of this project wasn’t even necessarily to make the most visually or artistically interesting image; the goal was primarily a technical exercise to practice building a complex scene. I actually started not with forest related things at all but instead I started with just trying to build an interesting groundplane. My plan was to use as many off-the-shelf premade assets as possible and focus on assembling everything together into a nice scene and focus on final lighting. Quixel Megascans has a lot of amazing large-scale 3D scans of rock formations and cliff faces; I had used a few of these back on the Woodville RenderMan Art Challenge and had made a note to myself back then to play with the Megascans large-scale rock formation assets more later. I started with placing a bunch of Megascans rock formations to get a sense of initial shaping for the scene. The overall shaping I went with for the scene draws from the principle of “compression and release”- I wanted the foreground to be through a narrower passage opening up into a larger space in the background, which I think helps give a sense that we’re looking into a larger world:
The next step was to put in a groundplane of dirt and soil. Since at the time RenderMan didn’t have hex-tiling [Heitz and Neyret 2018, Burley 2019] yet, I used the same technique that I used on the Woodville RenderMan Art Challenge to hide tiling in the groundplane textures: the groundplane texture is made up of several different tiled soil and dirt textures, projected using PxrRoundCube with different rotations per texture, blended together using a couple of different noise projections. One useful trick I added in this time was to also use the displacement maps to drive which texture “wins” at each blend point; this allows for nice things like larger rocks poking through layers of dirt and stuff.
Overall though I didn’t put too much effort into the groundplane since I expected it to be almost entirely covered with vegetation in the final scene, meaning very little of it would be directly visible. After getting the groundplane to a good-enough state, I fired up Maya’s XGen Geometry Instancer and started roughing in what all of the vegetation in the scene would look like.
The XGen toolset that ships with Maya today is really two essentially completely different toolsets packaged into a single plugin- XGen Interactive Grooming, and XGen Geometry Instancer. XGen Geometry Instancer was forked from Disney Animation’s internal XGen instancing system over a decade ago, while XGen Interactive Grooming was then added some years later [Todd 2013] as a totally separate authoring interface for hair workflows. For this project, I only used the Geometry Instancer half of XGen. I’ve had a fair amount of experience with Disney Animation’s version of XGen, so using the Maya version of XGen Geometry Instancer has been an interesting experience- the version in Maya was fairly heavily reworked to be more integrated into Maya compared with Disney Animation’s standalone version, and the two versions have since diverged even more due to many years of independent development and evolution, but there are still clearly a lot of Disney-isms in Maya’s XGen, such as the use of SeExpr [Disney Animation 2011] and Ptex [Burley & Lacewell 2008] to control instancing distributions and properties.
The basic workflow for Xgen Geometry Instancer is to first create a bunch of archives of geometry that the user wants to instance, and then create a description, which is a set of instances of the archives scattered across some area of geometry, called a patch. When the underlying geometry that XGen instances are being scattered on is a polygon mesh, patches bind to the faces of the mesh. Multiple decriptions can be organized together as a collection. Something that is a bit frustrating about XGen Geometry Instancer is that its integration into Maya is… somewhat strange. Maya’s XGen Geometry Instancer doesn’t really feel or behave like a native part of Maya- XGen descriptions and collections show up in the Maya outliner, but are edited through a dedicated separate interface instead of the standard Attribute or Channel editors, and instead of storing all data as part of the Maya file, XGen Geometry Instancer creates and depends on a bunch of external sidecar files, and even worse, paths baked into these external files don’t respect the project workspace system that Maya uses, making reusing XGen description between different Maya projects kind of annoying to do. All of this is the result of XGen Geometry Instancer being derived from an internal standalone tool at Disney Animation- the internal version of XGen makes a lot of sense integrated within the overall Disney Animation pipeline, but none of this was originally designed to be a deeply integrated part of Maya outside of Disney Animation, and even with all of the work that Autodesk put into making the commercially available Maya version of the system better integrated, the outside origin still shows through. However, I found on this project that XGen Geometry Instancer is nonetheless still super powerful and for huge numbers of instances is vastly more performant than the native Maya MASH instancing toolset.
The first vegetation test I did was to put down some basic grass, scattered using a super basic XGen Description setup where the base geometry used for scattering was just the groundplane itself. The grass is made up of just a couple of off-the-shelf grass models from Evermotion and Megascans, reshaded for the project’s needs, exported as XGen archives and scattered with random rotations applied per instance:
Next, I started blocking in trees since this scene was meant to be a forest scene. Originally I had planned on scattering trees using XGen as well, but I wound up placing the trees by hand. Part of the reason for placing by hand was simply that there aren’t that many trees in this scene, but the primary reason was just for more direct control since the trees play a really large role in establishing the overall framing of the scene.
The base spruce tree models I used are from Evermotion, but I opted to reshade them using the Evermotion textures as a starting point but then improved using some stuff from Megascans. The main reason for reshading was to improve how well the trees would hold up to being close to the camera, which requires more detailed displacement on the tree bark. I also put some work into making sure the spruce needles transmit light in a convincing way, which required some initial reverse-engineering of how the tree’s original Vray materials work in order to understand how to get a similar effect in RenderMan’s PxrSurface material, and then required further tweaking and adjustment to both the spruce needle textures and the material.
Here are a couple of lookdev test renders of one of the spruce trees; the first two show the overall look of the trees with my reworked shading, and the last one shows the close-up detail and also how the spruce needles look with backlighting:


One interesting thing I ran into was RenderMan’s opacity caching system. The opacity caching system stores an opacity value per micropolygon, under the assumption that micropolygon sizes in world space should be close to one micropolygon per screen-space pixel. As long as the one-micropolygon-per-screen-pixel assumption holds more or less true, this opacity caching approach works well; the average opacity value across a single screen-pixel sized micropolygon should match what the filtered mip-mapped texture lookup for opacity should be across the micropolygon, therefore, caching this value on the micropolygon allows for skipping a lot of texture lookups over the course of the render. However, as soon as micropolygons are larger than a single screen-pixel, the assumptions that allow for opacity caching to work without visual artifacts break, because the frequency that opacity caching can store values at drops below the frequency that the filtered mip-mapped signal from texturing represents; the net visual result is blurring in opacity edges, which can look super strange.
PxrSurface in RenderMan for Maya enables opacity caching by default, but for the spruce needles on the trees, I had to disable opacity caching. The spruce needles on the trees are modeled as a single quad strip per bundle of needles with opacity mapping; I left the quad strips unsubdivided to keep memory usage lower, but this meant that spruce needle polygon sizes were often way larger than one pixel in screen space for trees closer to the camera. Before doing this project I didn’t realize that RenderMan has an opacity caching system and enables it by default, so figuring out why the spruce needles looked all messed up took me a moment. This wasn’t a problem in the Woodville project because in that scene, all of the trees are in the background and therefore are so far from camera that all unsubdivided quad strips are subpixel in screen space anyway.
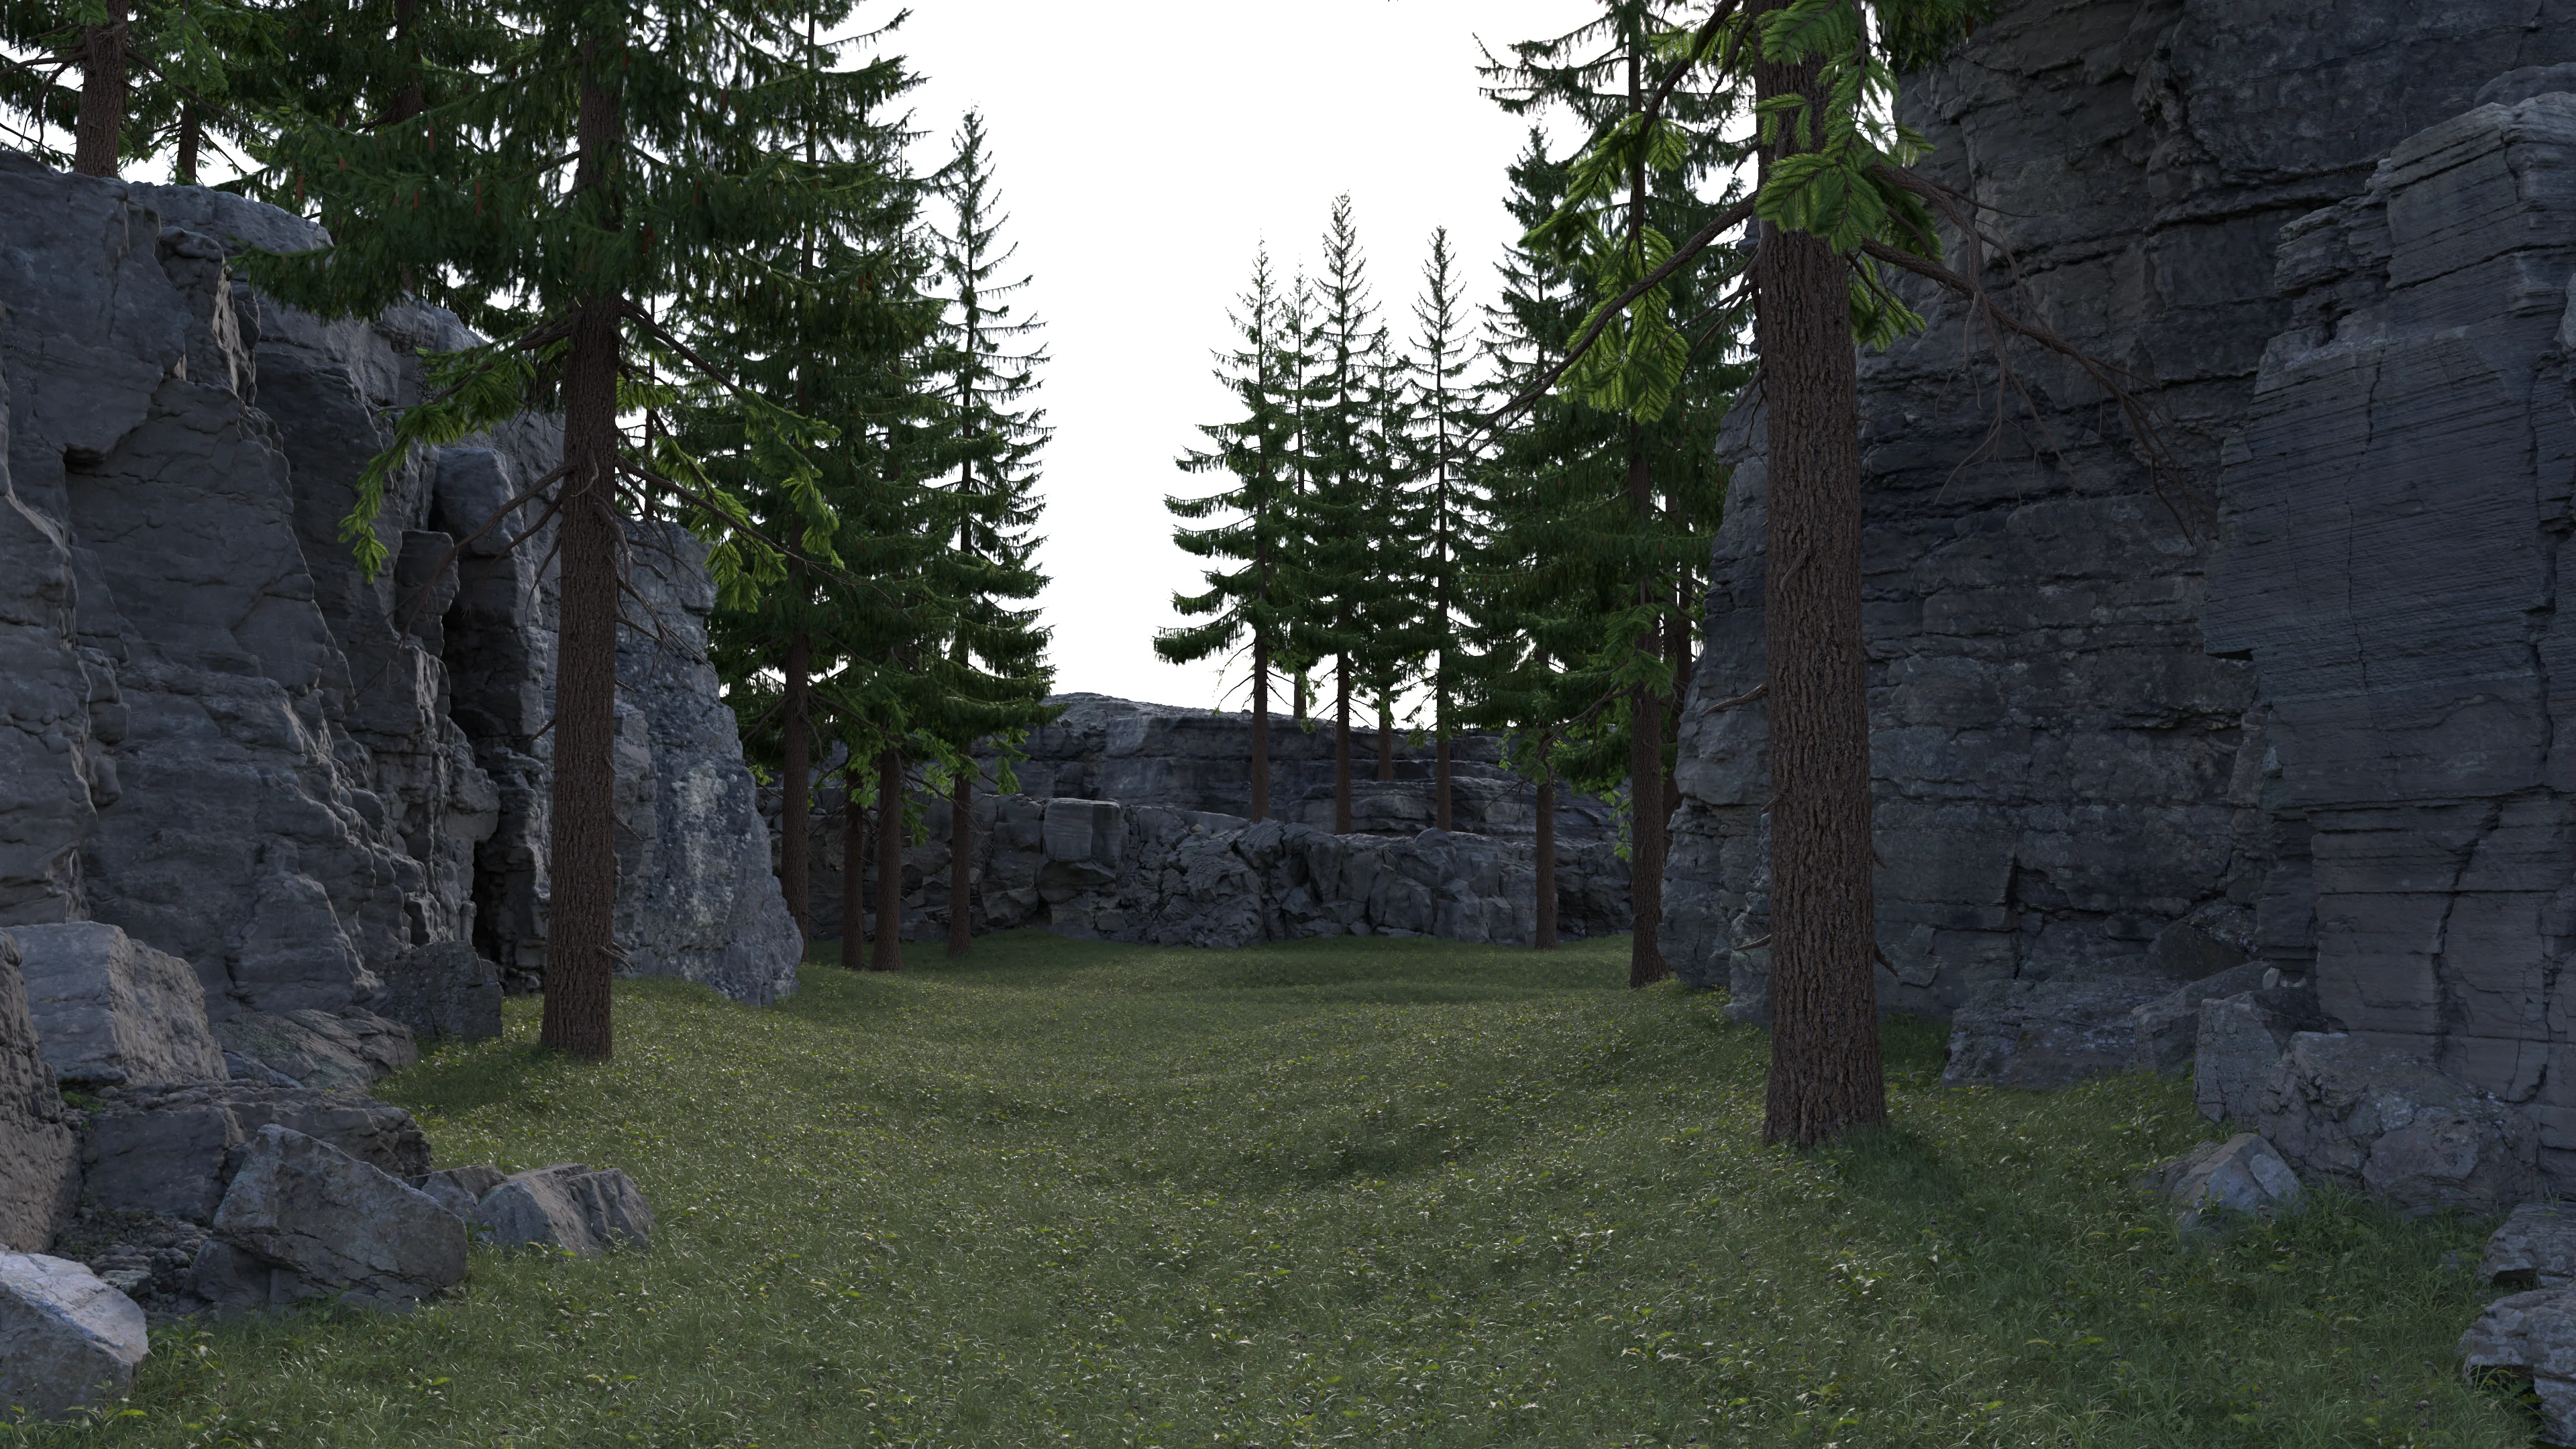
Here are the spruce trees blocked out along with the initial grass and rock formations. While nothing here is as close to the camera as in my lookdev tests, nonetheless the nearest foreground trees are close enough to the camera where the reworked high resolution displacement mapping and exact opacity evaluation on the spruce needles instead of cached opacity start to matter a great deal:
Forest Floor
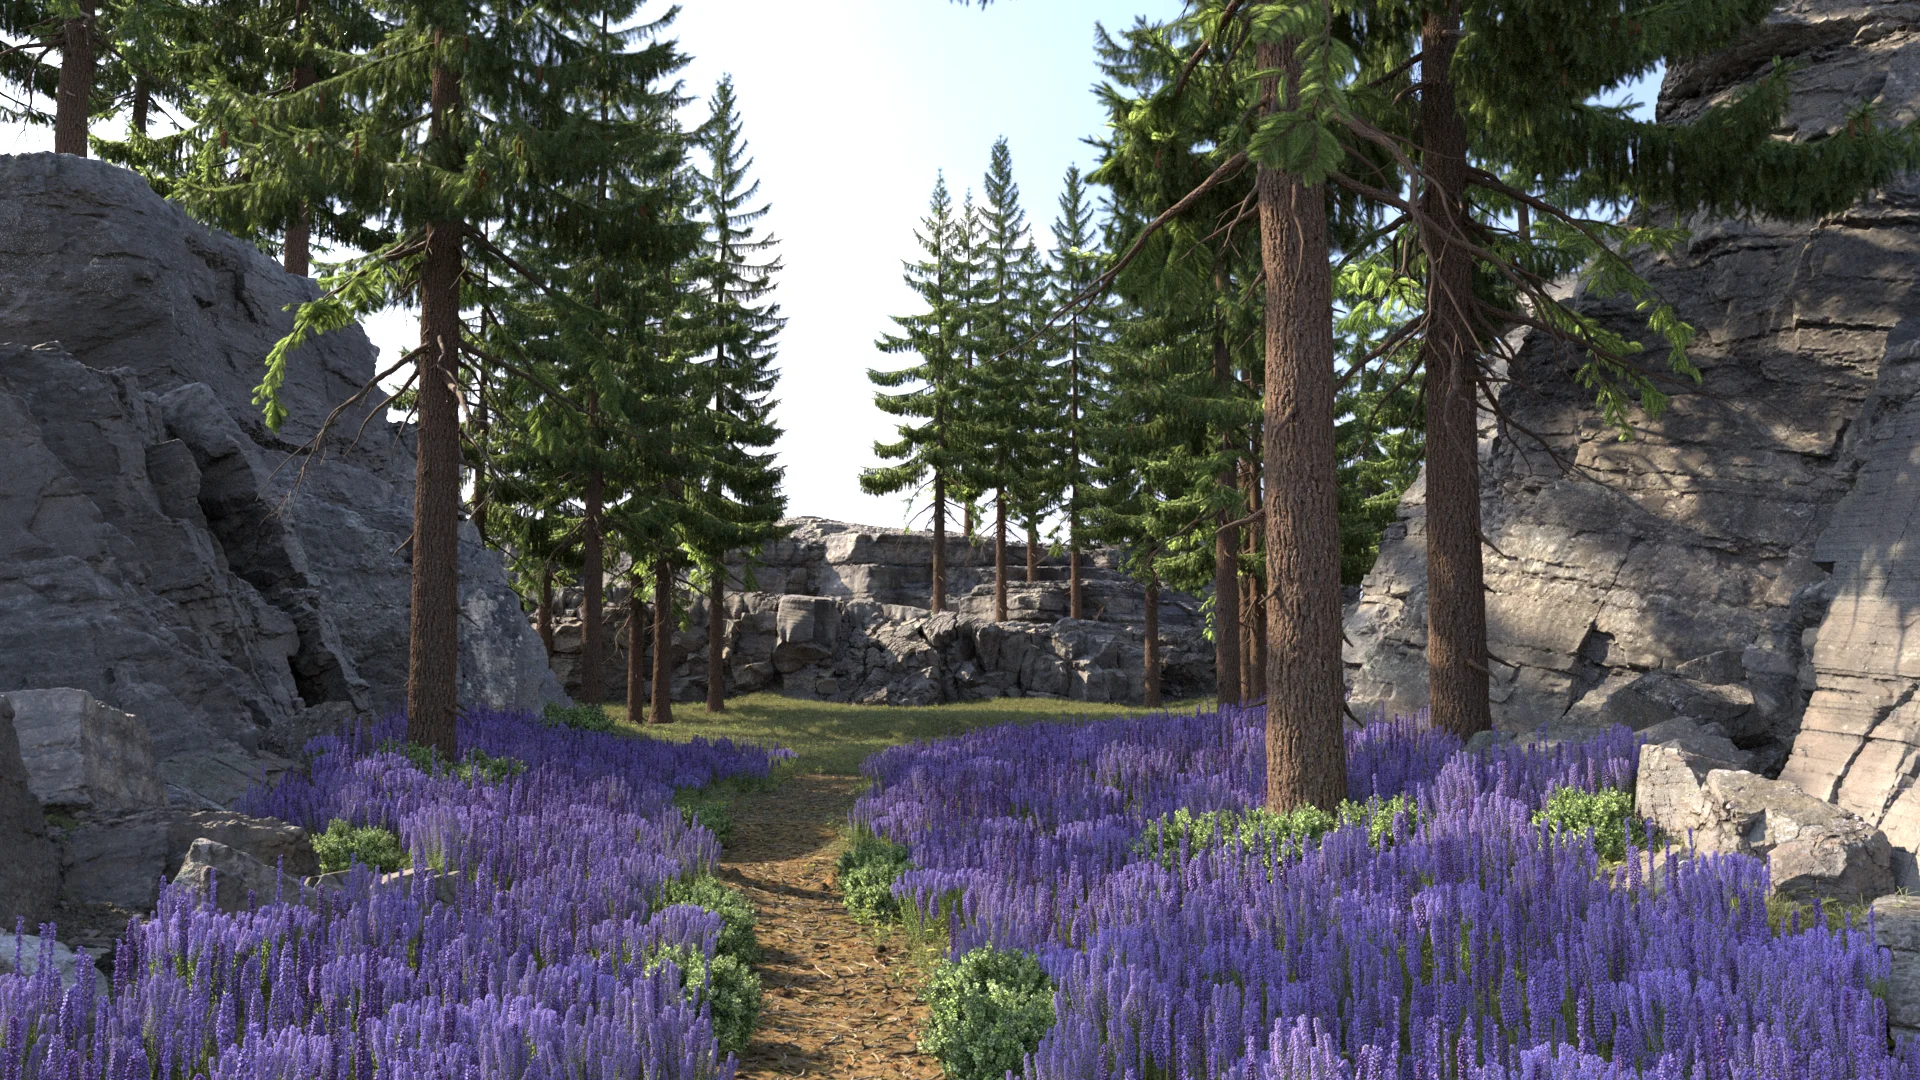
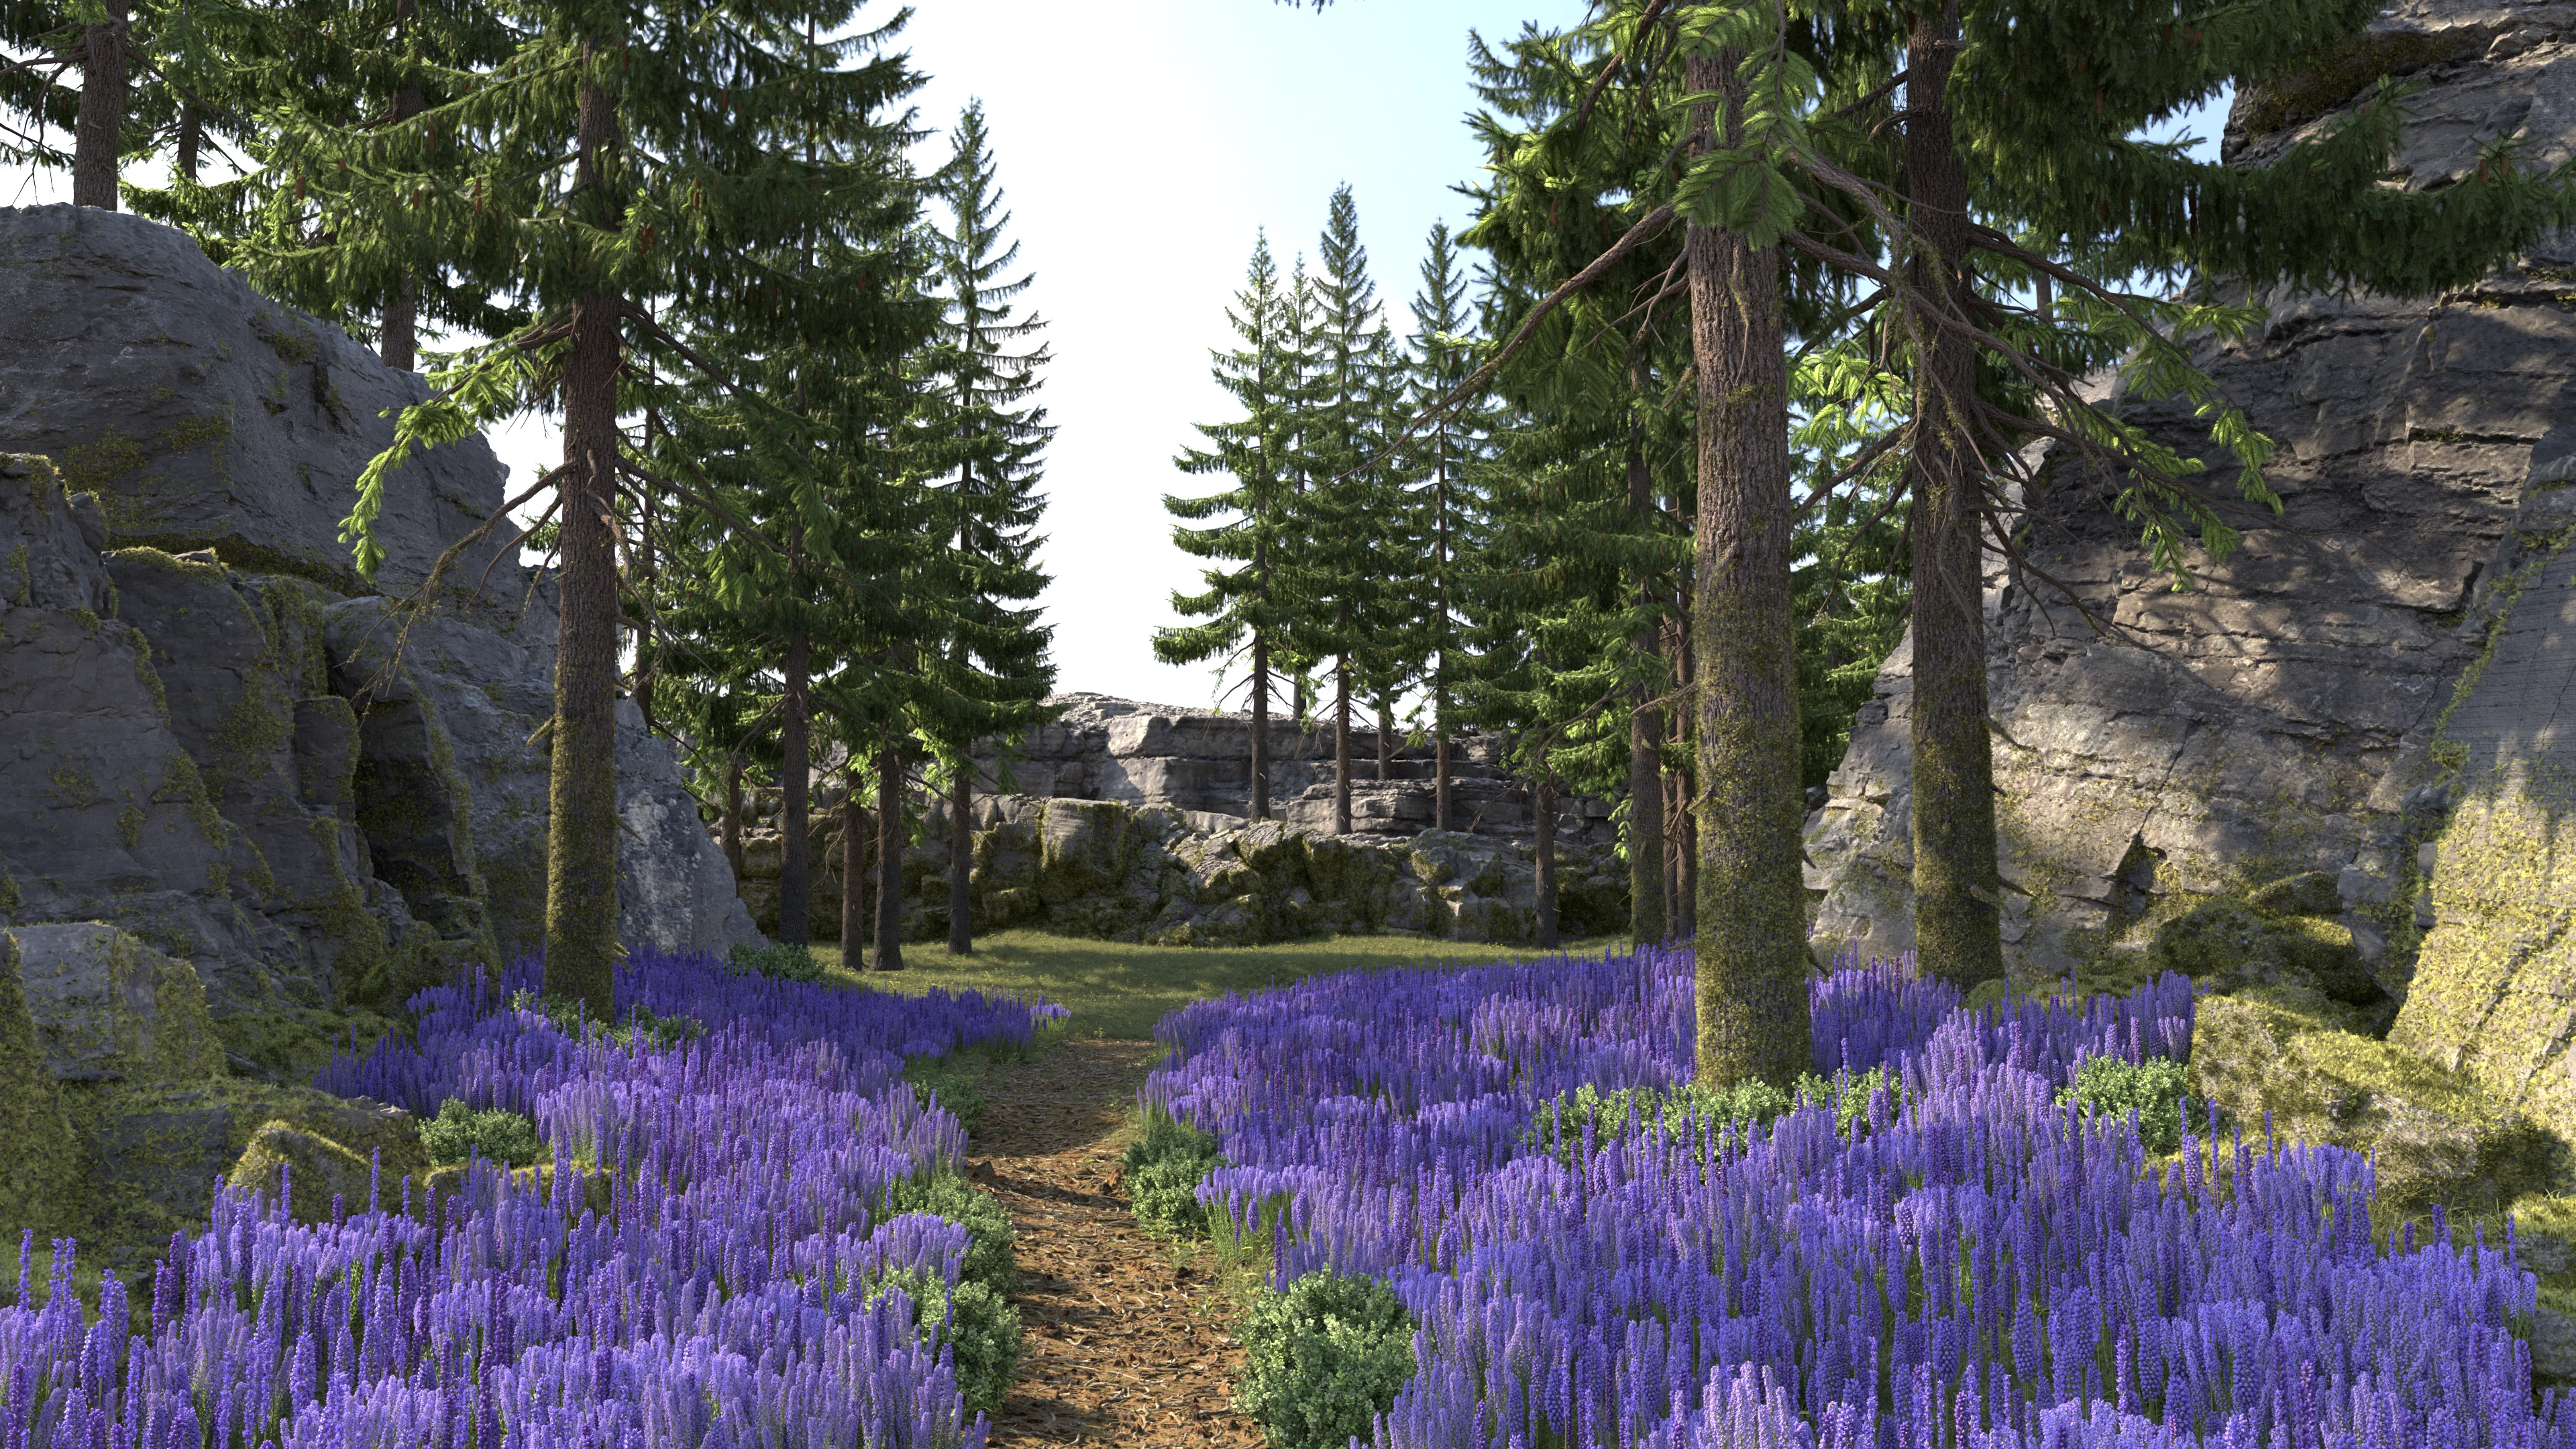
At this stage, with conifer trees and large rock formations, the scene was starting to remind me of trips to Yosemite (even though technically Yosemite’s conifers include pine, fir, and sequoia but notably not spruce). I’ve seen lupine blooms in Yosemite before, which struck me as really visually interesting since large fields of blue-purple flowers feel somewhat unusual and unexpected normally. So, to make the foreground in this scene more interesting than just a grassy plane, I added in a couple of layers of lupine flowers to make a purple lupine meadow. The lupine flowers are placed as a couple of different overlapping XGen descriptions, with varying clustering rules per description. I also carved a footpath through the grass and flowers by painting a simple density mask.
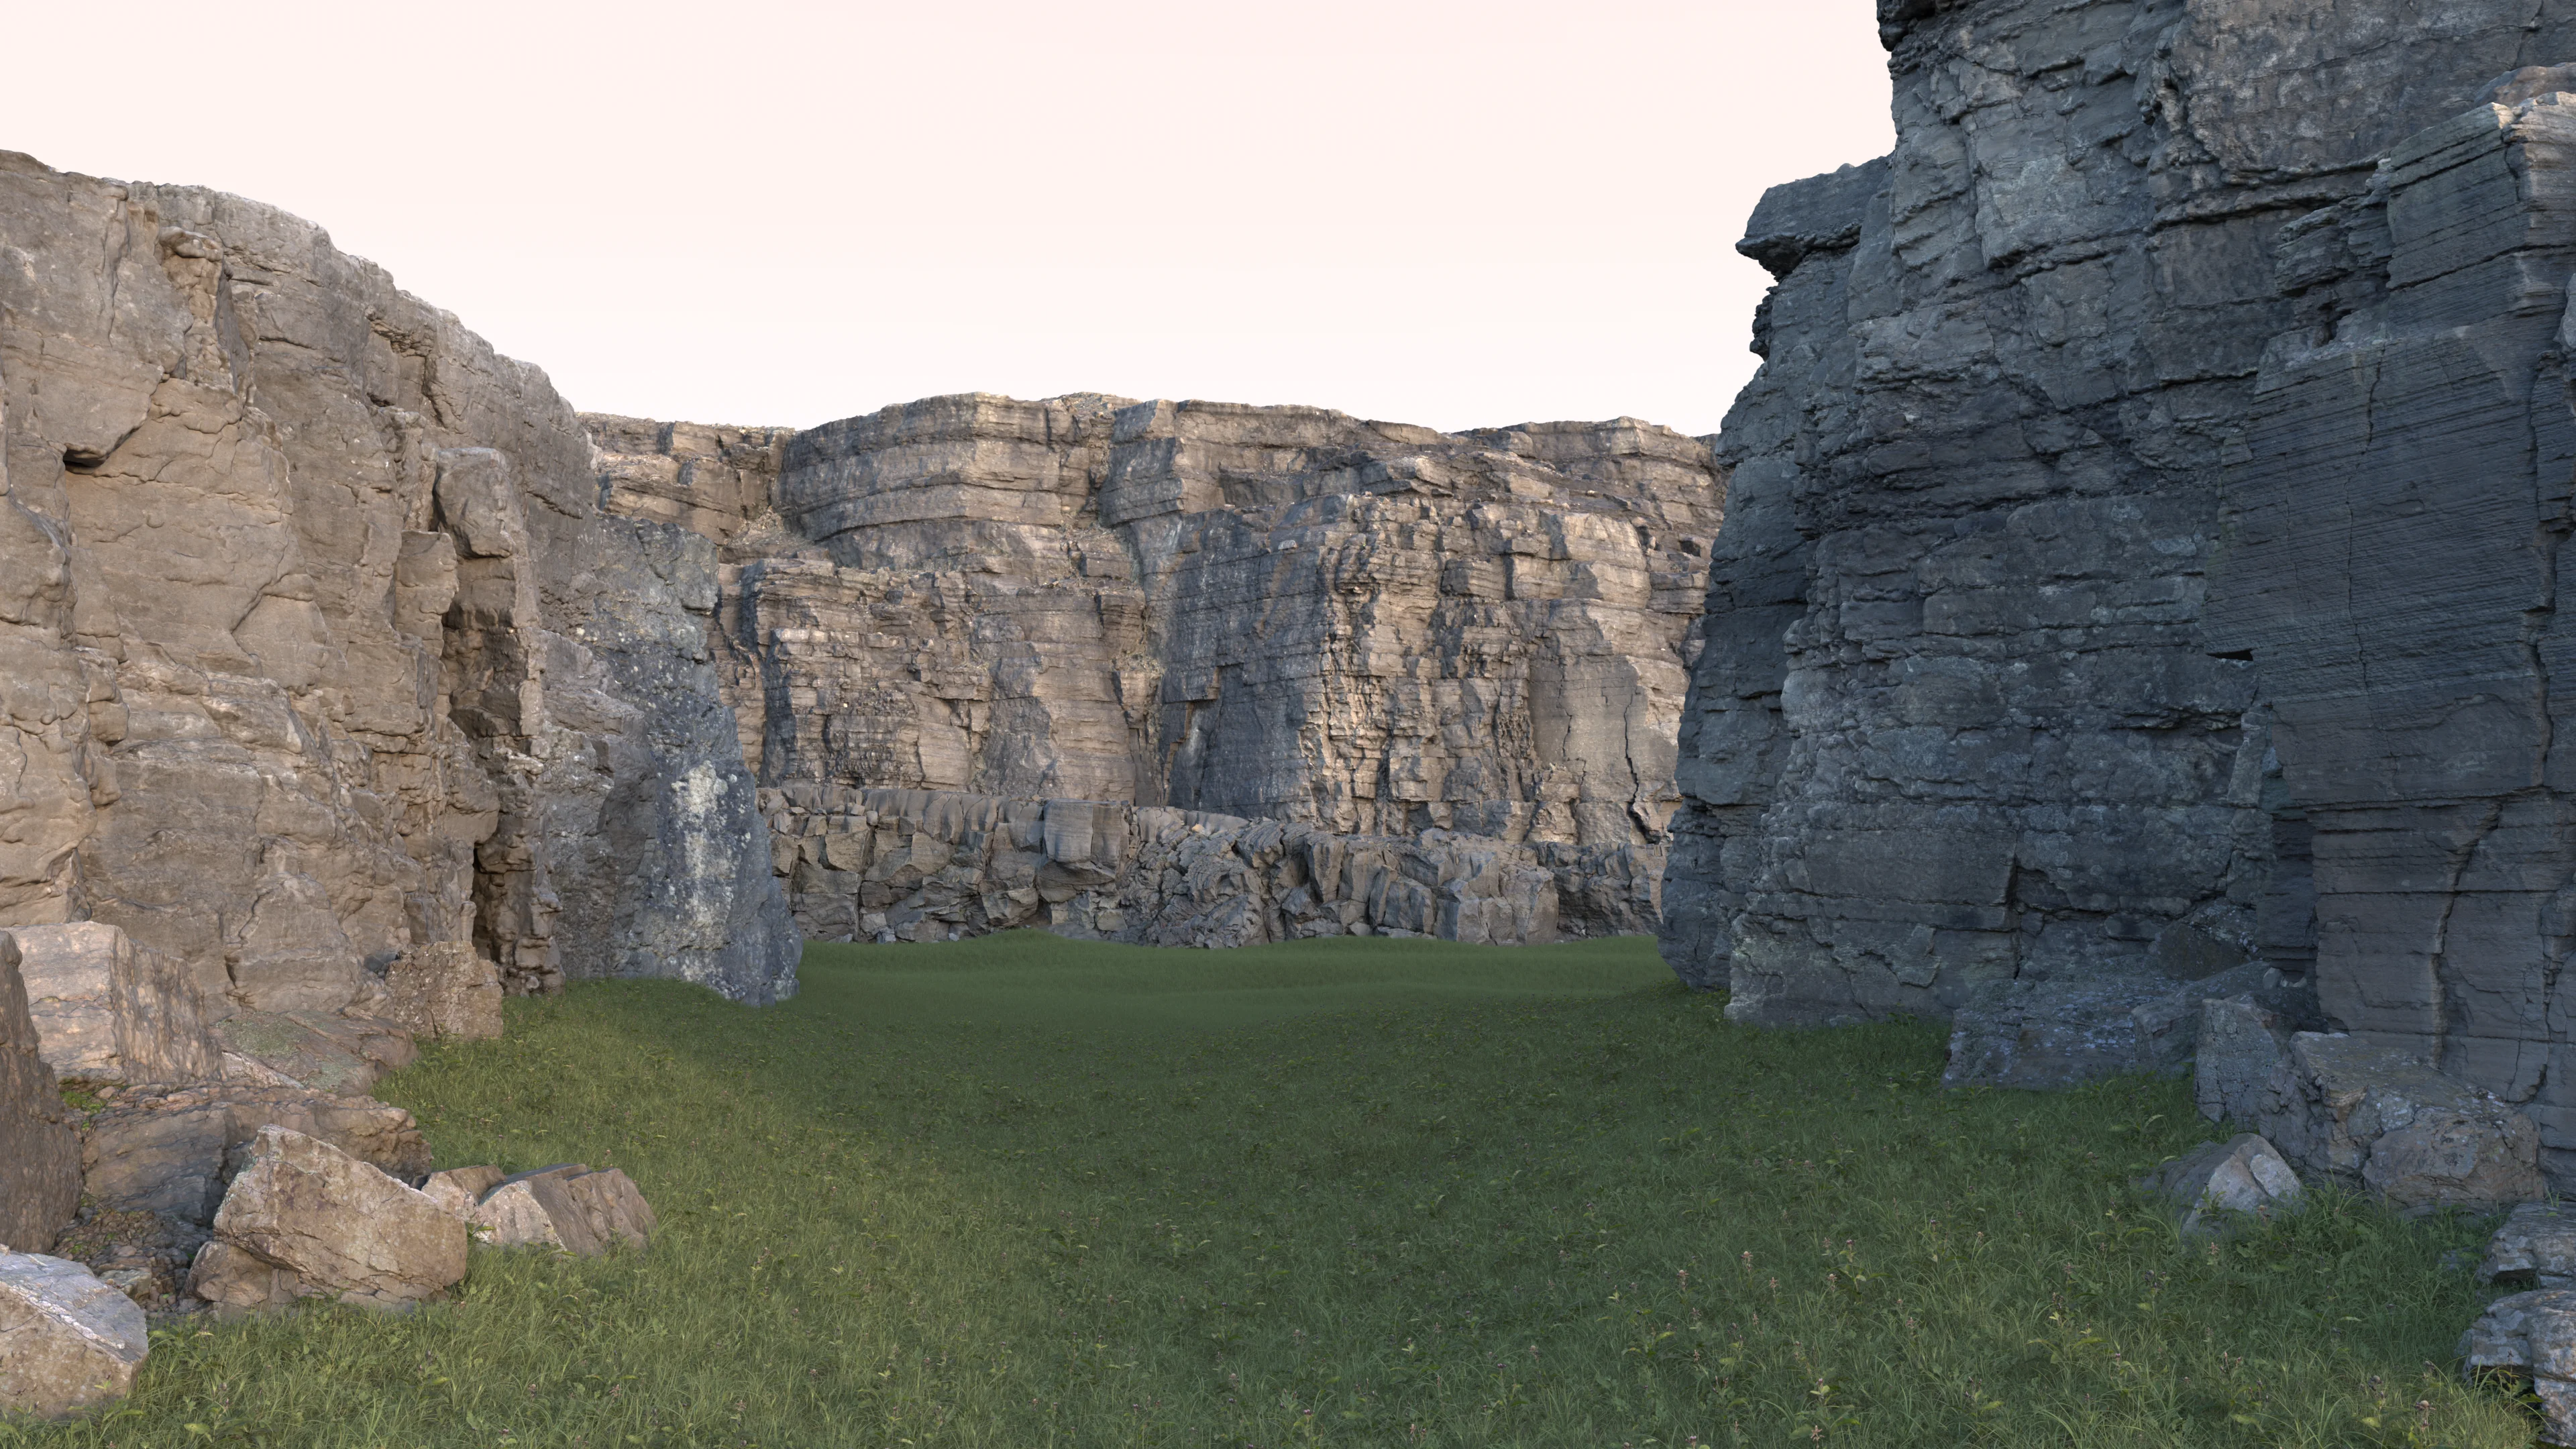
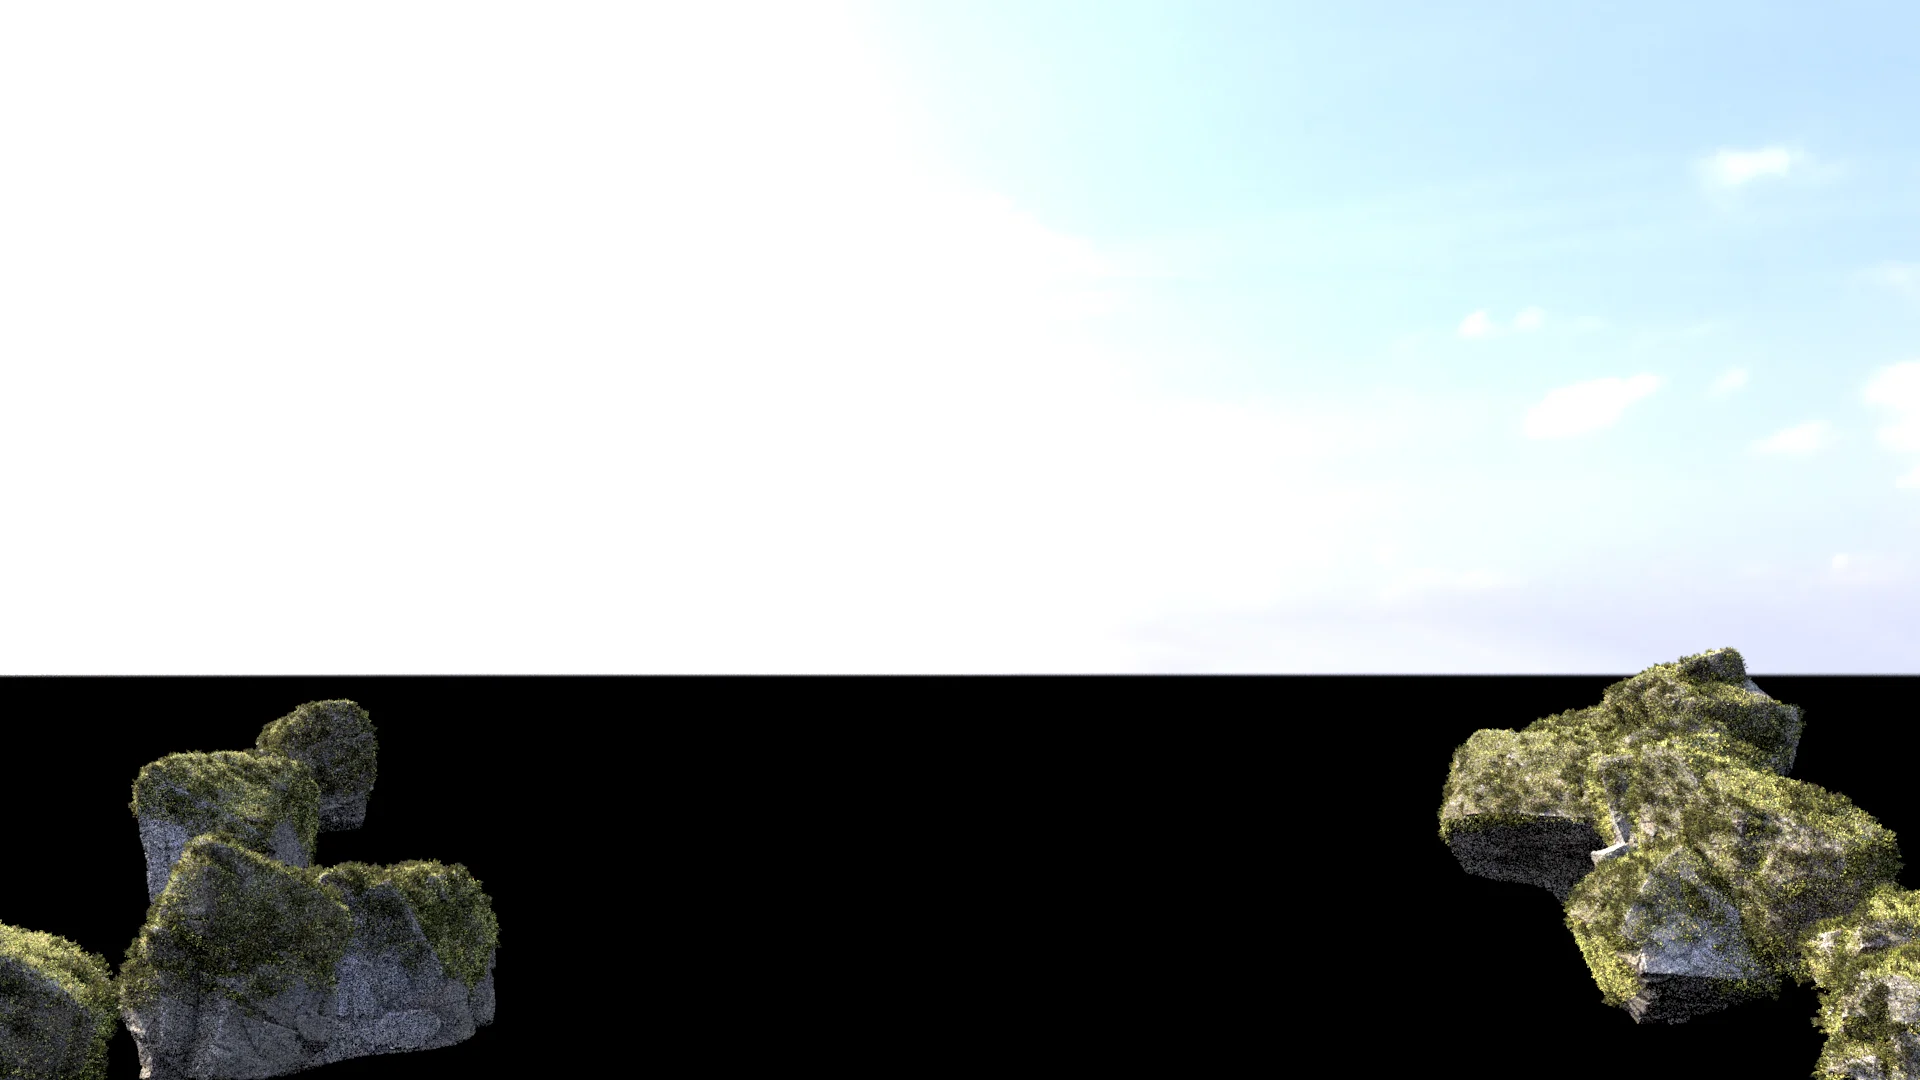
I also realized here that the overall massing of the scene was all vertical but in a horizontal framing, which was starting to make the scene feel claustrophobic to me. Having the rock formations be completely vertical also didn’t make sense to me for how they probably would have been formed in real life; a completely vertical cut through rock cliffs like that feels like it would have had to been man-made. So, I tried sloping the rock formations back to give more of an impression of a small valley or something that could have been carved glacially or by water erosion or something. Sloping the rock formations back also helped bring some more light into the foreground of the scene. Here is a comparison of what the scene looked like at this point with vertical rock formations versus sloped rock formations:
One nice thing about XGen Geometry Instancing is that it treats driving properties through painted masks as a first-class citizen, as opposed to the MASH toolset where using textures as masks is a lot more annoying than I feel like it should be. In my experience, MASH encourages procedural placement or hand placement using the MASH Placer tool over using painted masks to drive everything; using a painted mask only really works well with MASH’s World node, but the World node in turn doesn’t always play well with everything else in MASH’s toolkit; in this sense I really prefer how easy using painted masks is in XGen. However, in XGen, painted masks also come with a minor complication- one Disney-ism that remains in XGen to this day is that XGen expects painted masks to all be Ptex files, which means the masks either have to be made using a paint tool that natively supports Ptex, or means that masks created as regular UV textures need to be converted to Ptex. Within Disney Animation, which has a native Ptex workflow, this is not a problem at all, but in a vanilla Maya workflow in the outside world, this Ptex dependency adds some friction and an additional layer of file juggling to the XGen workflow if one is more used to a UV-based painting workflow.
Here is what the painted density mask for the footpath looks like in Maya’s viewport. Since leaving this mask pretty coarse was fine for the use case, I just painted it directly in Maya using the built-in simple surface paint tool:
Having just the lupine flowers and base grass looked kind of monotonous, so I also threw in some small shrubs here and there to help visually break up the fields of purple. In the areas where the groundplane show through because of the footpath, I also added several more layered XGen descriptions to scatter various small bits of ground debris that I pulled from Megascans; the debris includes things you’d expect from a conifer forest, such as sticks and twigs and clusters of dead conifer needles, in addition to some pebbles and small rocks and stuff.
With all of the debris on the groundplane, even as instanced geometry, the scene was starting to get really heavy to render, so as a small optimization I took the density mask for the footpath through the lupine flowers and grass and simply inverted it and applied it to the debris XGen descriptions. This way, there’s only debris where it’ll actually be visible. Putting all of this together got the scene to a point where I think the groundplane was looking pretty good:
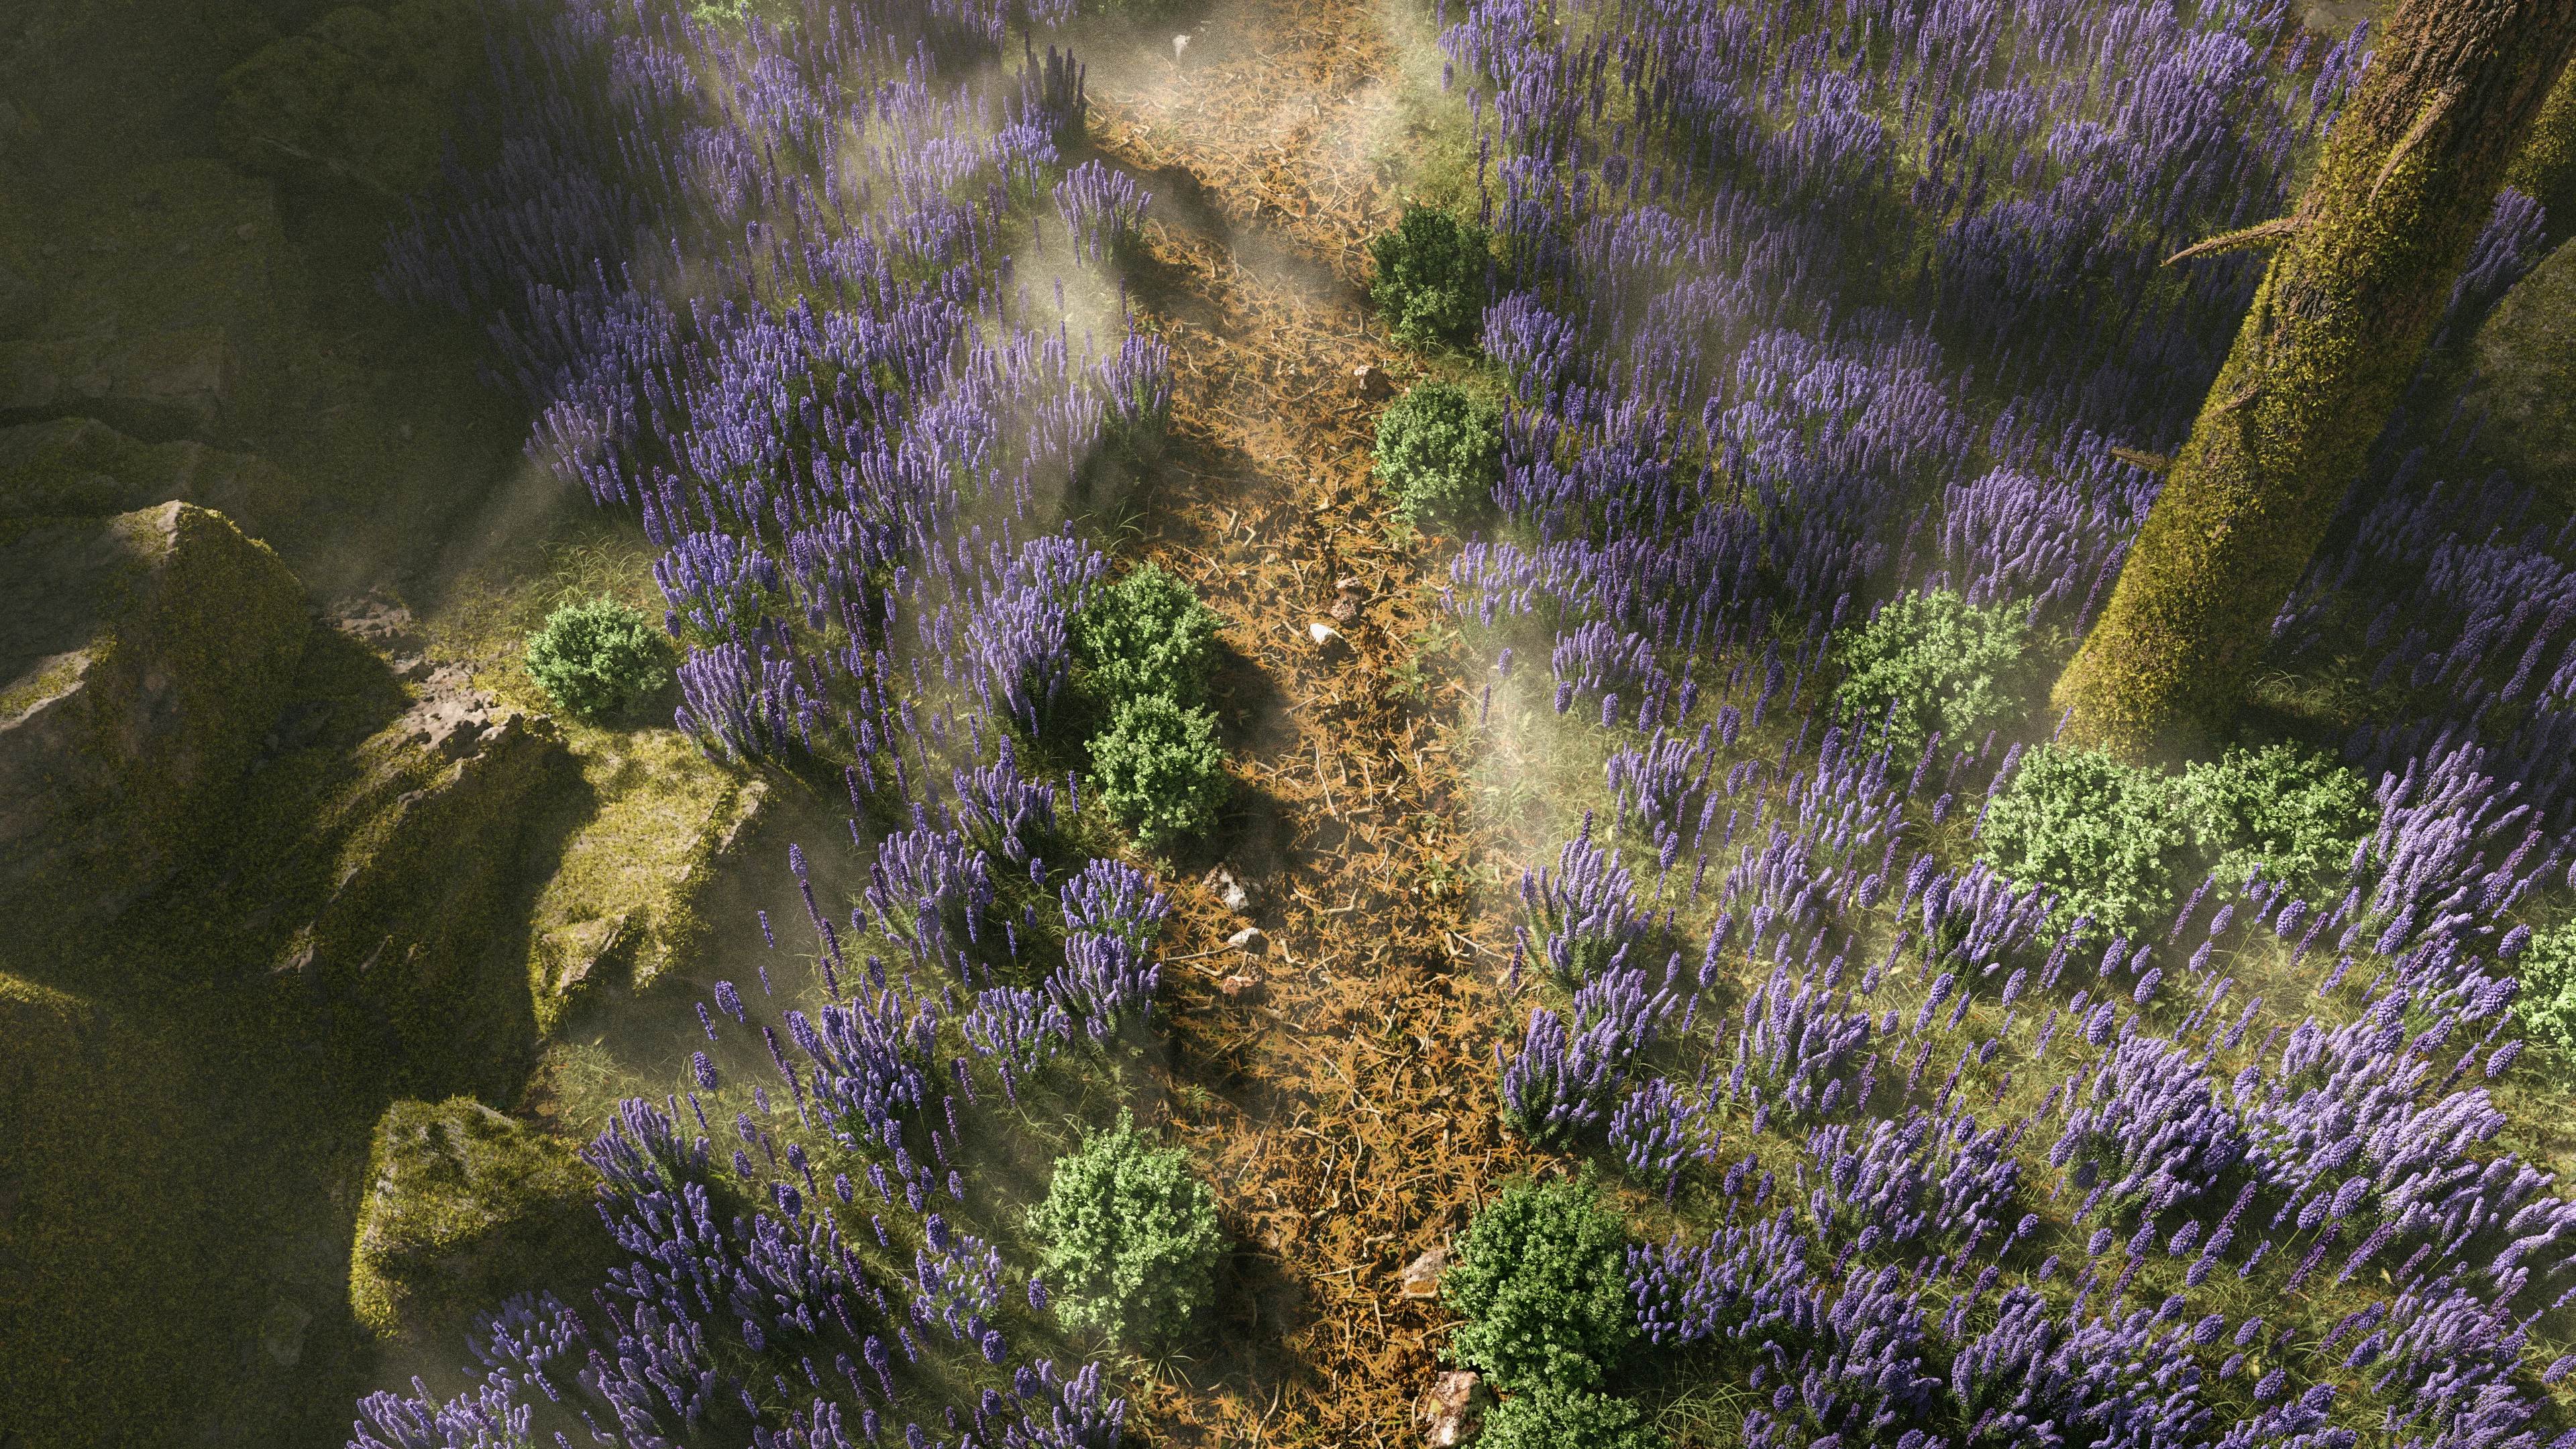
Here’s a top-down view of what all of the footpath debris looks like in the final version of the scene (I’ll get to the moss and volumes next). The nice thing about using instanced geometry instead of just adding decals to the groundplane texturing, or even adding displacement, is that the instanced geometry provides much more of a feeling of depth, especially in all of the areas where cavities and holes are visible under piles of dried needles:
Making Moss
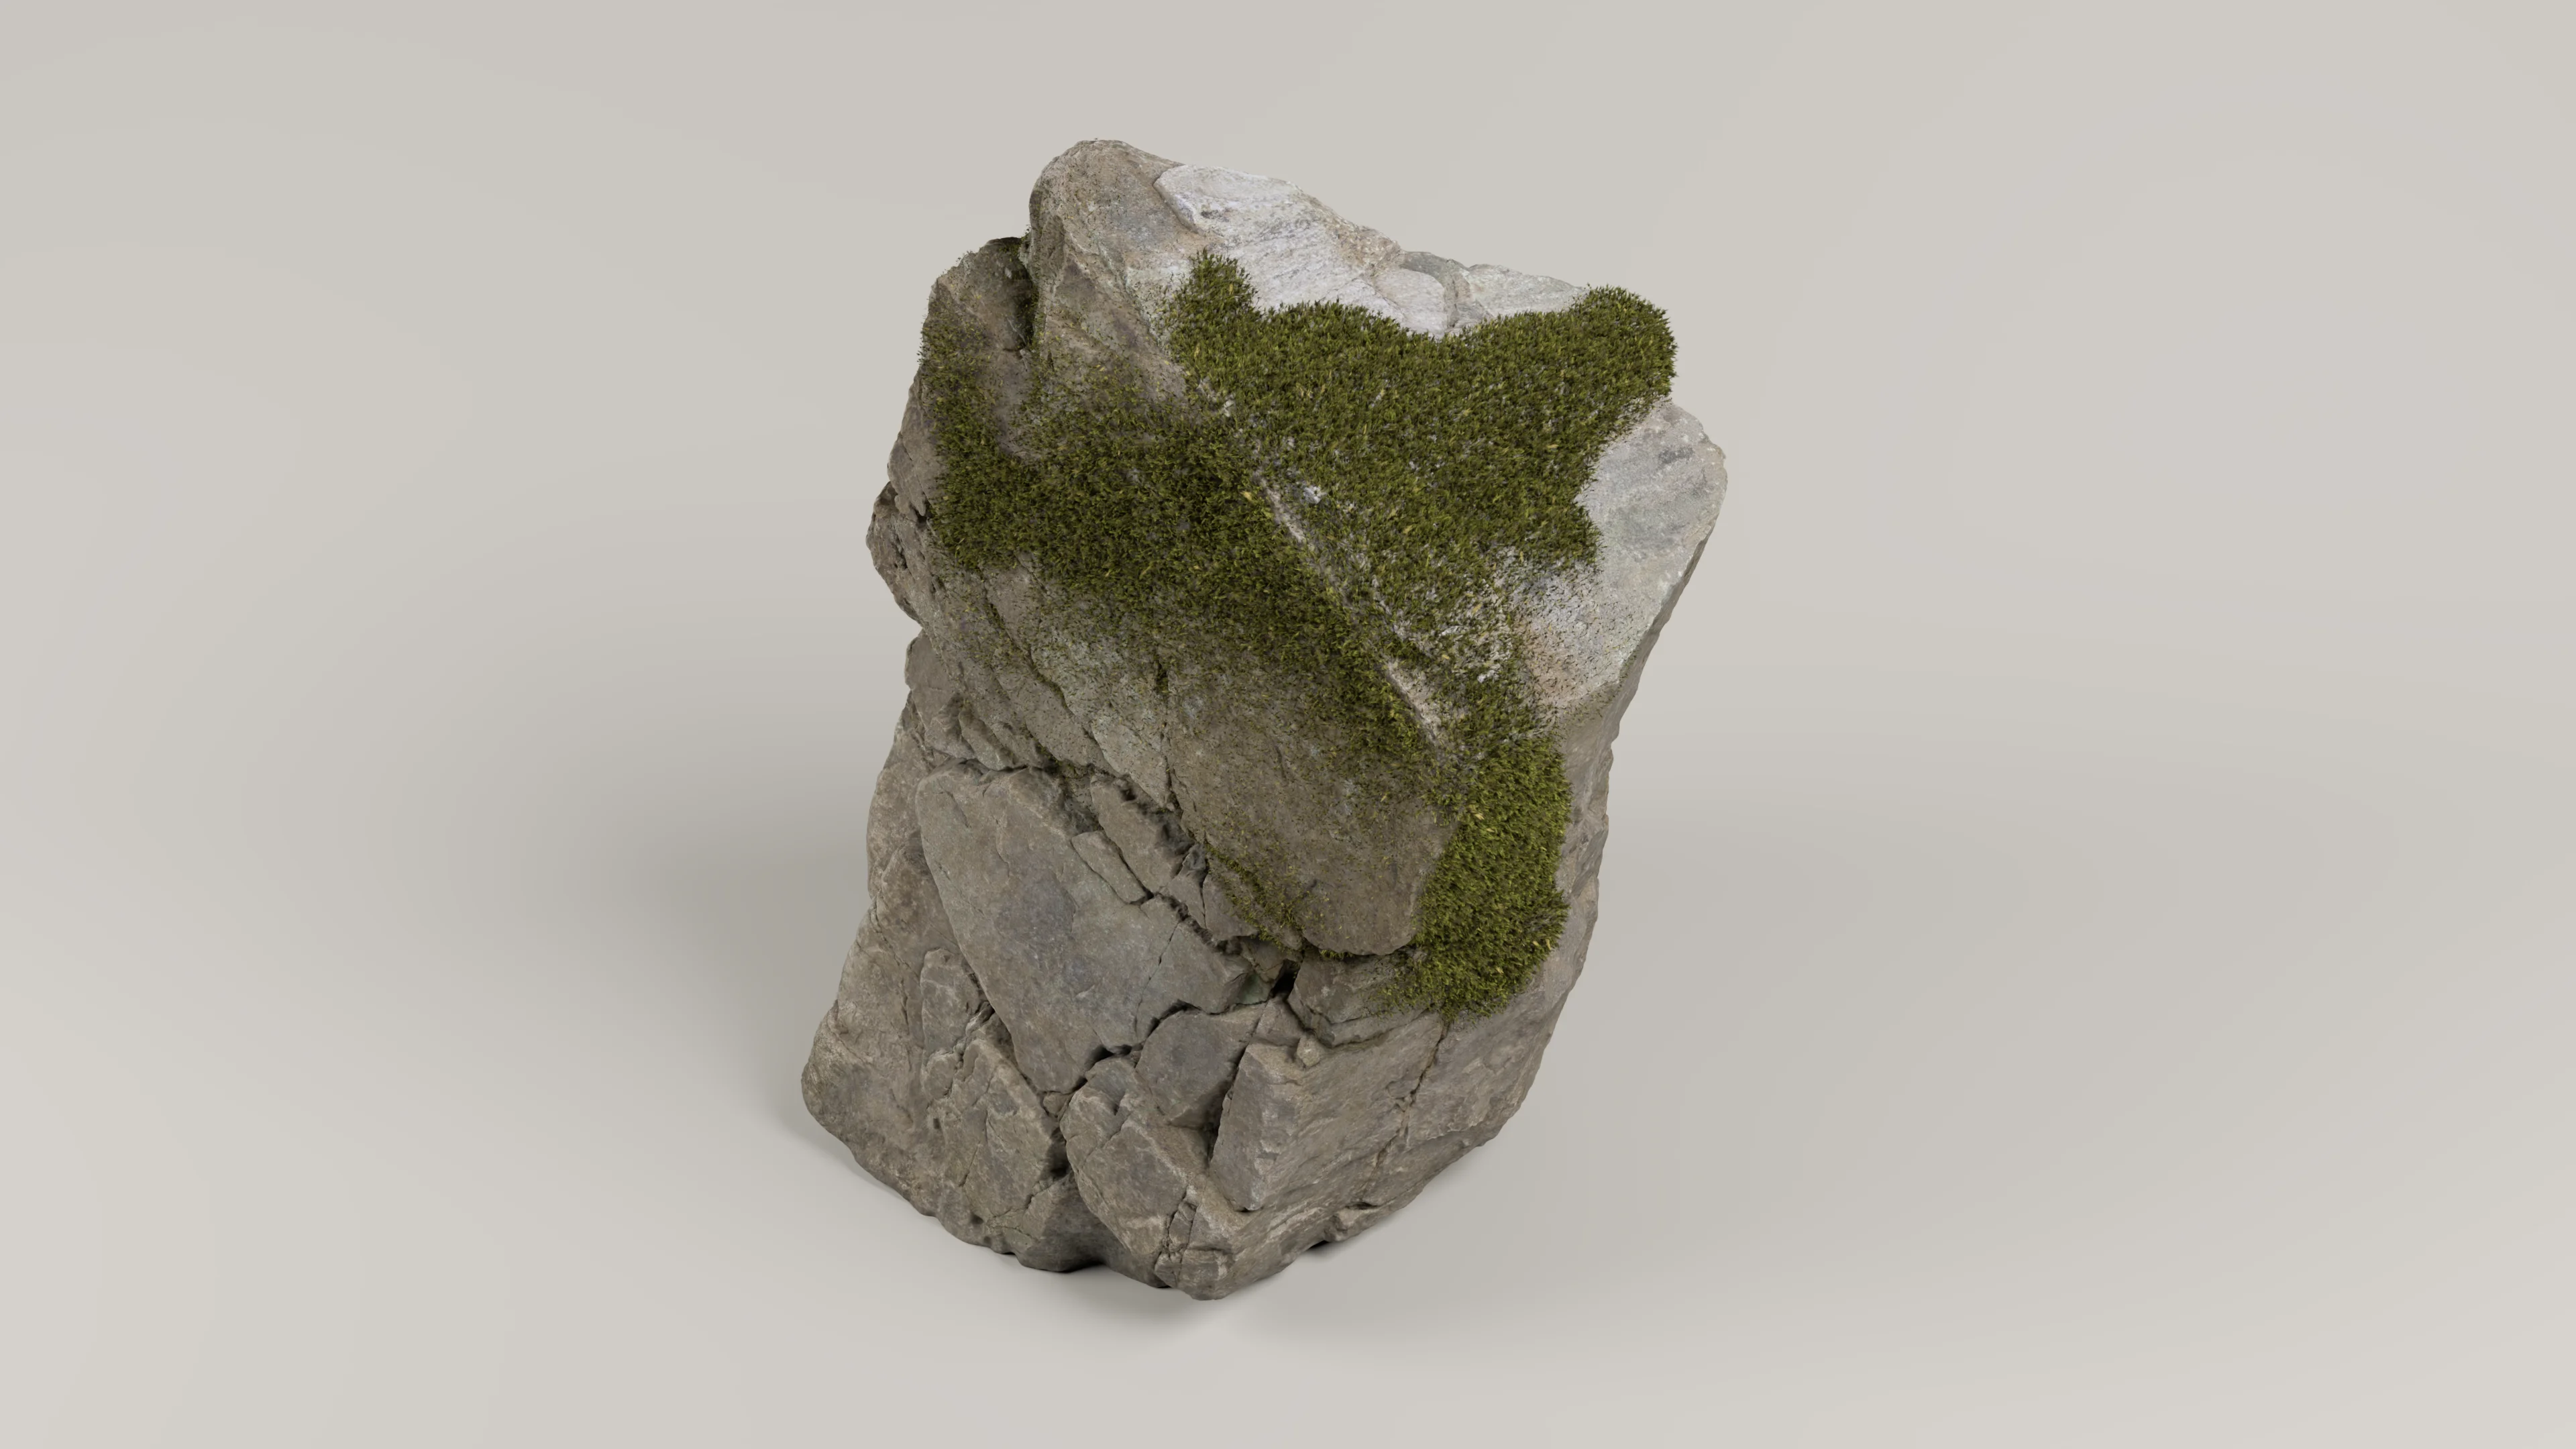
In order to add a bit more detail to the scene, I wanted to add moss to some of the tree trunks and rock formations and stuff. On the Woodville piece, the vast majority of the mossy surfaces in the scene are made using a purely textured approach, with only a small amount of geometric moss in specific places. For this scene, I wanted to move to a 100% geometry based moss approach. Geometry based moss simply holds up better close to camera, and even far away from camera, geometric moss with proper transluscency allows for much more realistic lighting responses completely automatically.
I made the pieces of moss by just grabbing a bunch of Megascans atlases of moss bits and cutting out each piece from each atlas as its own little card. The cards aren’t simple rectangles; each card is shaped to cut as closely to the actual moss shape as possible while still maintaining a very low triangle count. Using simple rectangular cards means that the vast majority of each card is actually going to be opacity mapped out, and in most raytraced renderers (including RenderMan), somewhat counter-intuitively we’d rather have a few more triangles to deal with in exchange for cutting down opacity map lookups. The reason is because triangle intersection using a BVH acceleration structure means that the runtime cost of intersecting N triangles is typically less than N times the cost of a single triangle, but having to either interrupt BVH traversal to evaluate an opacity map in-line or having to evaluate opacity as part of shading and then generate continuation rays for hits shading points where opacity is less than 1 is really expensive in the aggregate. Here’s what some of the moss cards looked like:
At rendertime each moss card is actually subdivided and displacement mapped as well, so the total number of triangles per moss card actually can end up being relatively high, allowing for more detail. This card-based technique produced several dozen unique pieces of moss, which when combined with some random hue shifts in the material and some flipping and scaling was more than enough to create the impression of tons of unique moss bits when instanced and scattered.
To get an initial sense of how well this approach would work, I did a small-scale test on a single rock before expanding to the whole scene, using a simplified version of the rock for the underlying geometry to grow the XGen descriptions from and using a simple density mask painted directly in Maya:
One small problem with using XGen Geometry Instancer with Megascans assets is that XGen can be somewhat difficult to use with super high-resolution meshes. The reason high-resolution meshes get tricky to use with XGen comes back to XGen needing to bind a patch to every face in the mesh; with a really high-resolution mesh, this can result in a ton of patches, and since Maya and XGen are not particularly well multithreaded in some operations, have a ton of patches in XGen can result in really slow update times as Maya loops over and updates all patches. XGen in Maya does have a multithreading option, but I found that even with this option enabled, really high-resolution meshes still bogged down instance generation a lot. So, my workaround was to take all of the meshes that I wanted to grow moss on and create highly decimated versions to serve as base geometry for XGen.
Below is a comparison of what the full-resolution geometry that I wanted moss on looks like in the viewport, versus the decimated version of that geometry for XGen. Note that the decimated XGen base geometry obviously isn’t visible in the final render; XGen allows for seprarately hiding the underlying base geometry versus hiding the generated instances.
For the moss density masks, I reached for Substance Painter instead of just painting in Maya using the basic built-in paint toolset. Painting the masks in Substance Painter made getting in nice bits of detail and complexity much easier. In order to make the Substance Painter workflow slightly easier, I also re-UV’d the decimated meshes to try to reduce the number of different UV islands; this step was much easier to do on low-resolution decimated meshes than it would have been on the full-resolution geometry!
Here’s what the painted masks for the “hero” foreground tree trunks look like in Substance Painter:
In order to use UV textures as masks in XGen, the textures have to be converted to Ptex. Maya’s paint tool actually has functionality for this; when using the paint tool, there’s an option to save and load from UV textures, which XGen then converts to Ptex upon hitting the map save button in the XGen UI.
I also used Substance Painter to paint the moss density masks for all of the rock formations and cliff walls. The viewport screenshot shows that the final resolution of the density masks actually isn’t that high, but in this case that wound up being completely okay:
One downside of using low-resolution decimated geometry as the base to grow XGen instances from while keeping high-resolution geometry for rendering is that there can be mismatches between where XGen instances are and where the high-resolution surface is; this mismatch means instances can either float in space or be embedded too far down in the high-resolution surface. XGen Geometry Instancer allows for specifying a displacement map on the base geometry to help correct for this, but in this case I found that the mismatch didn’t really matter. To address floating geometry I just applied a universal offset back along the surface normal, and for something like moss, pieces being embedded too far down in the high-resolution surface just look like shorter pieces of moss.
Here is a test render of what the moss looks like on just the smaller foreground rocks, which I did to confirm that at least for this use case, mismatches between the low-resolution surface used for XGen and the high-resolution render surface weren’t important:
Rendering everything together at this point produced the following image; things were starting to look pretty good at this point! I think the moss really helps with adding in a ton of additional detail, which in turn makes the whole scene look and feel more believable. In retrospect I suppose I should have adjust the moss so that it only grows in areas that stay in the shade longer, but even without taking that additional real-world factor into account, I think the moss looks pretty convincing:
This scene really shows the importance of having a robust instancing system in a production renderer- with all of the XGen instances added in, the scene at this stage took up about 50GB of memory in RenderMan for geometry alone, but 50GB is actually not too bad when considering that the total number of visible triangles is around a billion. According to RenderMan’s stats breakdown, of that 50GB of geometry memory, around 33GB is used just for storing instancing information! Most of the triangles just belong to instanced geometry, which is crucial to keeping geometry memory under control.
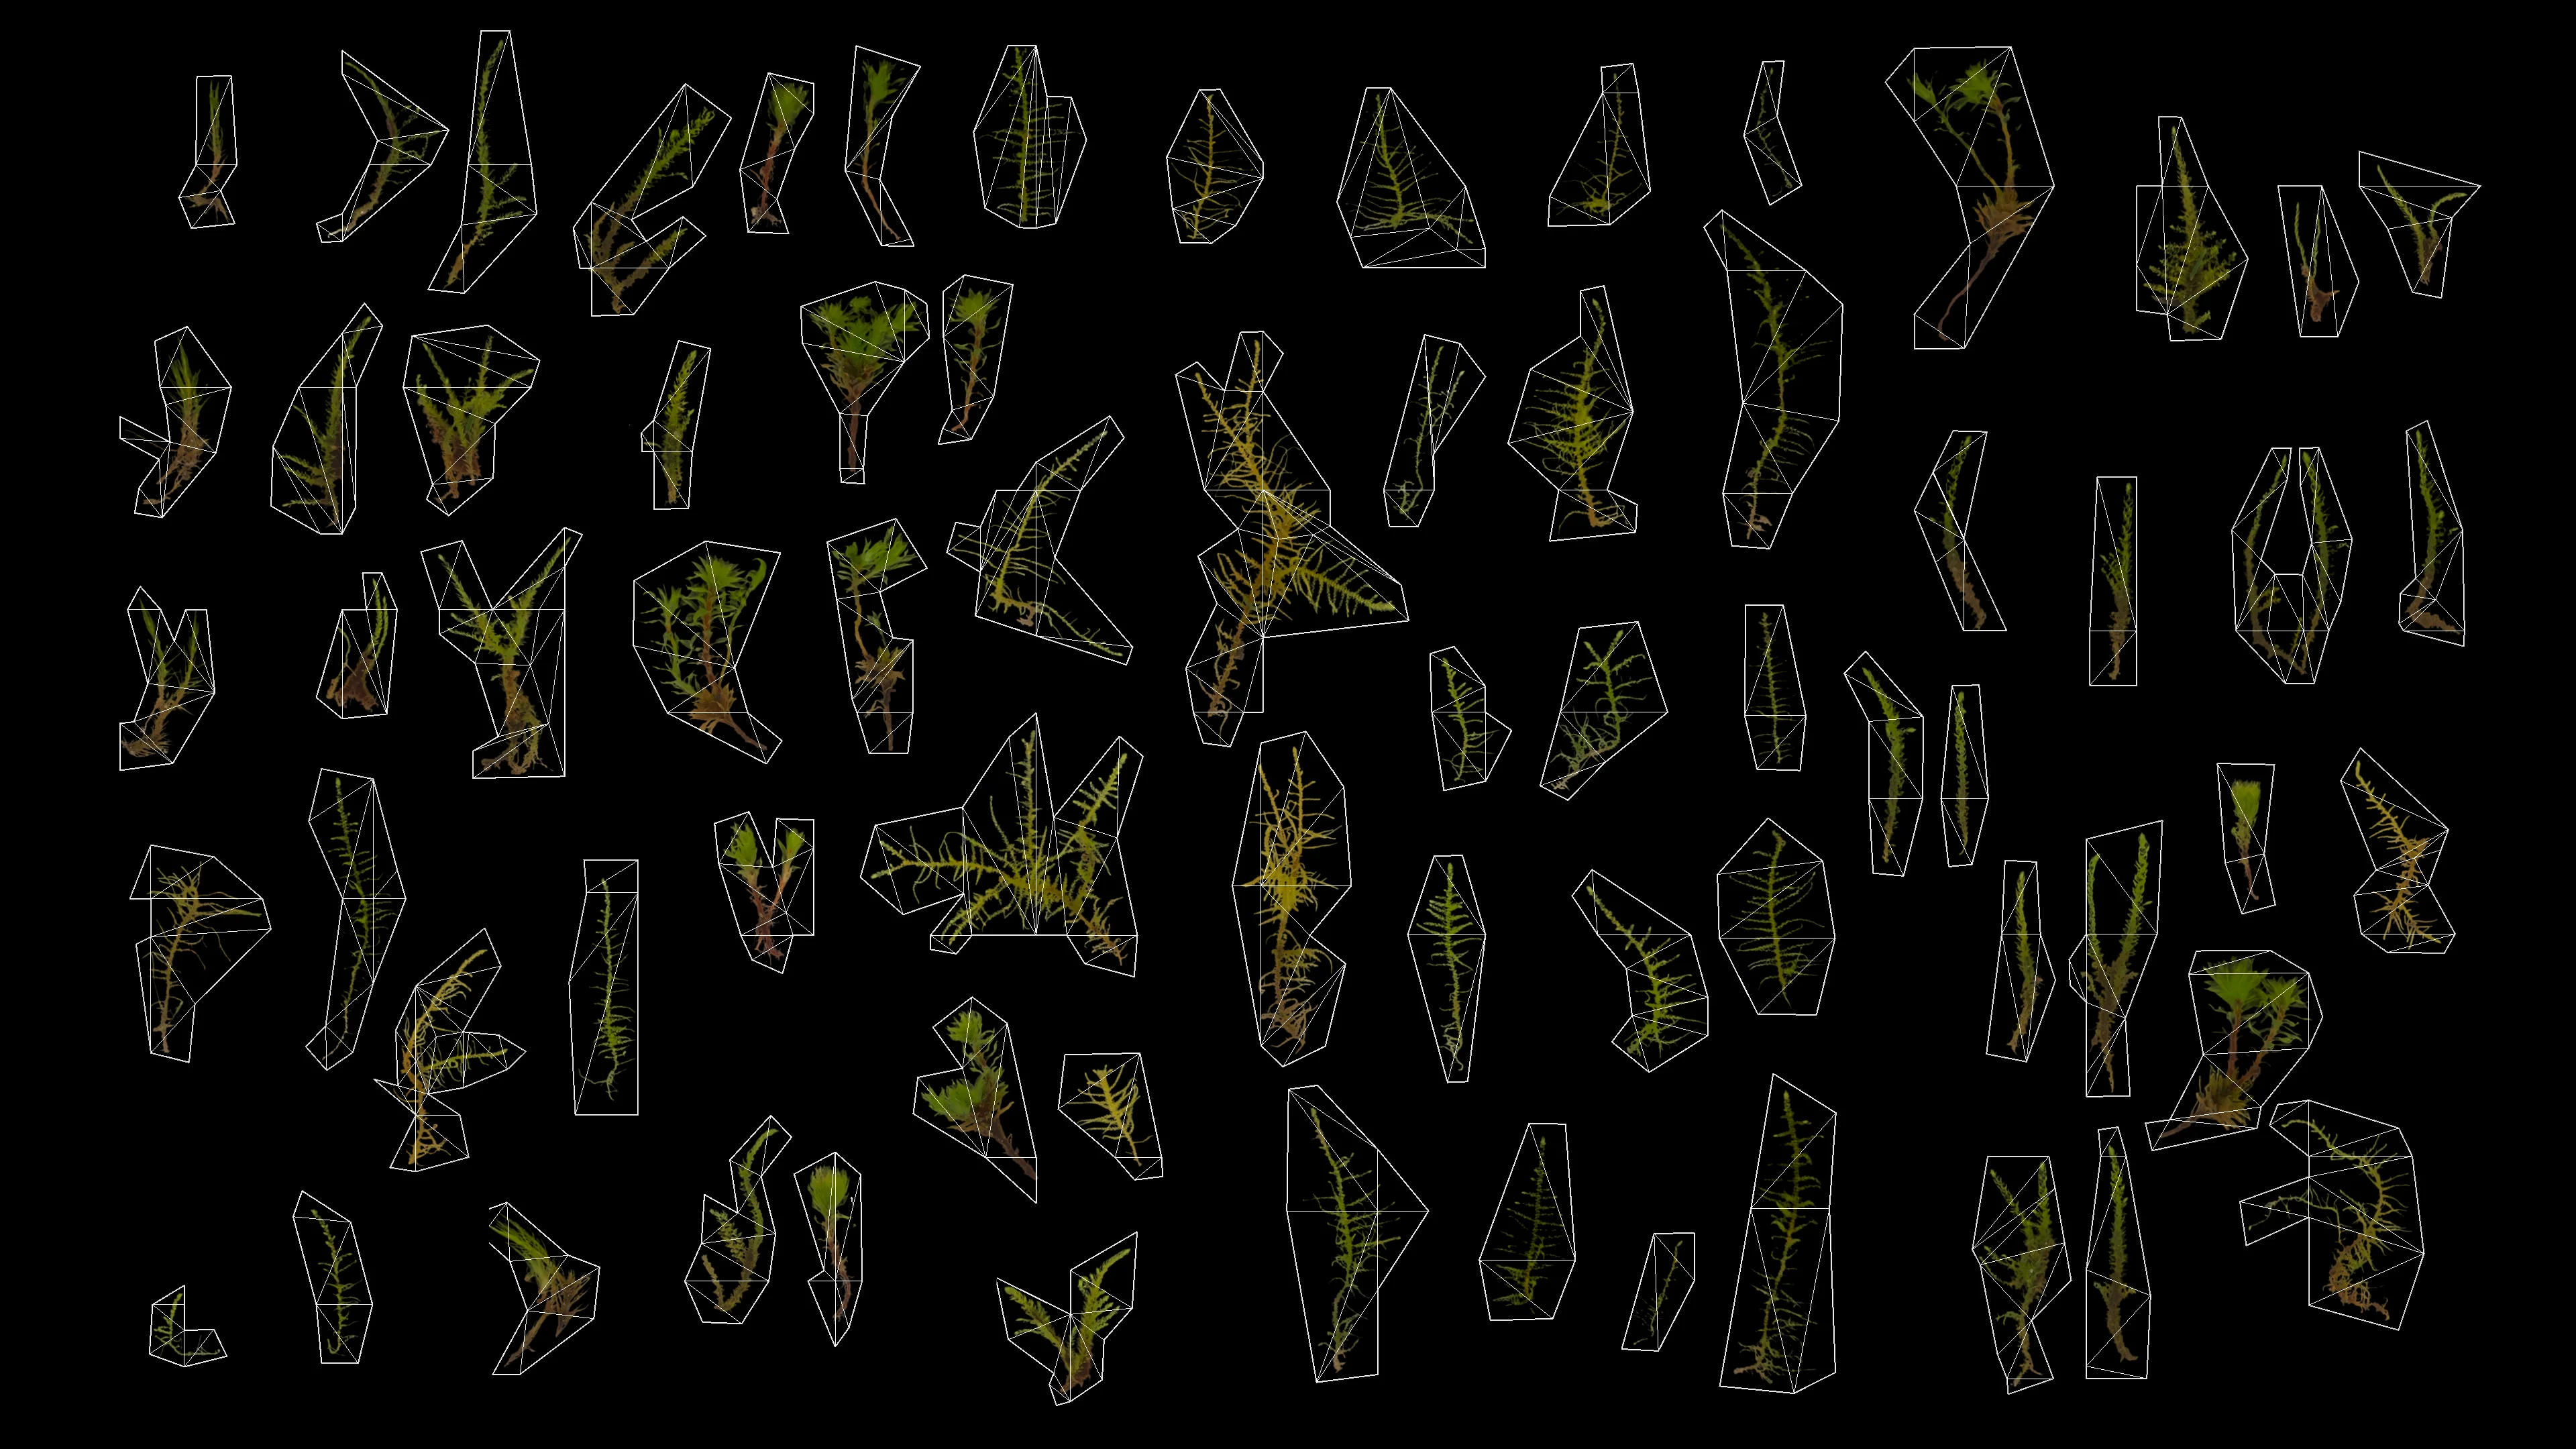
I ran some analytics to count up the total number of XGen instances (debris, grass, lupine flowers, and moss) in this scene; the total tally is 11,433,11. Here’s a comparison of what the final viewport looks like with only non-instanced geometry, and with every single XGen instance drawn as a blue bounding box on top:
The original stated goal of this project was to learn to create forest detail that could hold up well when viewed close up, but admittedly the closest tree in the final composition for this project is only in the mid-ground at best. I wanted to see how ell the moss would hold up when viewed closer, so after I finished the rest of the project, I set up an alternate camera much closer up to one of the trees. Here’s what the final version of the scene looks like with the alternate close-up camera. It’s far from perfect; in order to really look convincing this close up, I think the moss actually needs to be even smaller and even denser, but at least at a glance I think it does an okay job of holding up:
Filling out the Clearing
To finish building the scene, I wanted to put something in the clearing that the footpath leads to. Because I started this project with no real plan whatsoever, I was a bit stumped at this point what to put in the clearing! One initial idea I played with was throwing in a hot air balloon- I figured that a hot air balloon could provide a visually interesting splash of color into the background. I actually fully carried out this idea, including adding in some emissive volume flames for the hot air balloon’s burners. I also filled out the background with some more trees:
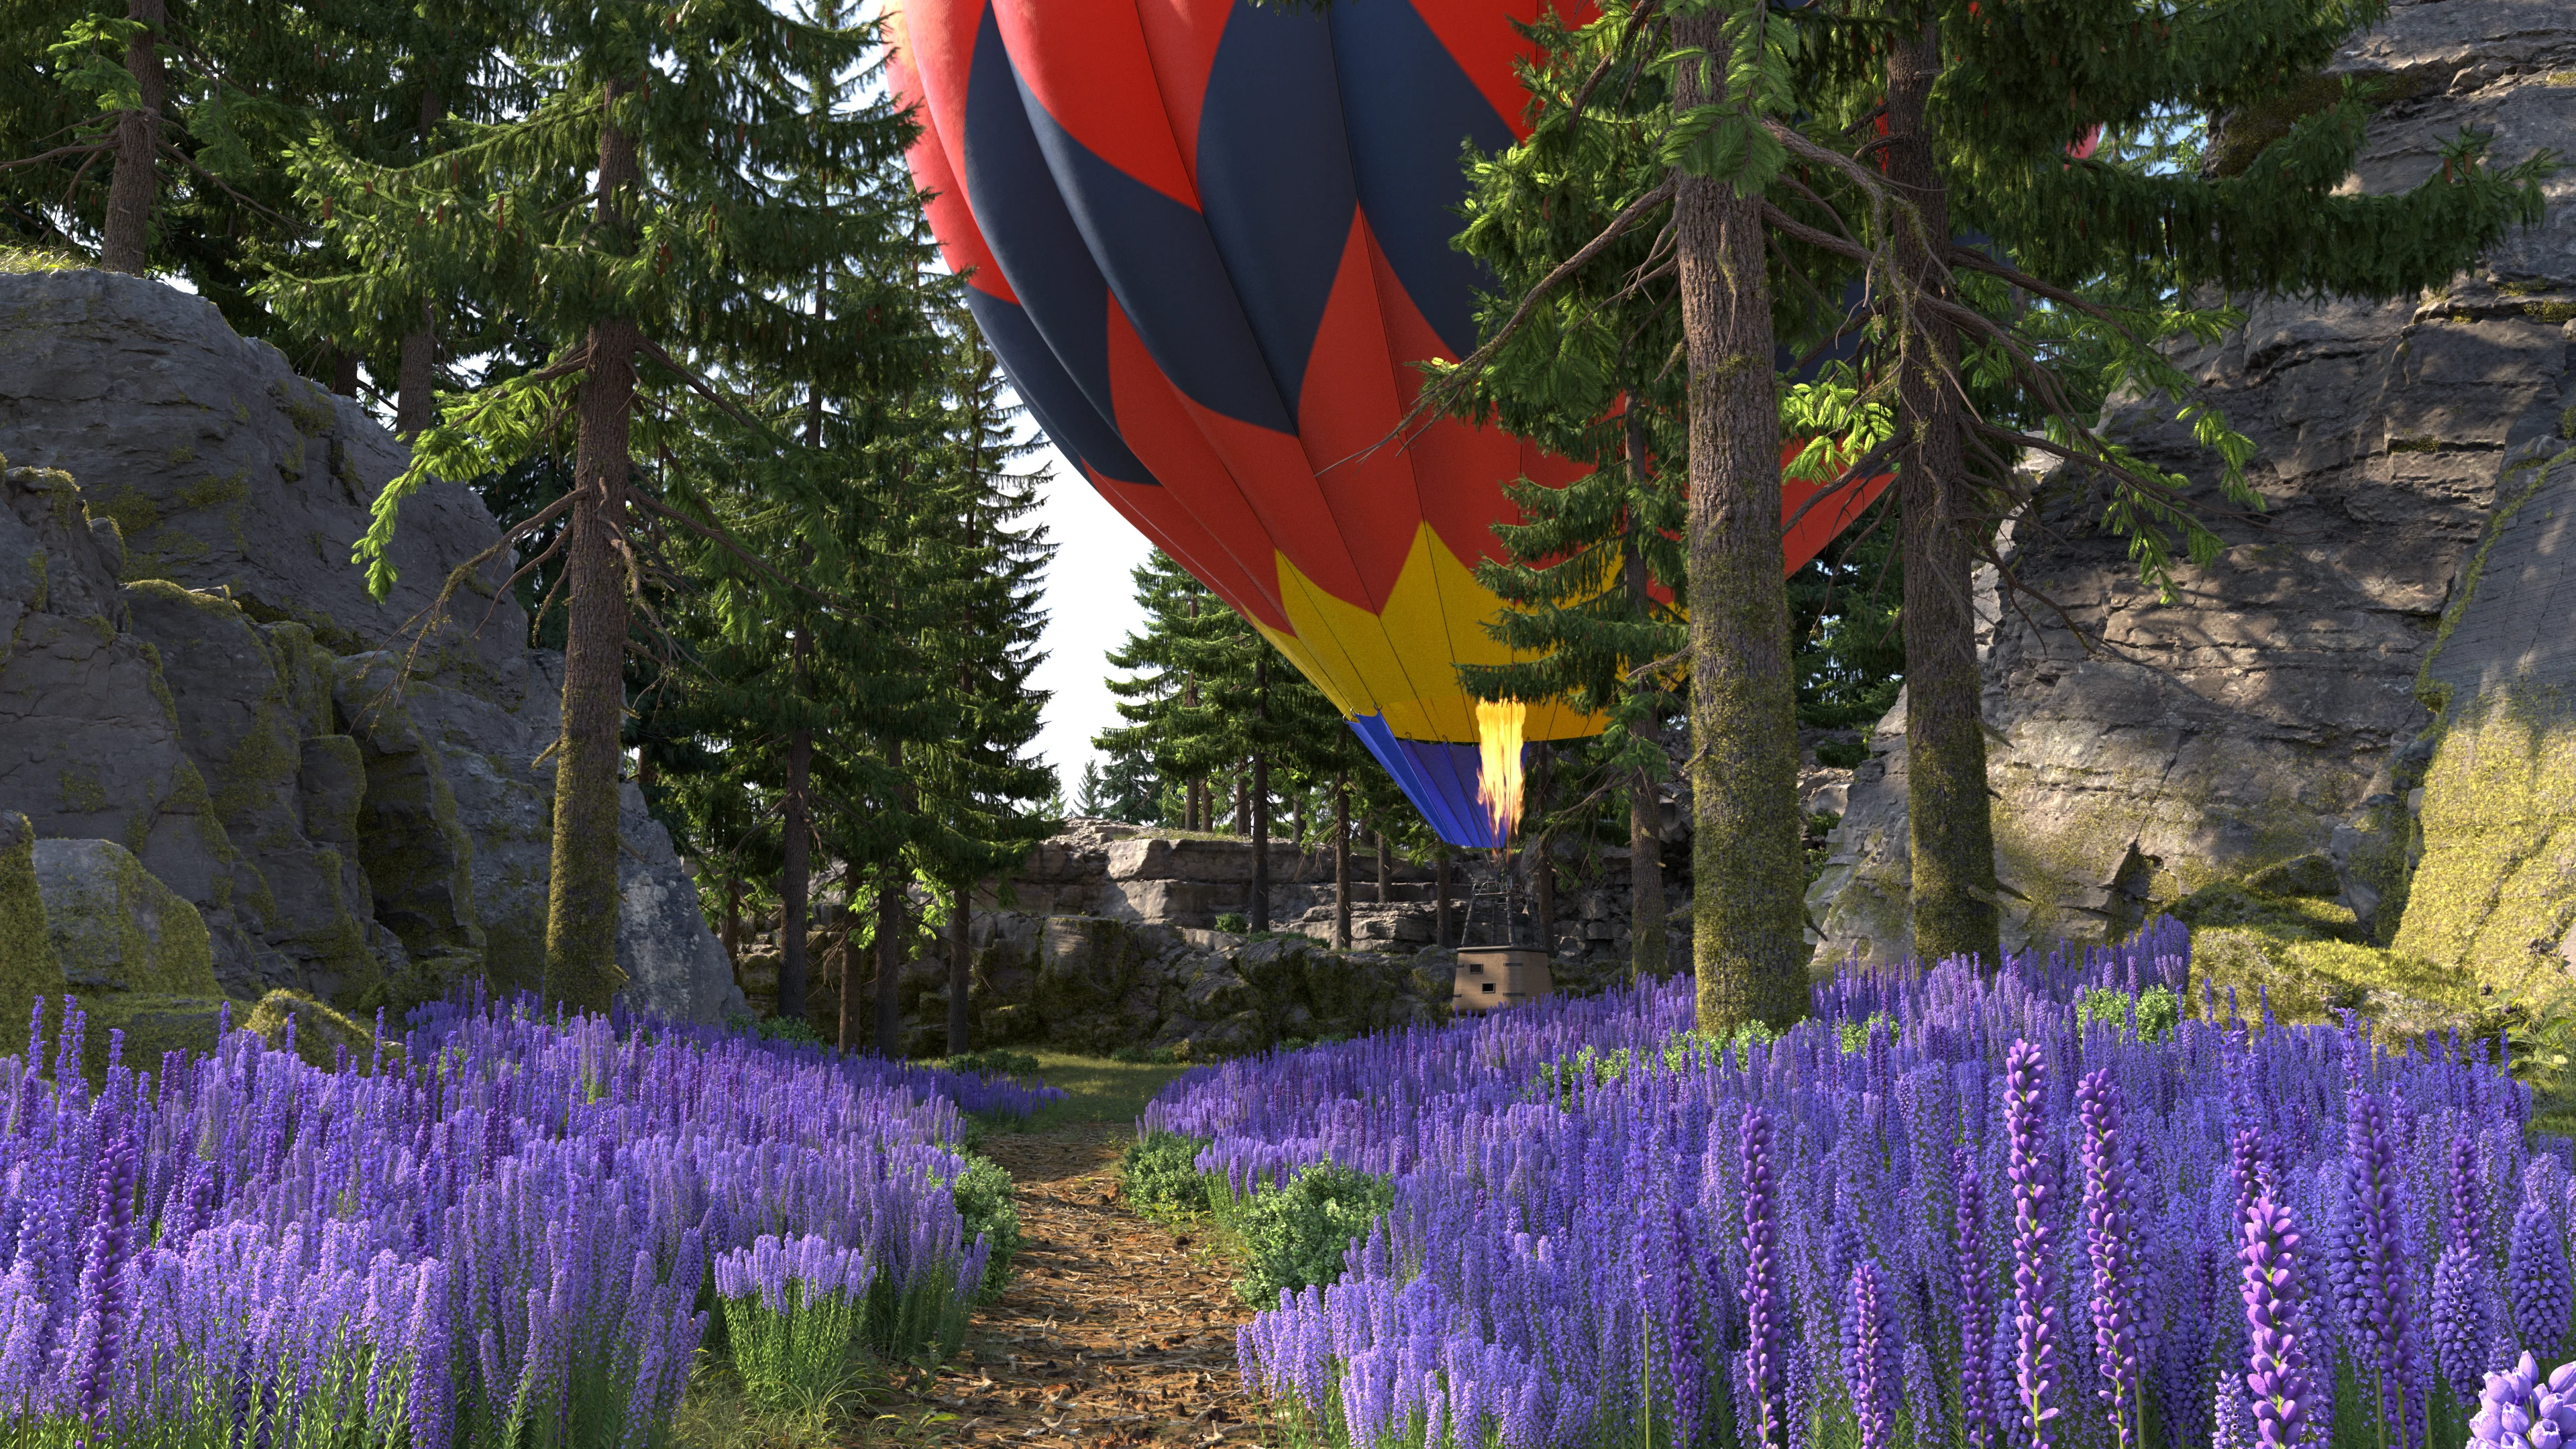
While I think the hot air balloon concept wasn’t the worse idea, I decided against it after seeing the hot air balloon fully in-context with the rest of the scene. Visually the balloon stood out, but I felt that it stood out too much and distracted from the overall composition. Also, in terms of the internal logic of the scene’s world-building, I thought that the balloon didn’t make a whole lot of sense- the clearing is pretty small, which when combined with all of the surrounding tall trees, makes for a hazardous landing site for a hot air balloon! I moved on to trying to find something more appropriate to the scene both visually and logically. I did keep the additional trees though.
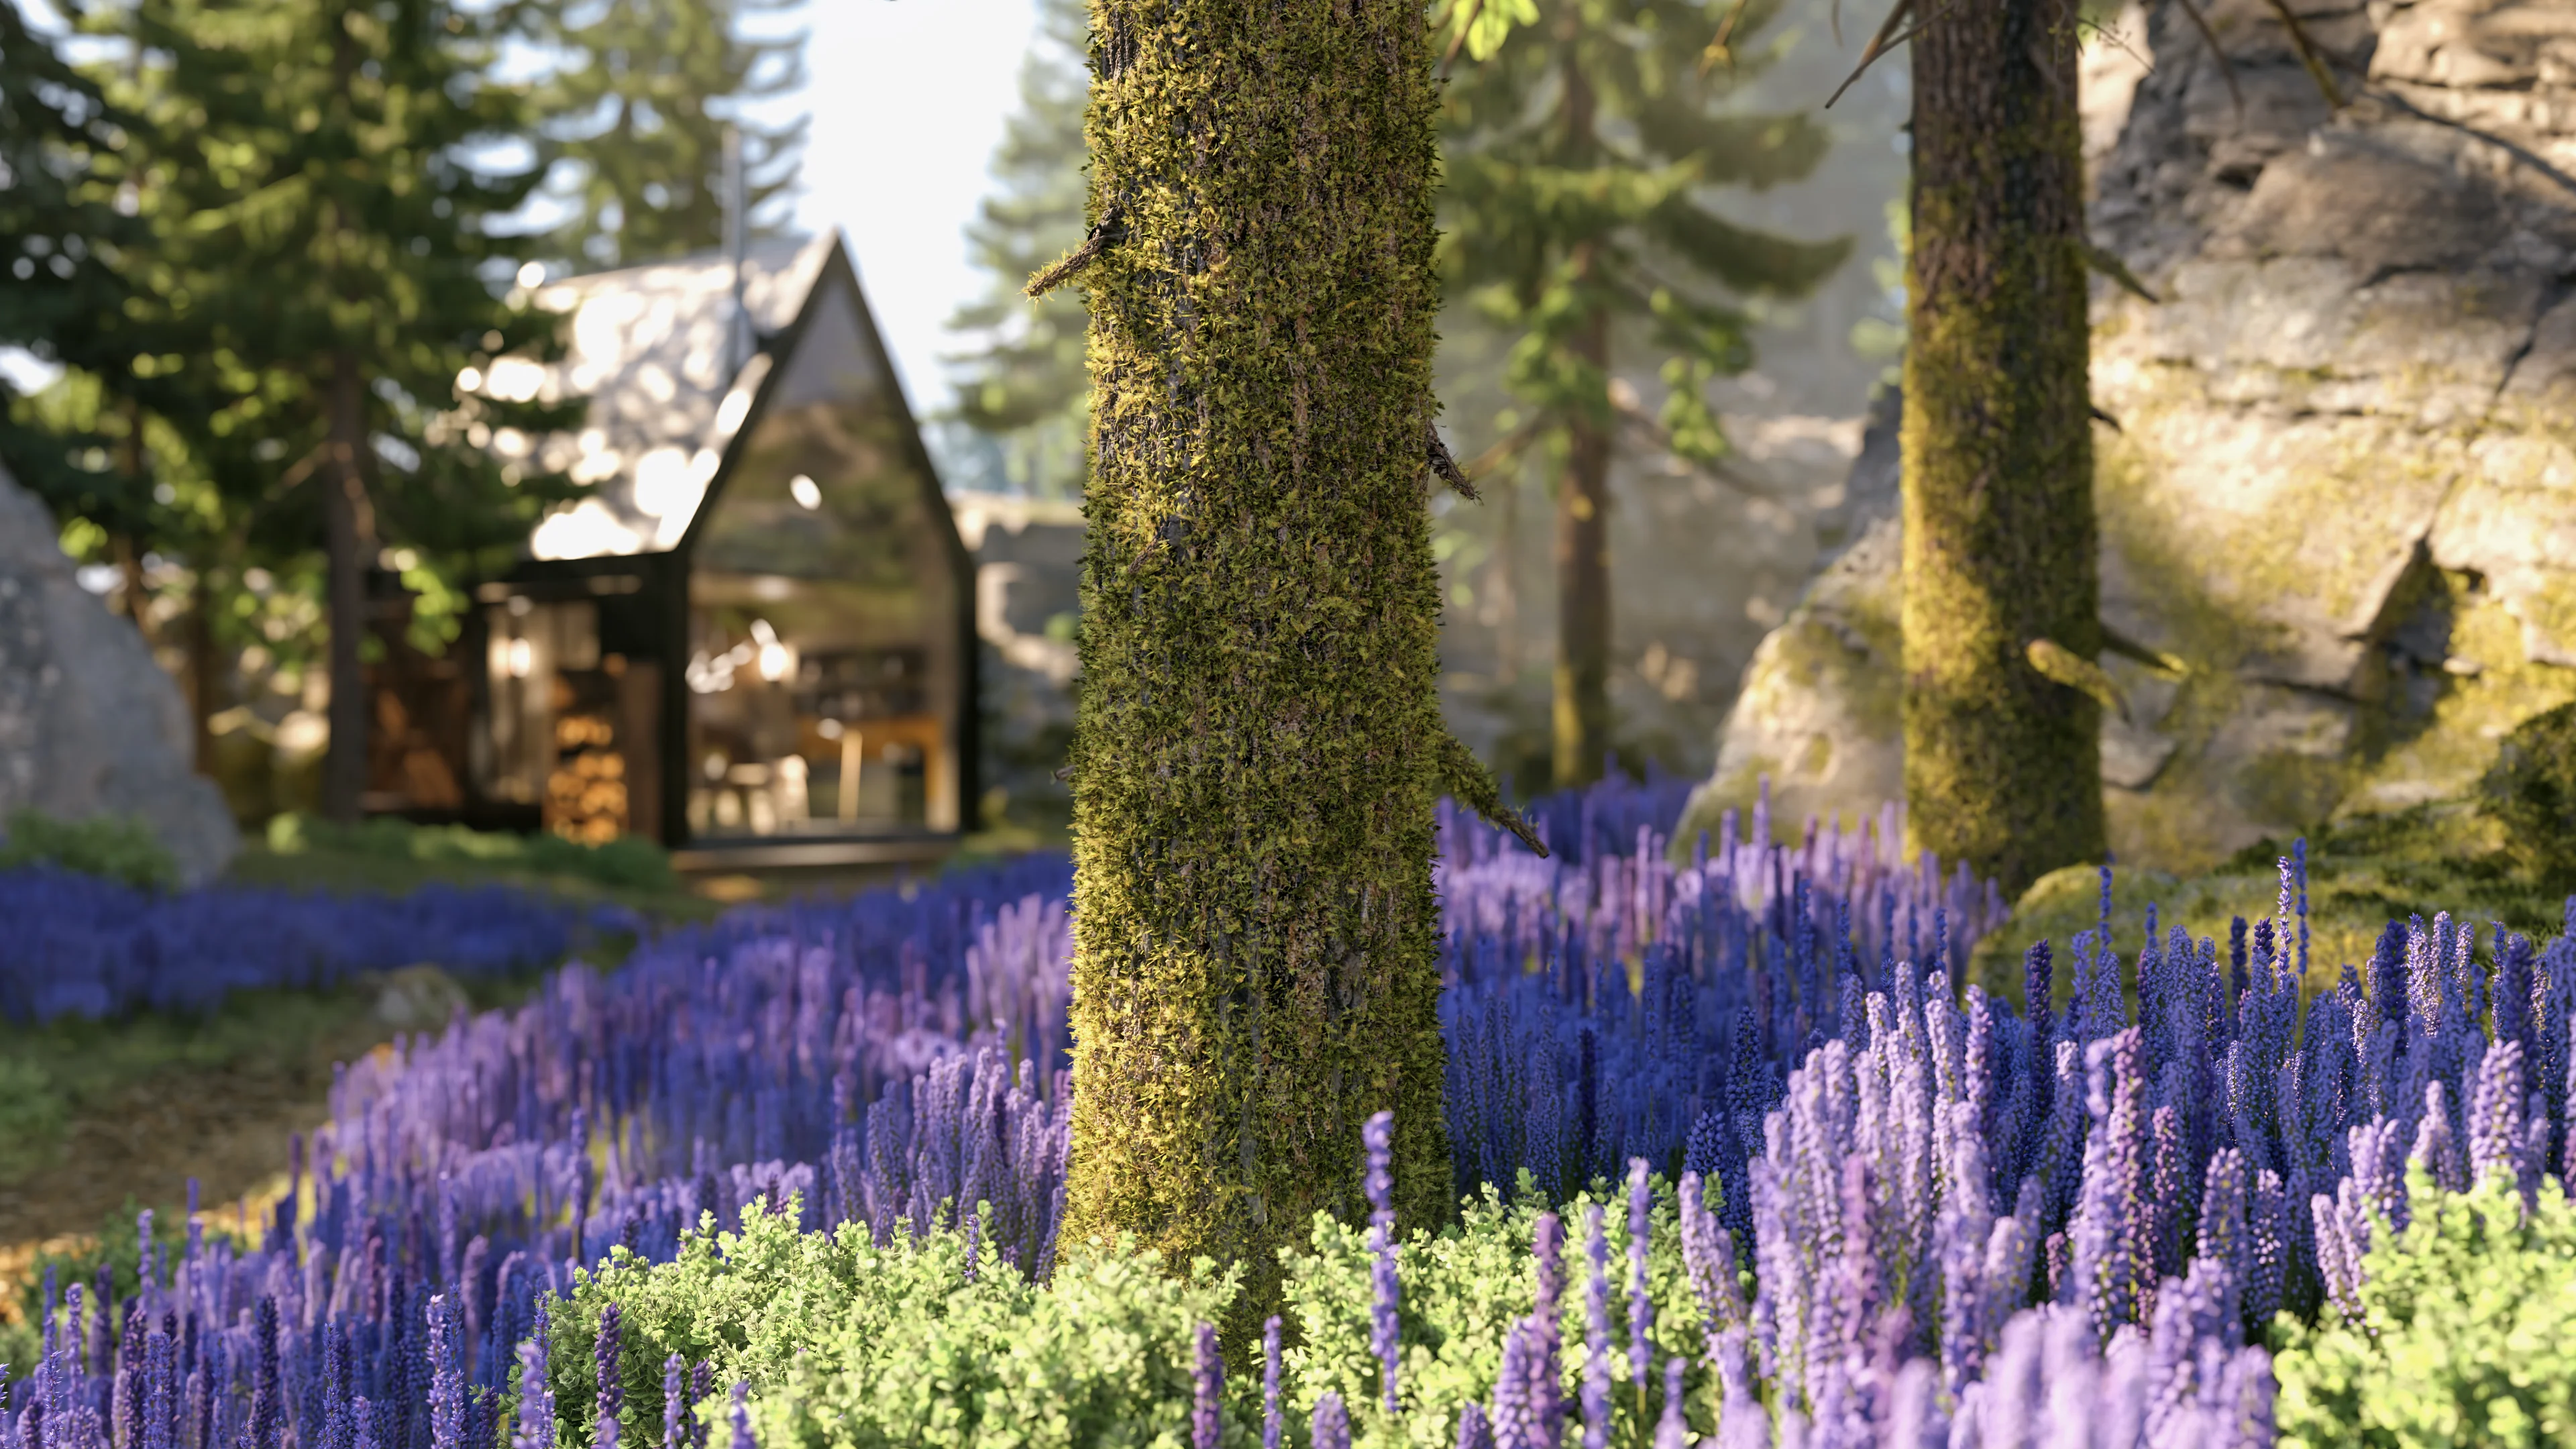
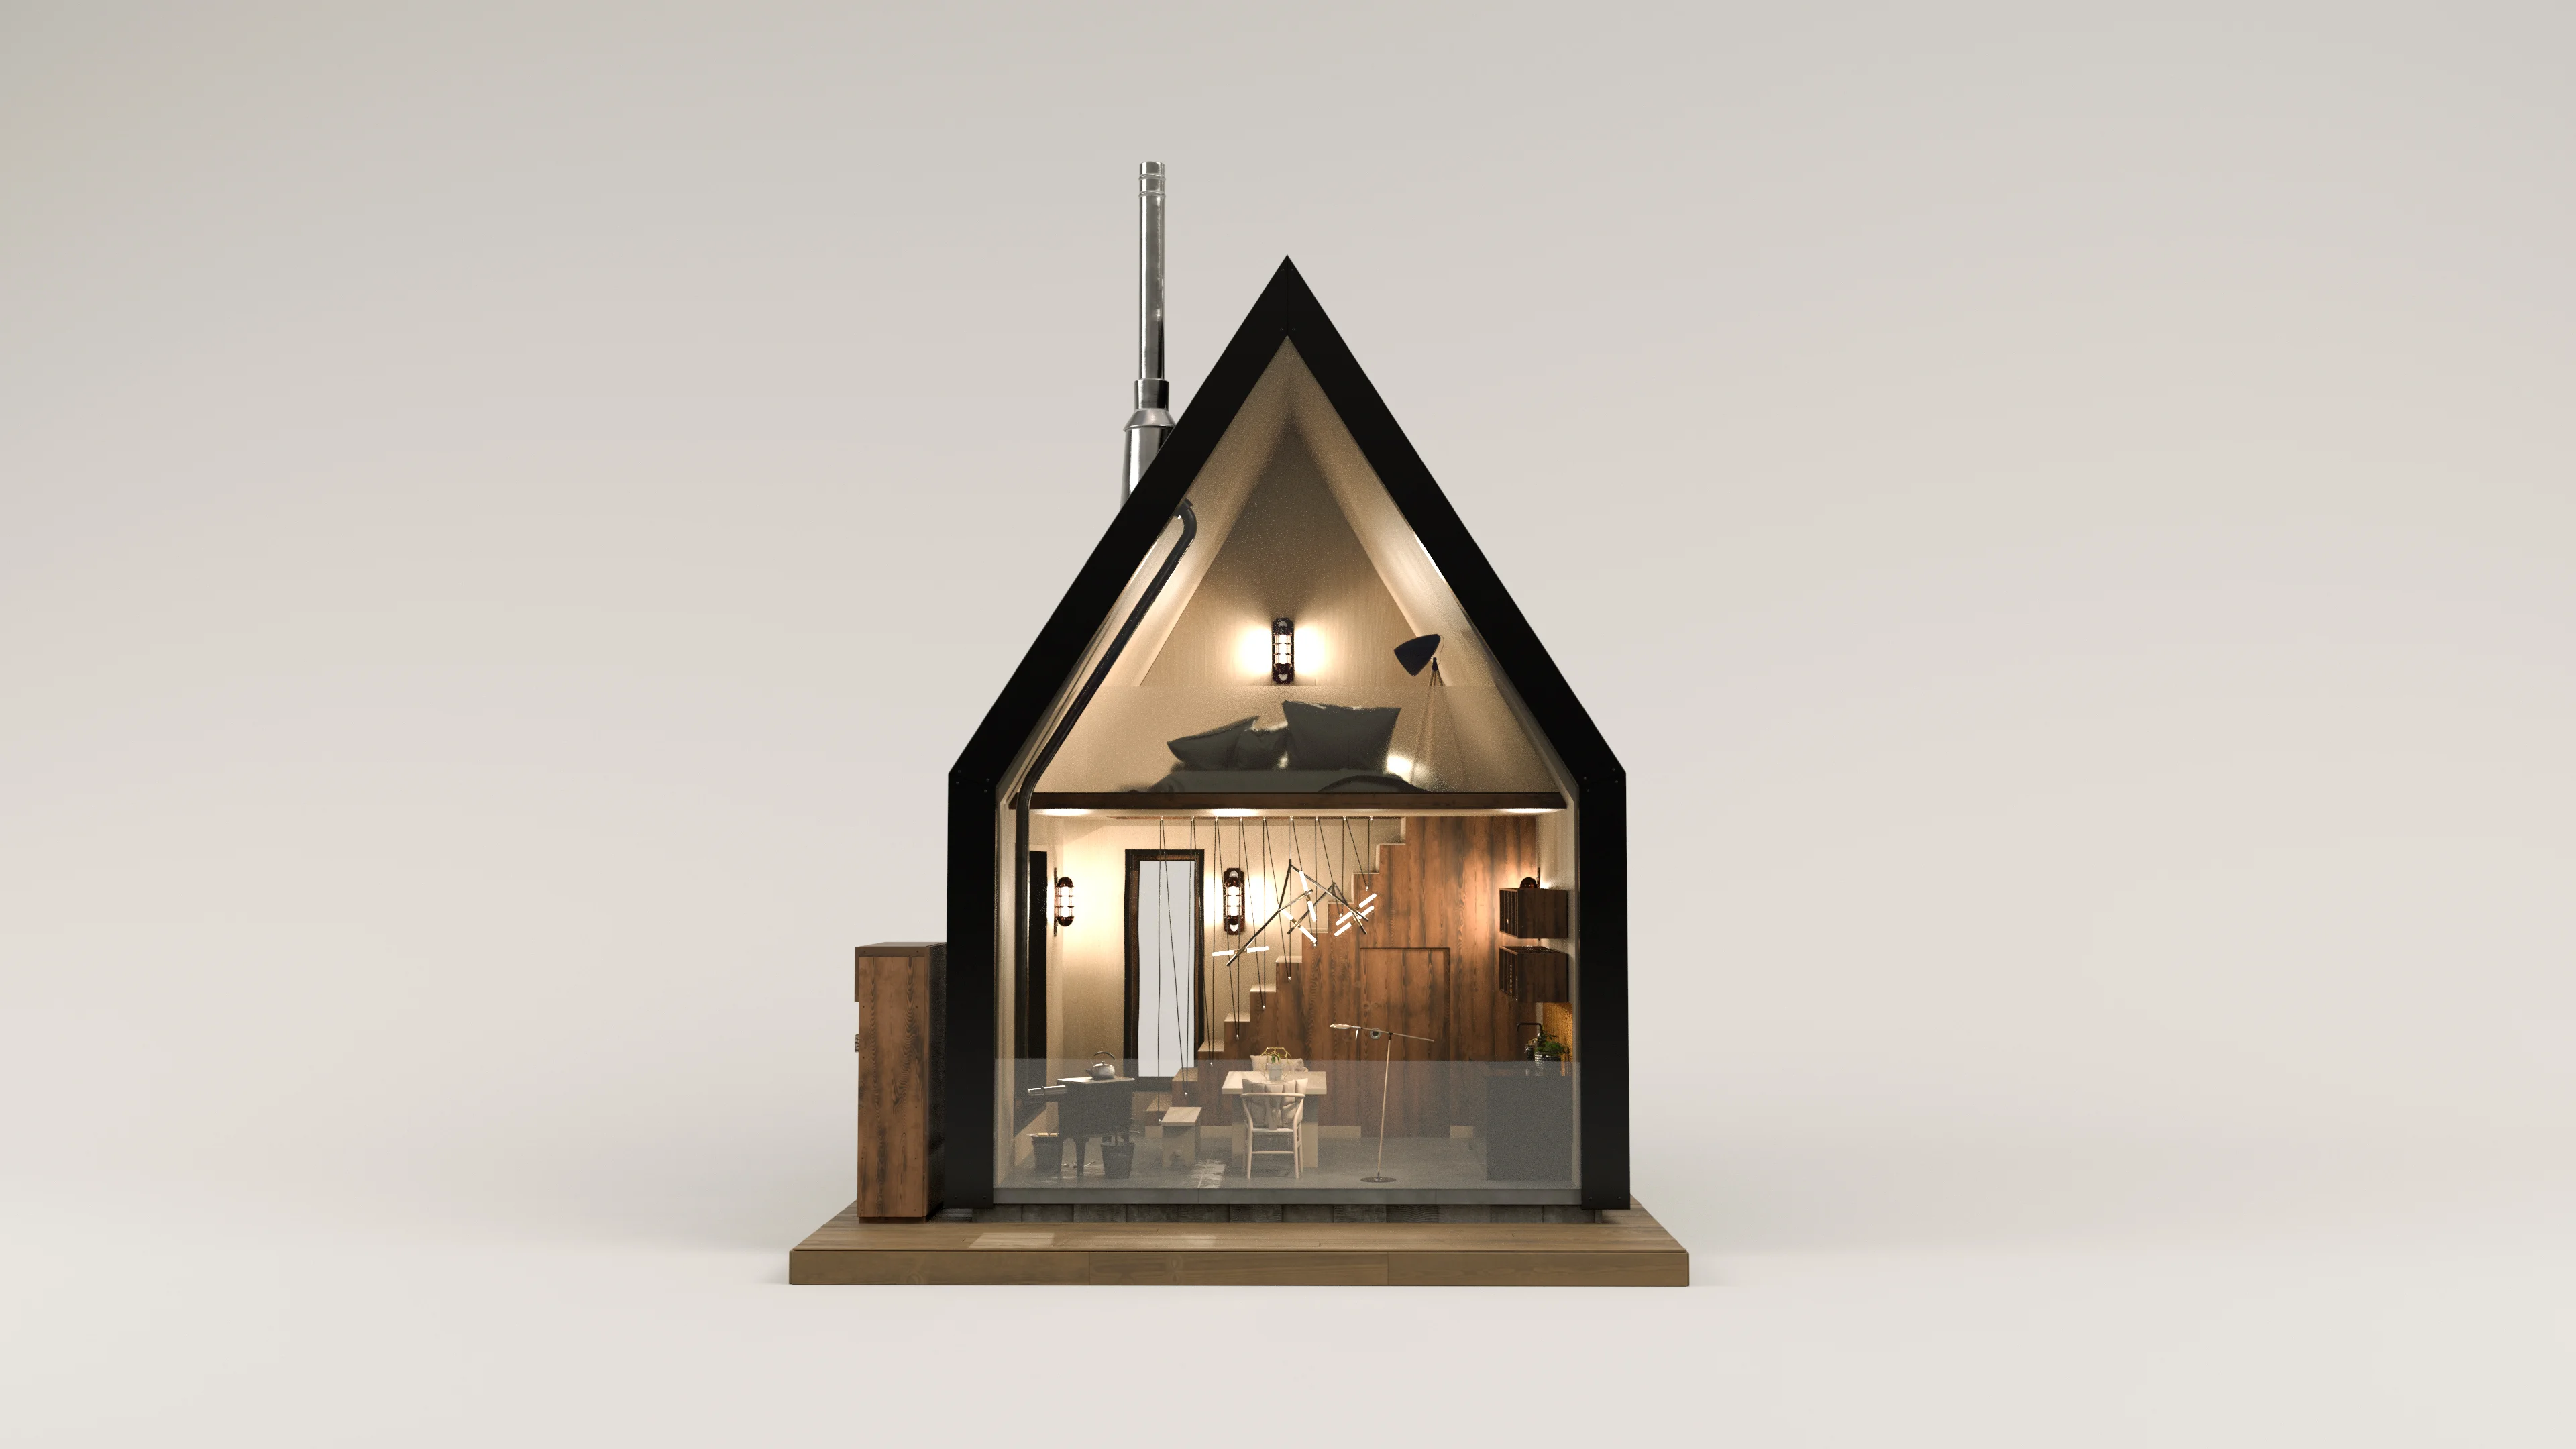
Since the scene’s original layout principle of “compression and release” comes from the architecture world, I figured it would be fun to turn this scene into a bit of an architectural scene (which tend to be my favorite type of scene to make anyway). Evermotion released a wonderful 15th Anniversary scene earlier this year that includes two small cabins; I thought that something along the lines of those cabins would fit the bill well for the clearing in my scene. I was looking for something that would be small and relatively unassuming, but also still be visually interesting; I didn’t really have any preference for what the style of the building would be, but something super modern felt like a nice change of pace after working on the Woodville project. I didn’t want to just grab one of the Evermotion 15th Anniversary cabins and drop it into the scene as-is though. To keep things more visually interesting, I wanted to be able to see into the cabin more than is possible in the vanilla Evermotion 15th Anniversary cabins, and I also wanted the cabin to look cozy and inviting on the inside. To build the cabin for this scene, I kitbashed together parts from the two Evermotion 15th Anniversary cabins and made the front of my cabin one gigantic glass sheet:
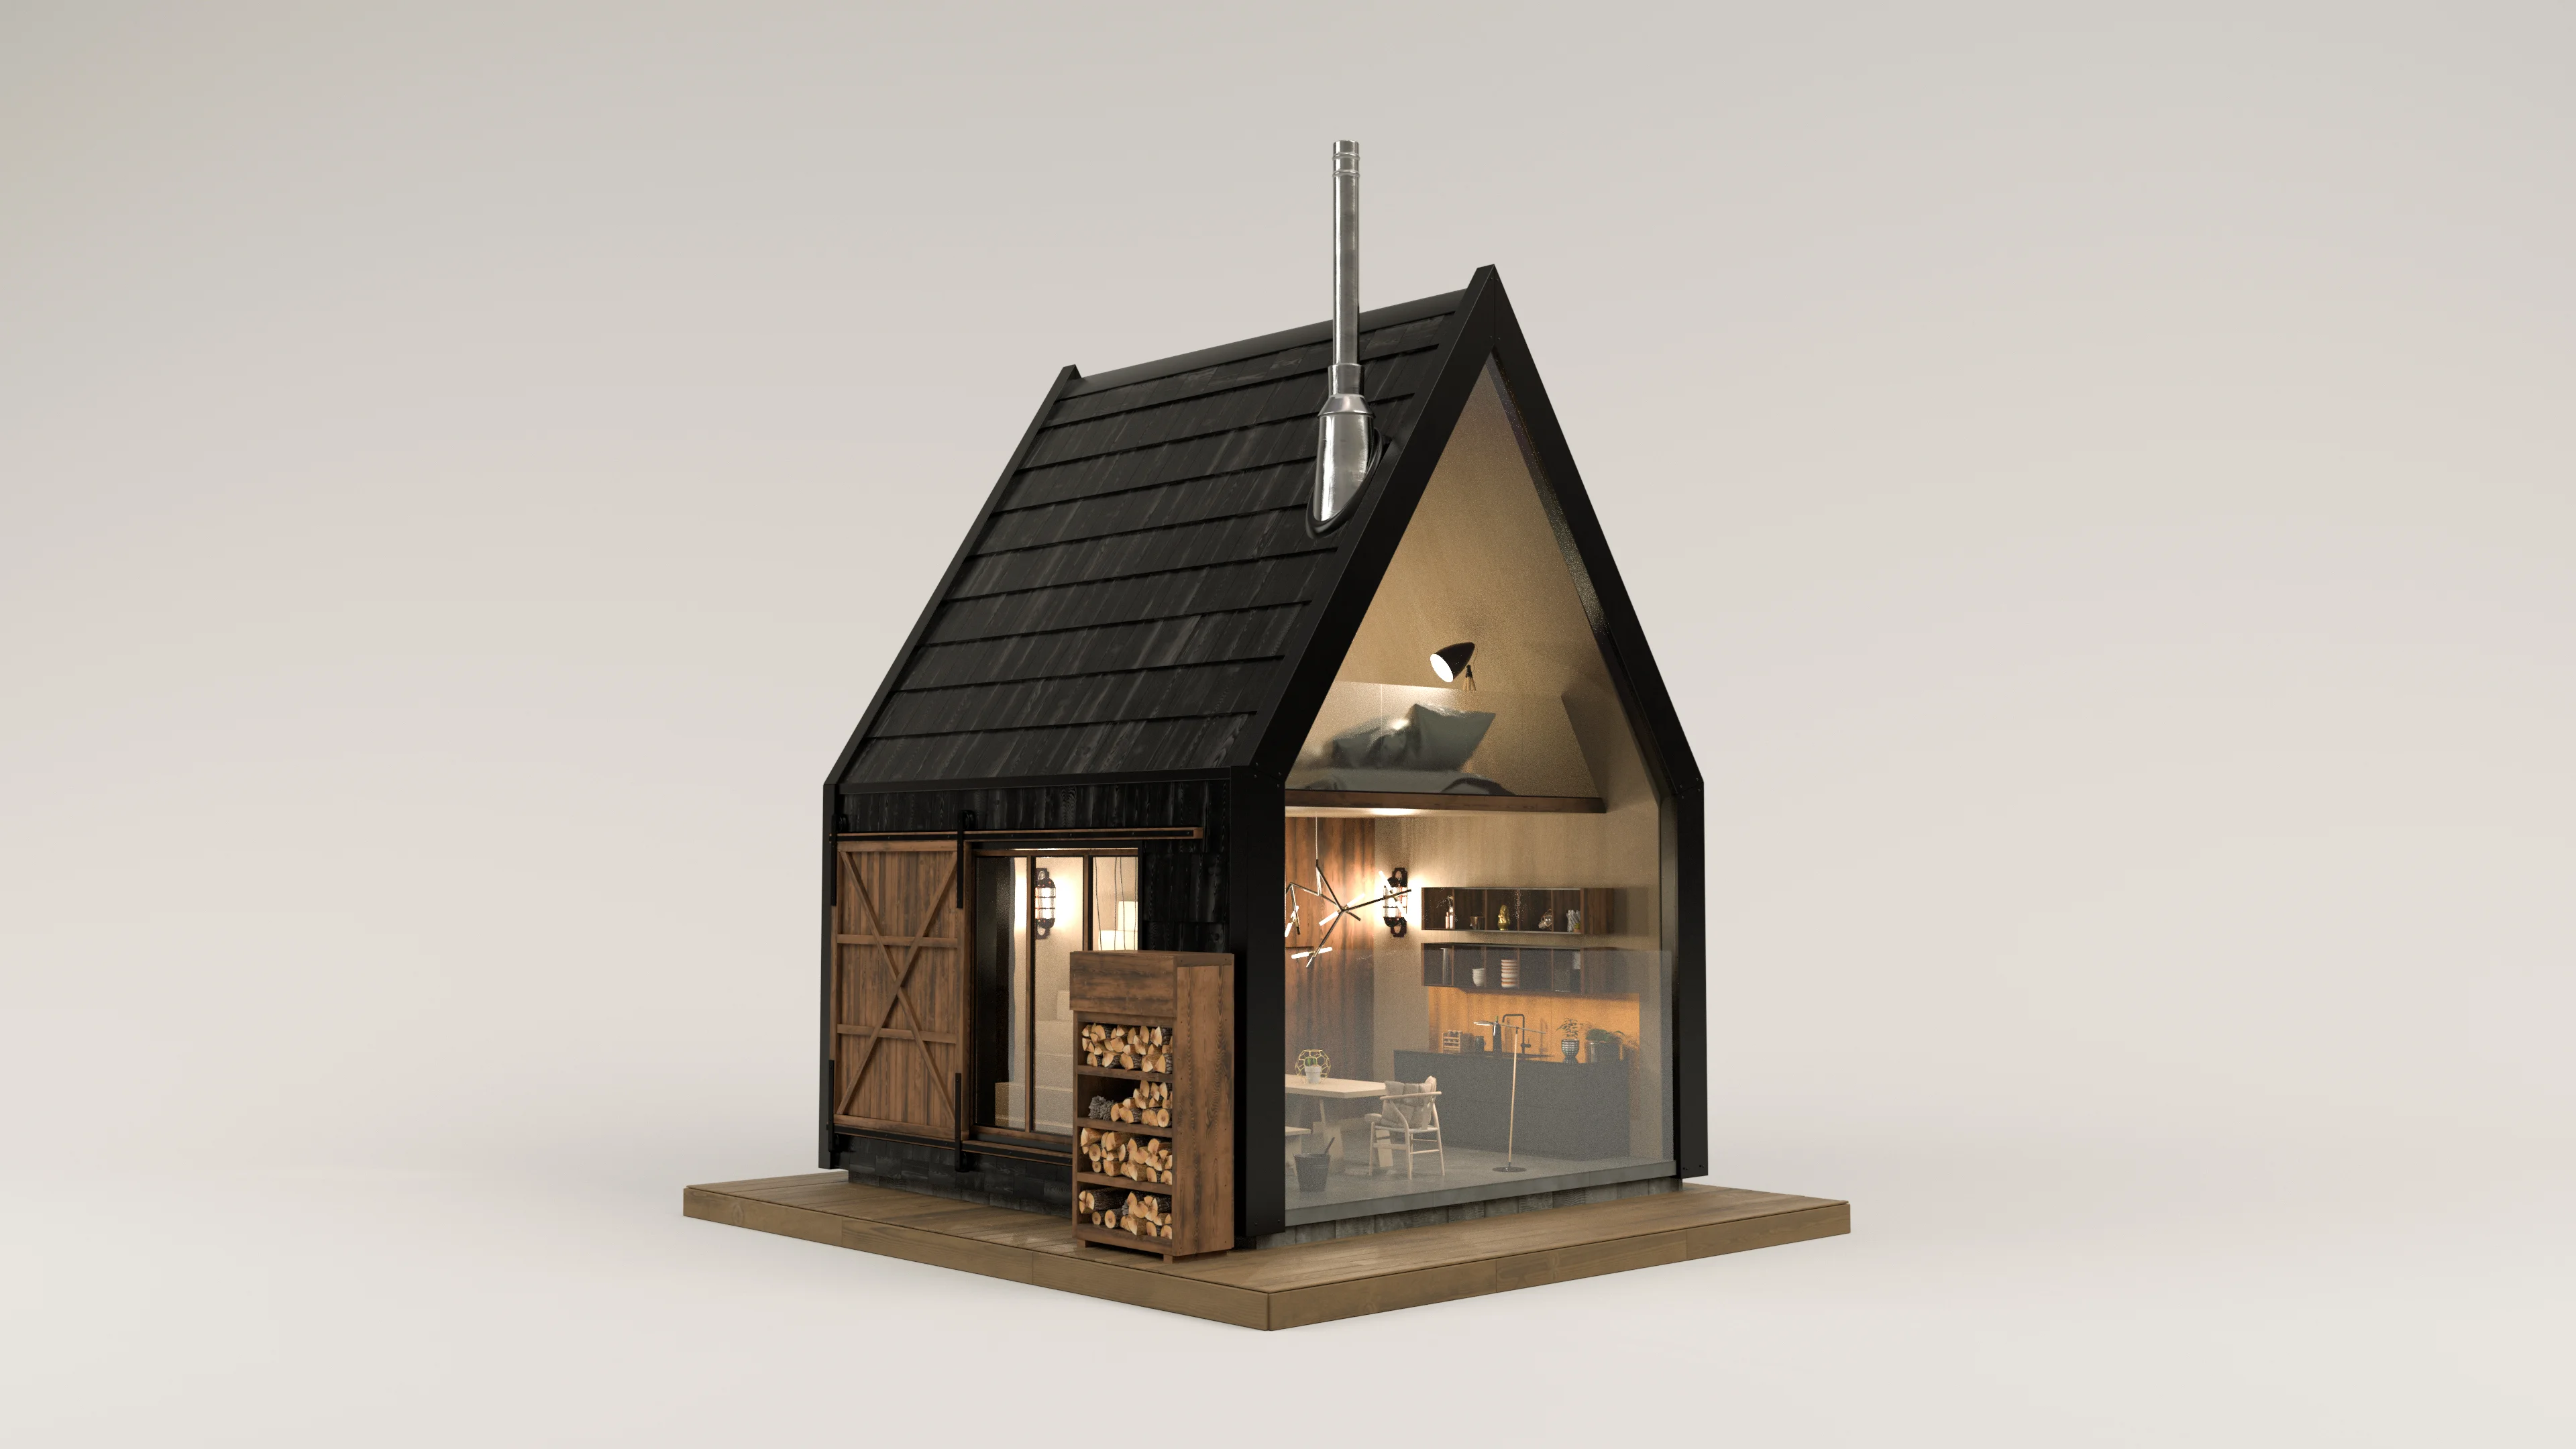
To give the giant front window a bit more realism, I added a subtle amount of unevenness and wobbliness to the glass sheet, much like how giant glass sheets on skyscrapers often have small amounts of visible unevenness. In the following test render, note the back window behind the staircase; the wobbliness of the front glass is most noticeable by the effect it has on how the back window’s straight frame looks:
To integrate the cabin in the scene, I expanded the footpath further to reach the cabin and expand out into a small sort of pad surrounding the cabin. One major mistake I made in putting together this scene though was that I didn’t keep track of the scale of anything, so finding the appropriate scale for the cabin to sit well in the scene took a few tries; for future projects I’ll have to keep track of everything’s scale more closely.
Overall I think compared with the hot air balloon idea, the cabin does a much better job of integrating into the scene without overly drawing attention to itself while still being visually interesting:
Much like in the Shipshape Art Challenge project, I used PxrSurface exclusively as the shading model for everything in this project. However, for the cabin, using PxrSurface became kind of cumbersome because the shader parameterization that Evermotion assets come with doesn’t match up directly with PxrSurface’s parameterization. Specifically, Evermotion assets typically come with Vray, Corona, or generic “PBR” materials. Corona and generic “PBR” materials are the easiest to adapt to other renderers because they both follow the roughness/metallic/basecolor workflow that was originally introduced by the Disney BRDF [Burley 2012] and has since become the de-facto norm across many popular and widely-used physically based shading systems [Karis 2013, Kulla and Estevez 2017, Georgiev et al. 2019, Häussler et al. 2020, Noguer et al. 2021, Stockner 2022, Andersson et al. 2024]1. PxrSurface, however, notably does not follow the roughness/metallic/basecolor parameterization [Hery et al. 2017]; roughness is the same in PxrSurface as in pretty much every other modern physical shading model, but instead of metallic, PxrSurface uses a combination of face color, edge color, and fresnel exponent to control how metallic a material looks. In order to convert metallic/basecolor maps into something PxrSurface could use, the approach I took was:
When creating textures from scratch using Substance Painter, as I did for the Shipshape project, PxrSurface’s parameterization isn’t an issue because Substance Painter has built in export templates to save out textures in PxrSurface’s expected parameterization even though Substance Painter uses a standard metallic/basecolor workflow. When bringing in existing metallic/basecolor textures though, the above conversion has to be done within the material’s node network. I had to wire up a small node subnetwork to do this for every single Evermotion material that had metallic, which got really old really quickly. At least as of RenderMan 23 (the current version while I was working on this project), RenderMan doesn’t have any utility node to do this conversion from metallic/basecolor to PxrSurface’s diffuse/specular face/specular edge color paramterization2; such a node would be really helpful! Alternatively, a full implementation of the Disney BSDF [Burley 2015] (as opposed to the reduced-paramter Disney BRDF that is already available) would be useful too since a full implementation of the Disney BSDF would both be able to accept roughness/metallic/basecolor parameterized inputs and provide the full range of abilities that a production-quality shading model needs.
Mist and Atmospherics
With the surface geometry and shading for the scene complete, the last things to do were atmospherics and final lighting. Over the last two RenderMan Art Challenges, I’ve evolved my atmospherics and volume rendering workflow a lot. For the Woodville Art Challenge, I relied on a combination of homogeneous mist and heterogeneous fog made procedurally using Maya’s volume noise nodes plugged into the density field of a PxrVolume. This workflow was simple, but ultimately challenging to control and slow to iterate on since seeing what anything looked like required doing a full render. For the Shipshape Art Challenge, I moved to an entirely VDB-based volumes workflow, even for mist and stuff. Using an entirely VDB-based workflow allowed for more direct control, and because RenderMan for Maya can preview VDBs in Maya’s viewport, I was able to get a good sense of how volumes were placed and how they massed together in the scene without having to wait for full renders.
For this project, the volumes workflow was similar to the one on the Shipshape Art Challenge; everything is VDB-based, even the background haze. In making the mist and atmospherics in this scene, I knew I wanted to break things down into three distinct types of volumes: background haze, foreground godrays and atmospherics, and some mist low down clinging to the ground. I broke out and rendered these three types of volumes in their own passes/layers to give more control during compositing.
Here is the background haze layer, which is mostly uniform but does have a small amount of variation that creates a bit of a cascading effect:
For the main foreground godrays and atmospherics layer, I use similar types of volumes as in the background haze layer, but with a different lighting scheme. The main lighting setup for the entire scene is basically just a single super high-resolution skydome IBL with a sun baked in. However, I wanted the godrays to be more prominent than could be achieved by just using the skydome IBL as-is. For for this layer, I created a separate distant light with an orientation matched to the IBL’s sun position, cranked up the exposure of the distant light, and twiddled with the size (angle) of the distant light until the godrays became more visually prominent:
The low ground-hugging mist is made up of VDBs with higher-frequency detail than the previous two layers. There are only a handful of unique VDBs here, but I instanced them around a bunch using native Maya instancing to cover the entire valley floor. I really like how the low mist settles down in between the lupine flowers and floods the footpath area:
Finally, here’s what the three volumetrics layers look like stacked together, with the per-layer adjustments used in the final composite. One thing that I think is kind of neat about looking at the composited volumes together is that we can actually clearly see the shadow cast by the cabin; this detail isn’t actually necessarily clear in any of the volumes layers in isolation, but becomes apparently obvious once all three are stacked since each layer brings something different into the whole:
The clouds in the background in the final render are just part of the skydome IBL; in the future I’m hoping to build background cloudscapes from scratch, but that’ll have to be for a future art exercise.
Final Lighting
The final lighting setup for this scene was super simple; effectively the whole scene is lit by just a simple sun + skydome IBL setup. My goal was to keep the lighting as naturalistic as possible, so a simple sun + sky setup fit the bill, and even with the simple setup, the complexity of the forest geometry still provided a lot of interesting areas of highlight and shadow. For final lighting I did split out the sun as a distant light from the skydome IBL, much like what I did for the volumetrics passes, and I painted out the baked-in sun in the skydome IBL. The reason for splitting out the sun in this case wasn’t to adjust its brightness independently from the sky though, but instead was to allow for slightly adjusting the color temperature of the sun without affecting the fill provided by the sky. The sun is just a touch warmer in the final lighting than it was in all of the in-progress renders up to this point.
There are a bunch of practical lights in the cabin as well; the interior of the cabin is actually lit only using the practical lights and contains no other stage lighting. I initially calibrated all of the practical lights against the sun’s brightness, but that wound up making the interior of the cabin a bit too dark to be visible in a bright sunny day, so I cheated and applied a uniform exposure boost to all of the cabin’s practical lights to brighten up the inside of the cabin.
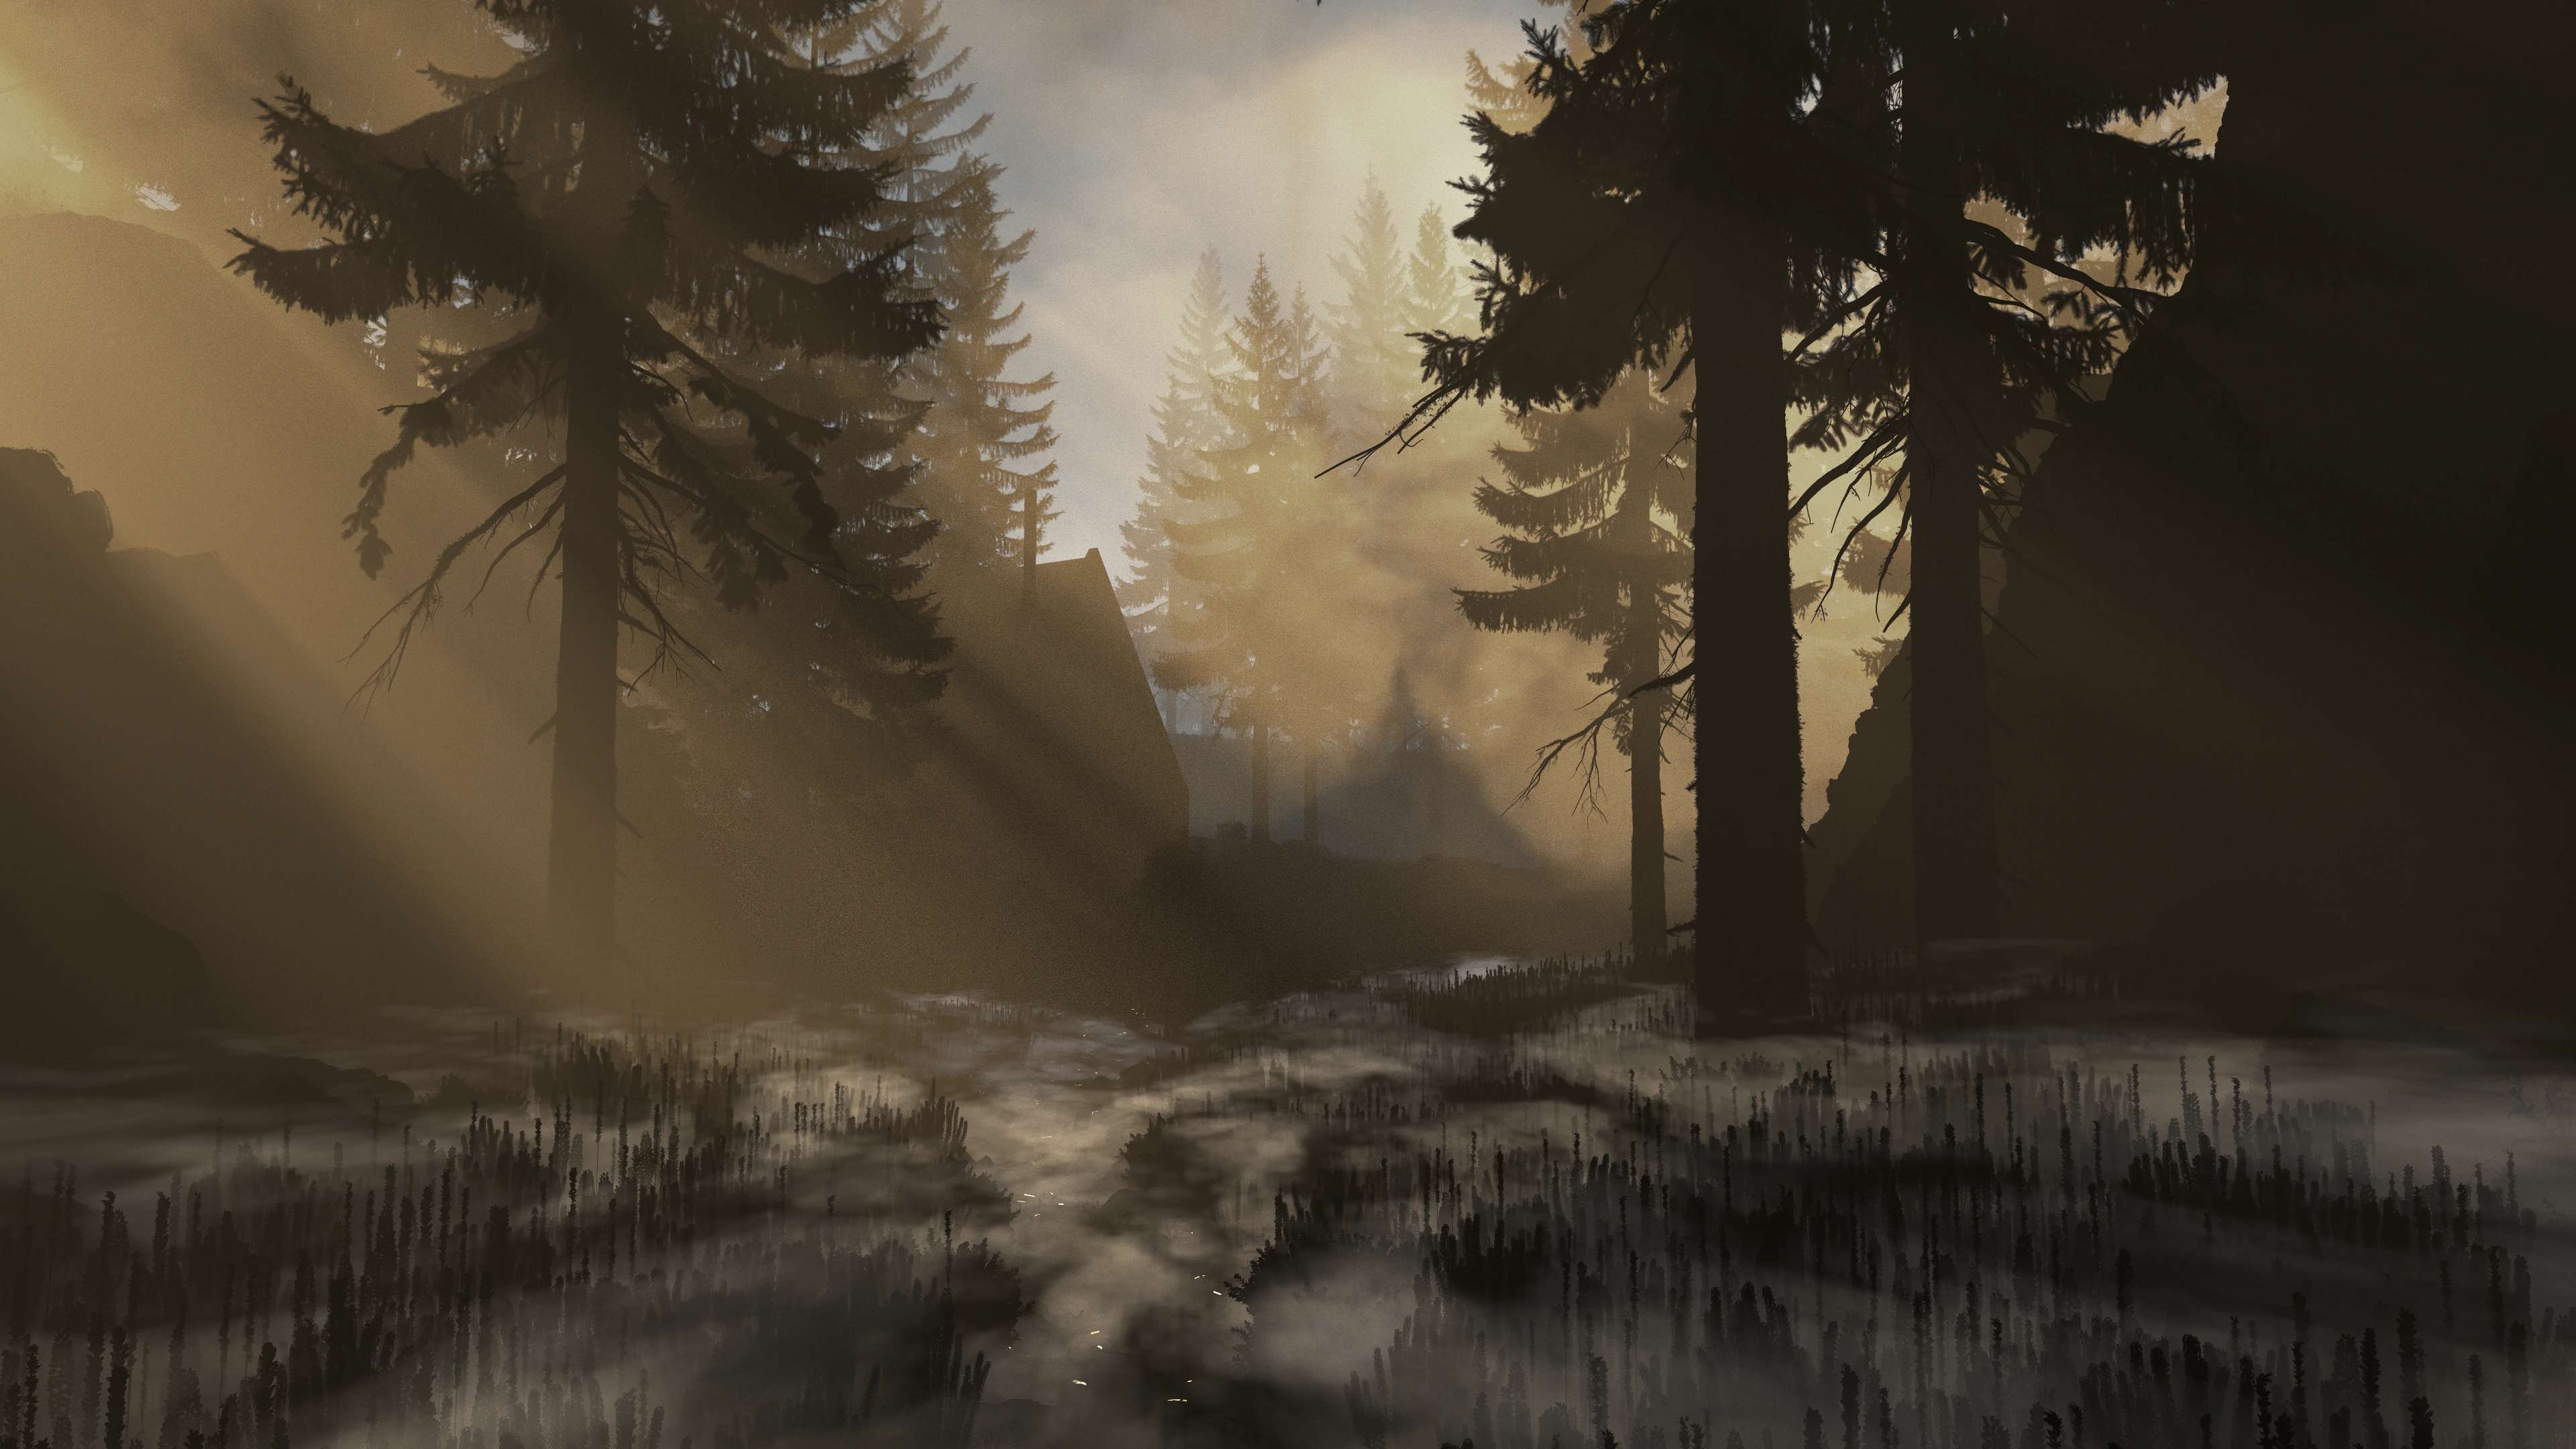
Putting everything together with the volumetrics produced the following main daylight version of the scene. I also did a small amount of color correction in Lightroom, but in this case the color correction was limited to some basic contrast and saturation adjustments. The color correction for this piece wasn’t nearly as extensive as what I did for the Woodville and Shipshape projects. Here is the final piece, followed by a 50% grey clay shaded version with the same final lighting, comp, and color correction:
I had some fun with making some alternate time-of-day versions of the final lighting setup. These were quick and just for fun, so the sun angle is the same as in the daylight version even though in reality that would make zero sense. I kept the sun angle the same in the variants since they use the same volumetrics passes, just color corrected differently. These variants were made quickly on a whim, which is why I didn’t put in the additional effort to redo everything to work with more plausible sun angles.
Here’s a late afternoon golden hour variant, followed by a 50% grey clay shaded version. A lot more of the look of this variant was achieved by extensive color correction in Lightroom. I think this variant shows off the godray volumetrics better than the main daylight variant, even if the angle of the godrays and by extension the angle of the sun don’t make much sense for golden hour:

The other variant I played with is a cooler overcast morning. A lot of the look of this variant also comes from Lightroom, possibly even more so that for the golden hour variant. I also boosted the contribution of the low ground-hugging mist in this variant to make it more visible, since low mist is typically characterstic of overcast mornings. I left the godrays in, even though having godrays at all on an overcast morning is fairly implausible; again, these two variants were quick and just for fun.
Here’s the overcast morning variant, followed by a 50% grey clay shaded version:
Conclusion
I learned a lot from this project; the goal of the project was to figure out how to put together a detailed forest environment that holds up well at relatively close camera distances, and I think the end result accomplishes that well enough. The final image in this project is decent- it’s not the most narratively interesting image, but it makes for a passable archviz type piece, but to be honest a nice looking image was somewhat secondary to the goal of figuring out how to build a scene like this. Maya’s version of the XGen toolset makes building this type of scene relatively easy and the XGen toolset is super powerful, even if it doesn’t feel particularly native to the rest of Maya. XGen certainly feels a lot more scalable for this type of project than MASH, which I’ve run into performance problems with on scenes much smaller than this one. At the same time though, in my opinion, Maya’s version of XGen isn’t nearly as easy to use and isn’t nearly as featureful as tools like ForestPack for 3ds Max, which remains the gold standard for instancing/scatter tools, or the Geo-Scatter plugin for Blender, or Houdini’s native toolset.
At the end of the (metaphorical) day, I had a lot of fun making this piece! The process was much more experimental and aimless compared with working on RenderMan Art Challenge pieces, which was a nice change of pace for an art project. I learned a bunch of techniques that I’m sure I’ll make use of again in the future, and I got in more practice, which is ultimately the most important part of getting better at anything. I’m really happy that I’ve more or less figured out a reliable way of making good trees now, given how much time I spent a long time ago trying to figure out how to make decent trees.
Finally, here is a progression video I put together from all of the test and in-progress renders that I made throughout this entire project:
References
Zap Andersson, Paul Edmondson, Julien Guertault, Adrien Herubel, Alan King, Peter Kutz, Andréa Machizaud, Jamie Portsmouth, Frédéric Servant, and Jonathan Stone. 2024. OpenPBR Surface Specification. Academy Software Foundation white paper.
Autodesk. 2020. XGen Geometry Instancer. Autodesk Maya 2020 User Documentation.
Autodesk. 2020. XGen Interactive Grooming. Autodesk Maya 2020 User Documentation.
Brent Burley and Dylan Lacewell. 2008. Ptex: Per-face Texture Mapping for Production Rendering. Computer Graphics Forum (Proc. of Eurographics Symposium on Rendering) 27, 4 (Jun. 2008), 1155-1164.
Brent Burley. 2012. Physically Based Shading at Disney. In ACM SIGGRAPH 2012 Course Notes: Practical Physically-Based Shading in Film and Game Production.
Brent Burley. 2015. Extending the Disney BRDF to a BSDF with Integrated Subsurface Scattering. In ACM SIGGRAPH 2015 Course Notes: Physically Based Shading in Theory and Practice.
Brent Burley. 2019. On Histogram-Preserving Blending for Randomized Texture Tiling. Journal of Computer Graphics Techniques 8, 4 (Nov. 2019), 31-53.
Iliyan Georgiev, Jamie Portsmouth, Zap Andersson, Adrien Herubel, Alan King, Shinji Ogaki, Frederic Servant. 2019. Autodesk Standard Surface. Autodesk white paper.
Tobias Häussler, Holger Dammertz, and Bastian Sdorra. 2020. Enterprise PBR Shading Model. Dassault Systèmes white paper.
Eric Heitz and Fabrice Neyret. 2018. High-Performance By-Example Noise using a Histogram-Preserving Blending Operator. Proceedings of the ACM on Computer Graphics and Interactive Techniques (Proc. of High Performance Graphics) 1, 2 (Aug. 2018), Article 31.
Christophe Hery, Ryusuke Villemin, and Junyi Ling. 2017. Pixar’s Foundation for Materials: PxrSurface and PxrMarschnerHair. In ACM SIGGRAPH 2017 Course Notes: Physically Based Shading in Theory and Practice.
Brian Karis. 2013. Real Shading in Unreal Engine 4. In ACM SIGGRAPH 2013 Course Notes: Physically-Based Shading in Theory and Practice.
Christopher Kulla and Alejandro Conty Estevez. 2017. Revisiting Physically Based Shading at Imageworks. In ACM SIGGRAPH 2017 Course Notes: Physically Based Shading in Theory and Practice.
Jeremie Noguer, Paul Edmondson, Michael Bond, and Peter Kutz. 2021. Adobe Standard Material Specification. Adobe white paper.
Lukas Stockner. 2022. The new Principled BSDF Model in Cycles. In BCON 2022: Blender Conference 2022.
Thomas V. Thompson, Ernest J. Petti, and Chuck Tappan. 2003. XGen: Arbitrary Primitive Generator. In ACM SIGGRAPH 2003 Sketches & Applications.
Michael Todd. 2013. Interactive Grooming System: User Friendly Hair & Fur. Michael Todd Portfolio.
Walt Disney Animation Studios. 2011. SeExpr.
Footnotes
1 Additional post-2020 references added in update to post in May 2025. keyboard_return
2 As of RenderMan 24, released in 2021, RenderMan does now have a PxrMetallicWorkflow node that converts metallic/basecolor inputs into the diffuse/specular face/specular edge color inputs that PxrSurface expects. RenderMan 24 also includes a new implementation of the full version of the Disney BSDF. keyboard_return