RenderMan Art Challenge: Woodville
Table of Contents
Introduction
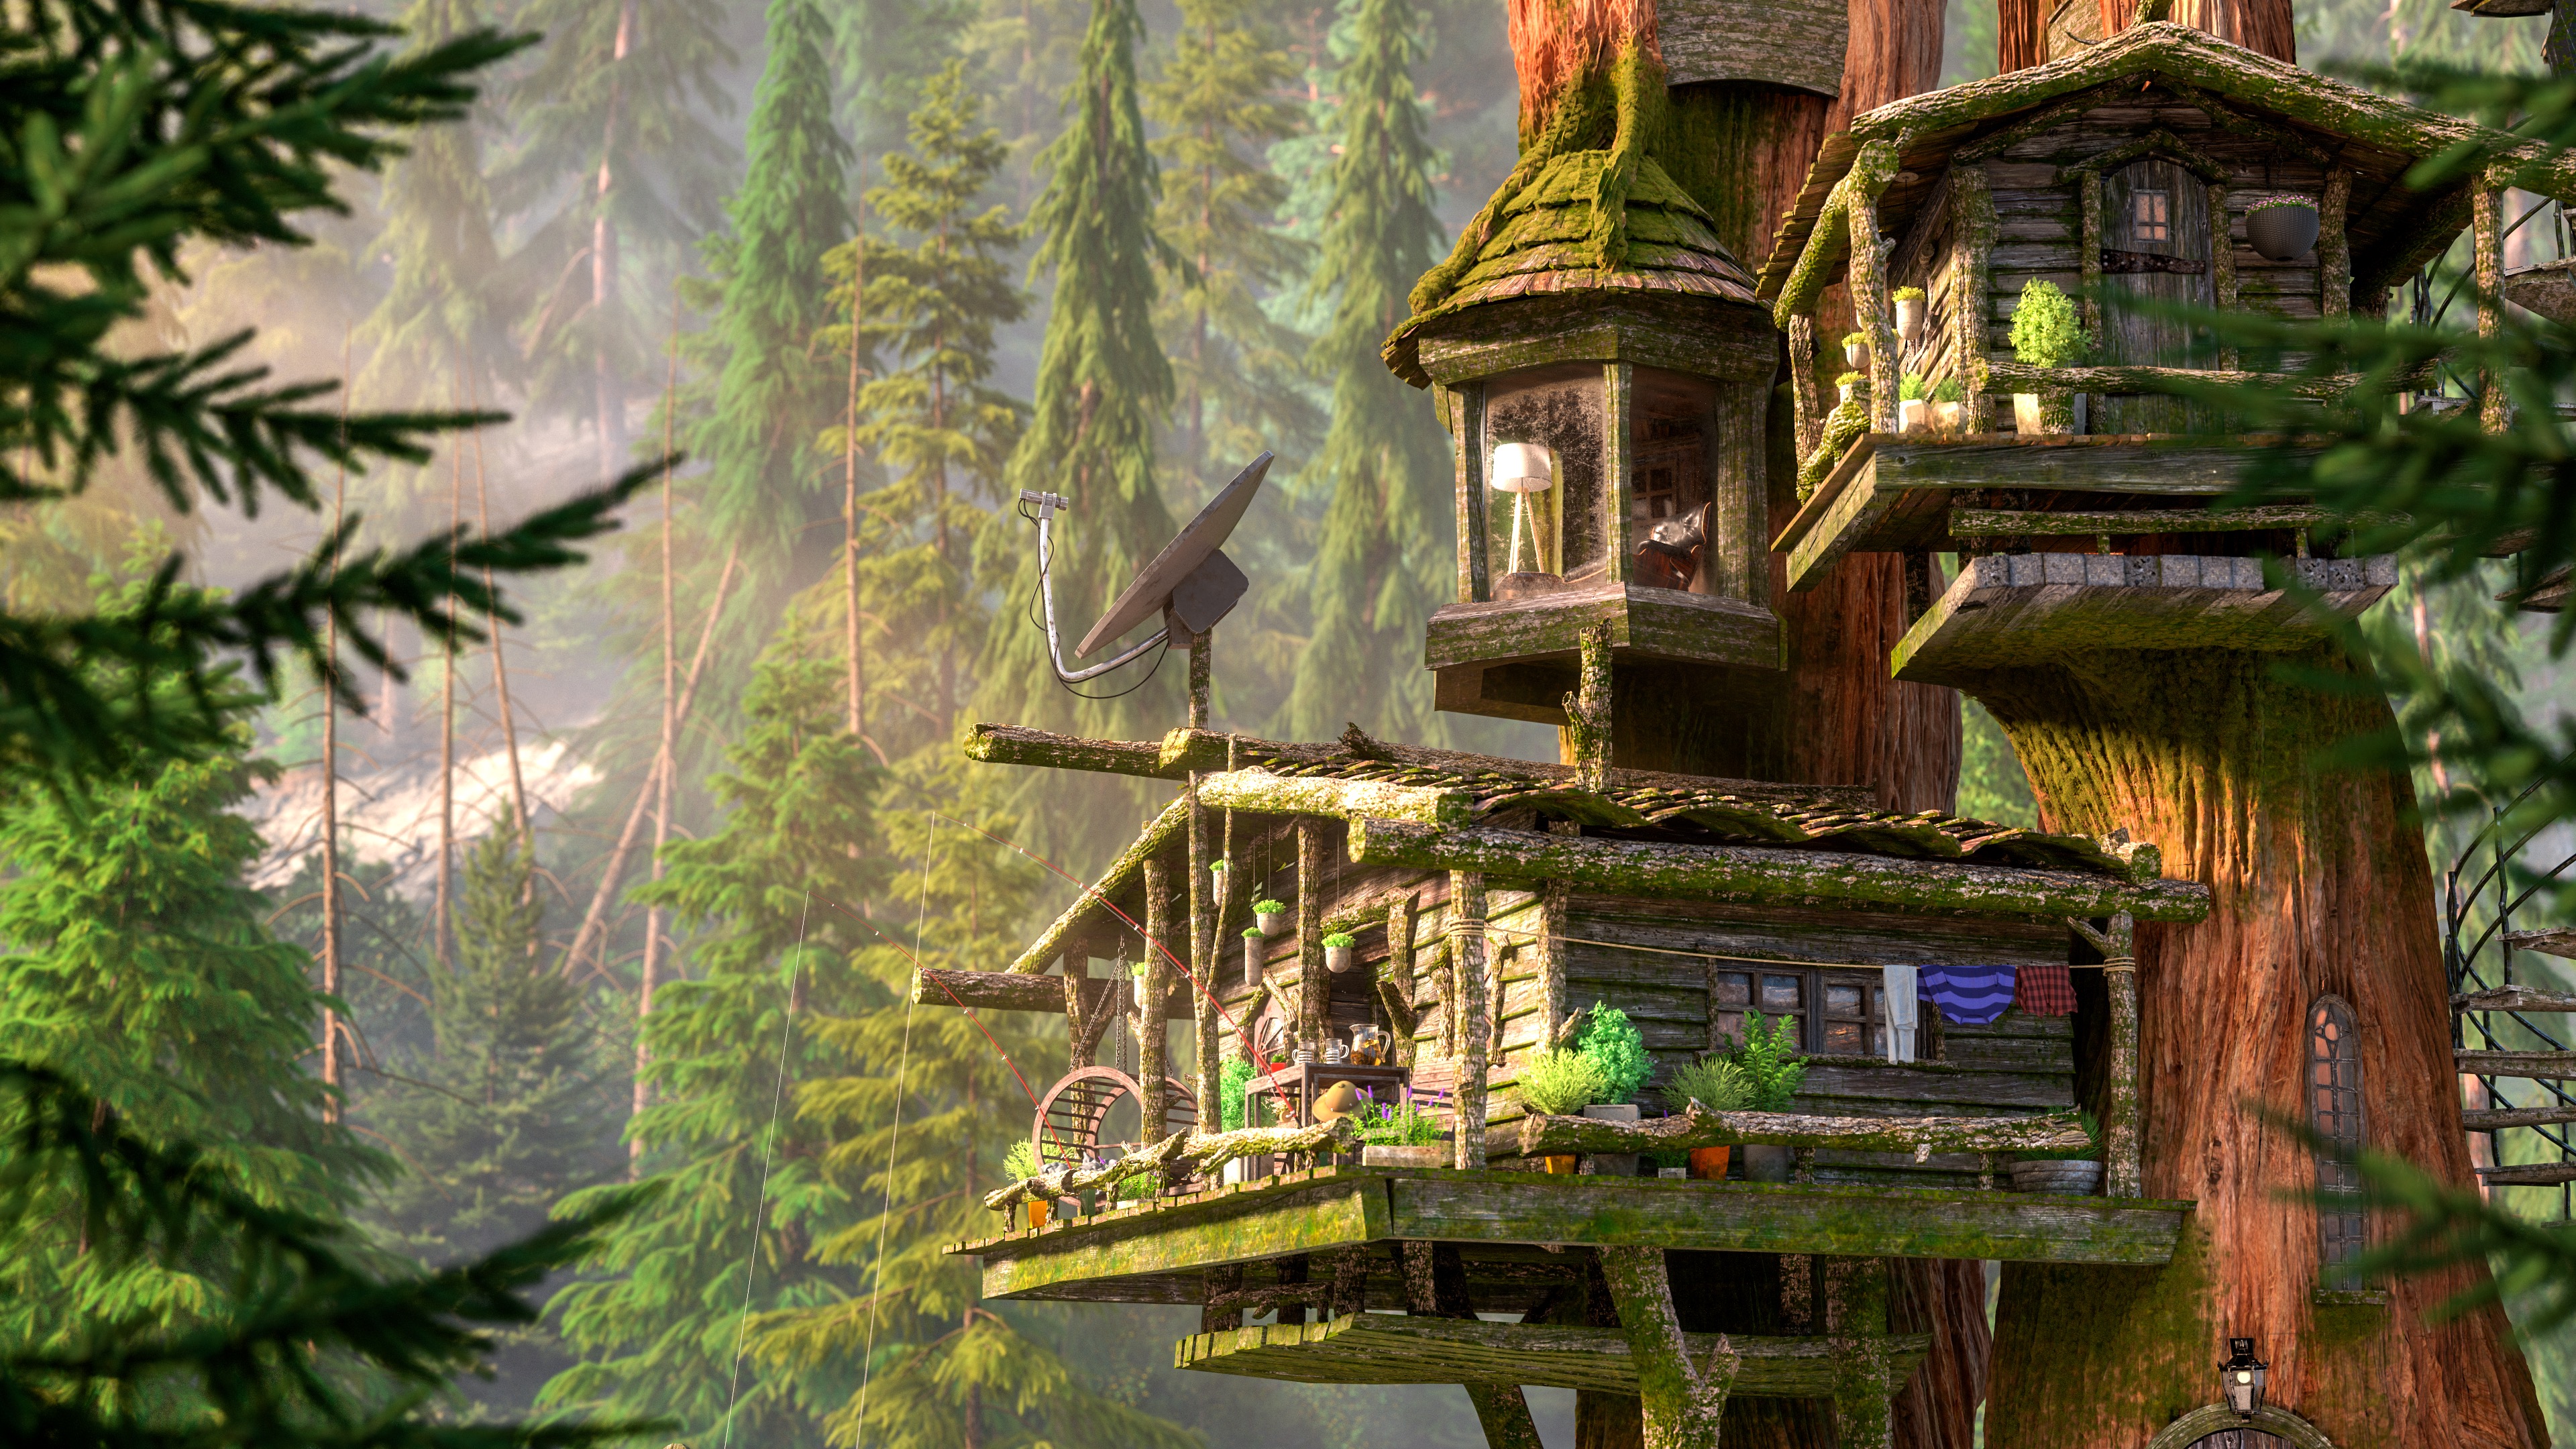
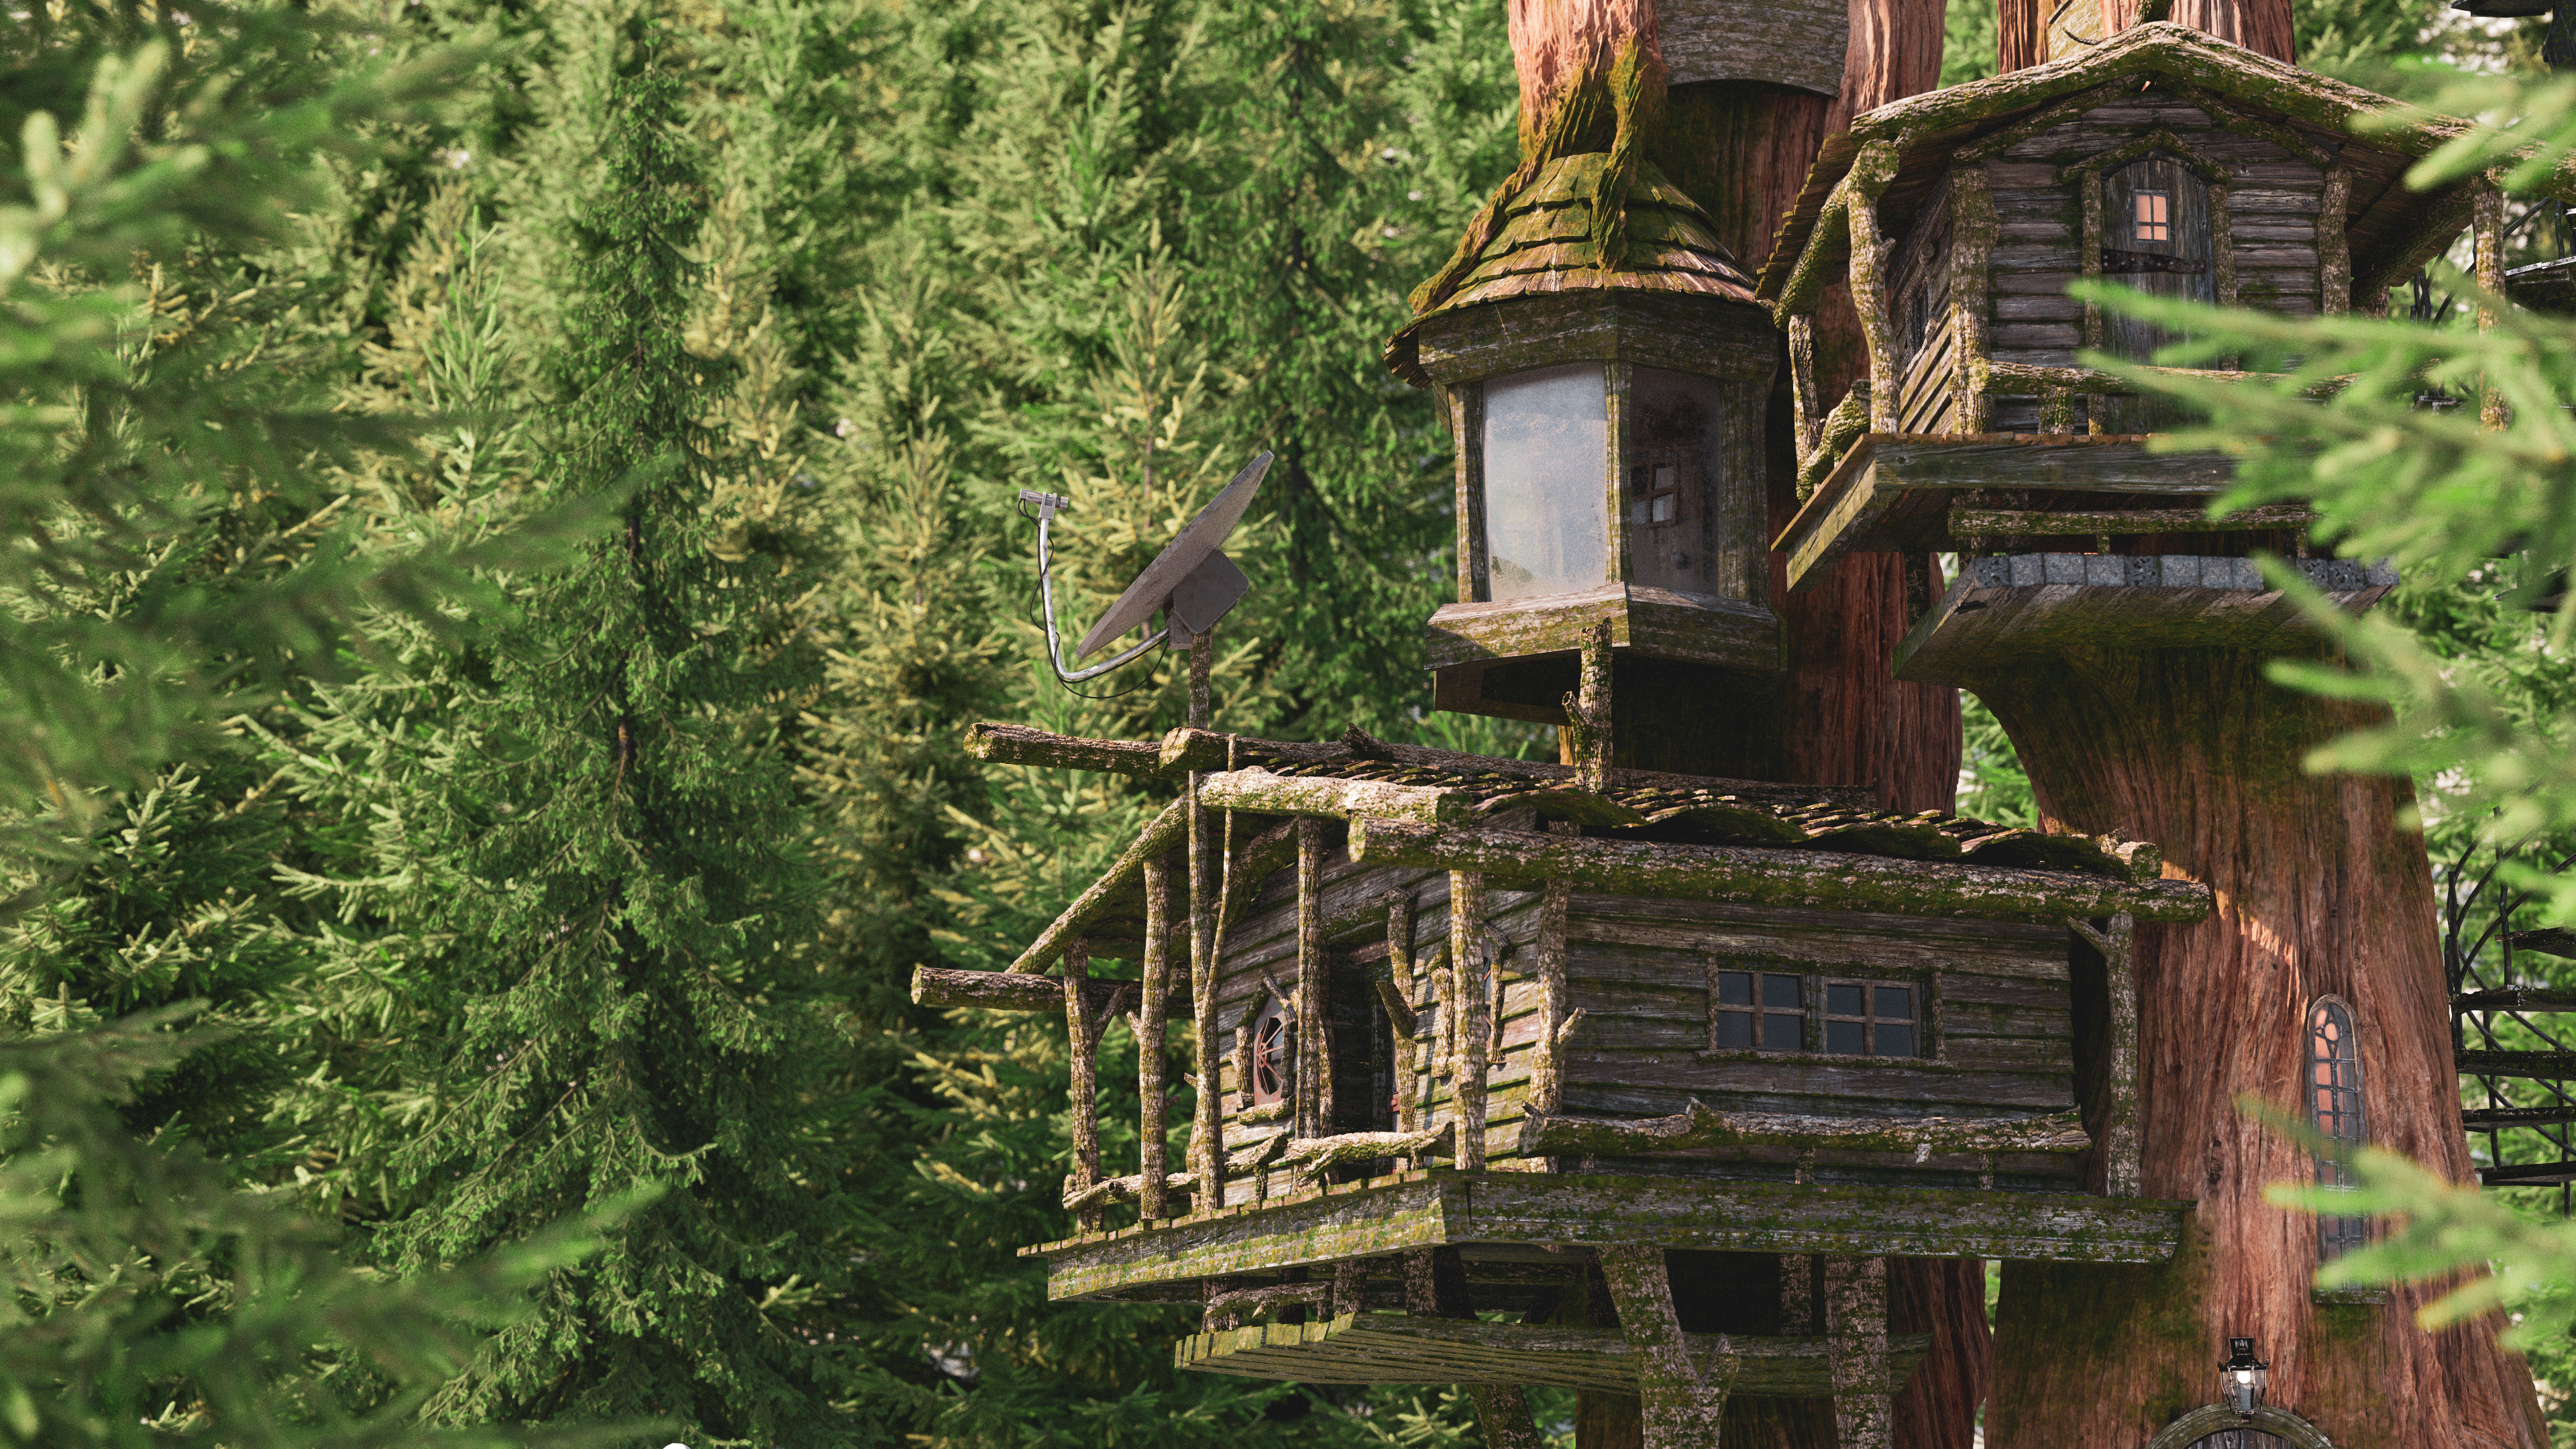
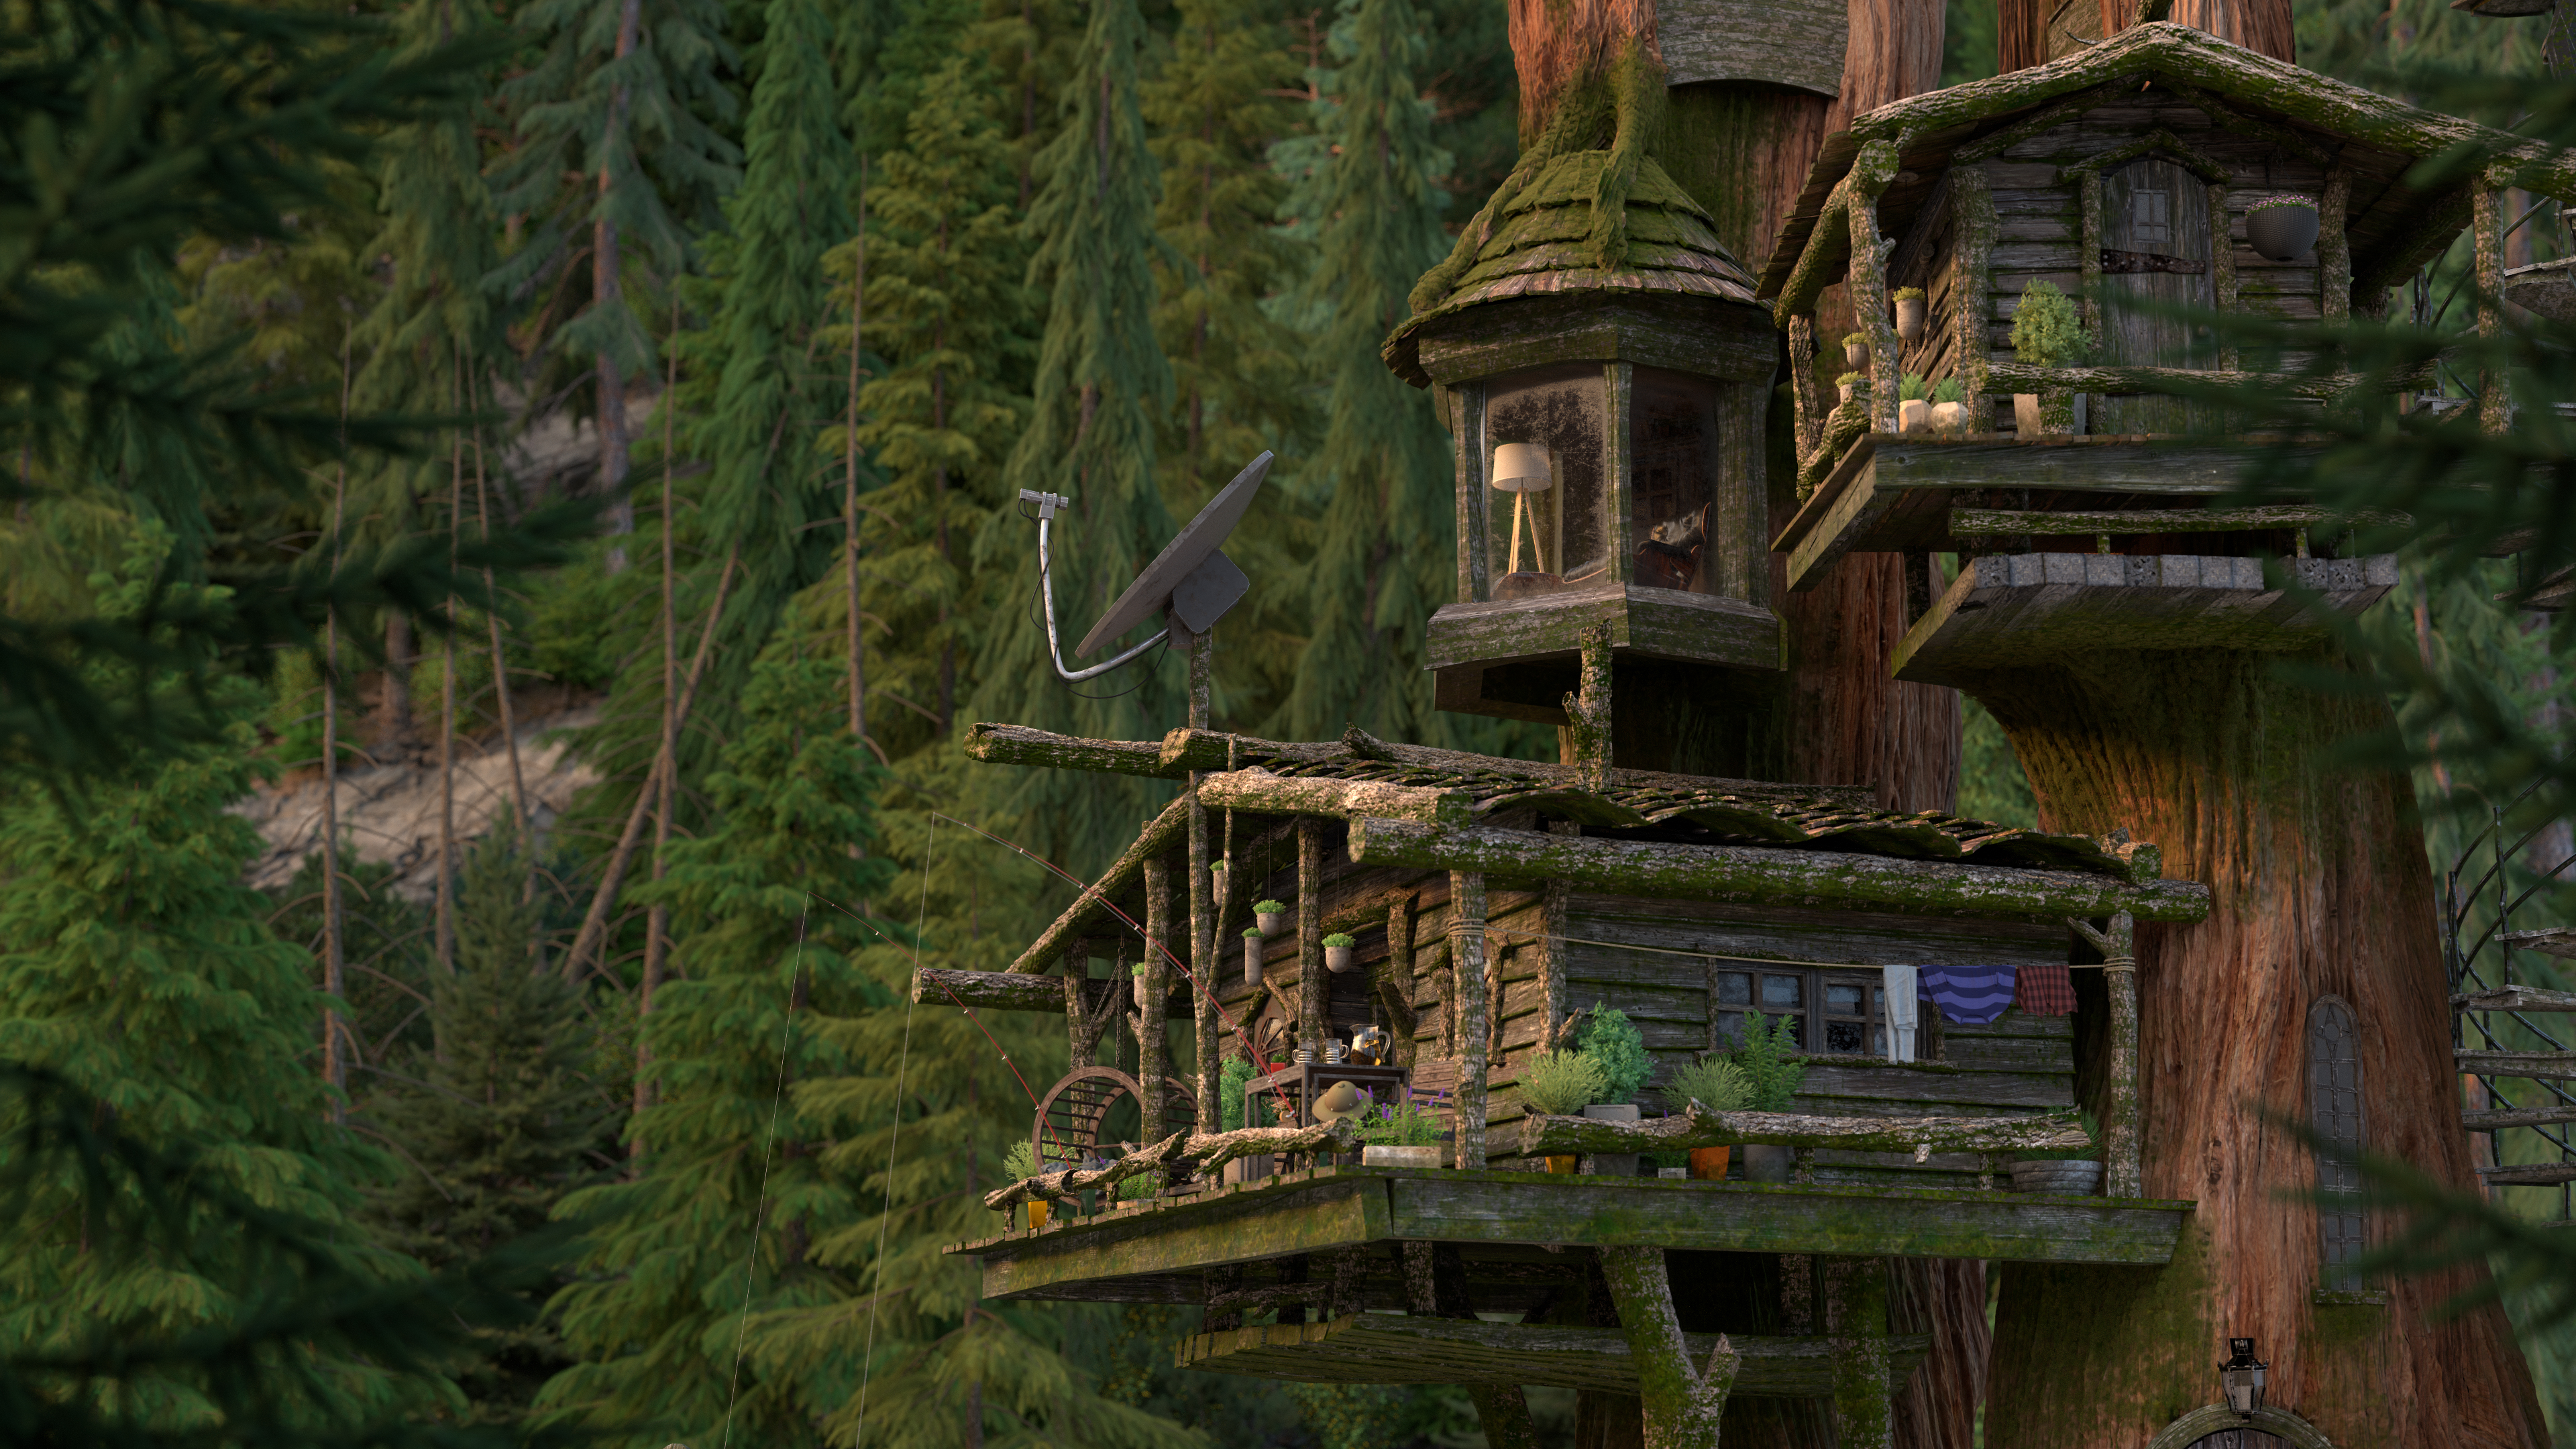
Every once in a while, I make a point of spending some significant personal time working on a personal project that uses tools outside of the stuff I’m used to working on day-to-day (Disney’s Hyperion renderer professionally, Takua Renderer as a hobby). A few times each year, Pixar’s RenderMan group holds an art challenge contest where Pixar provides a un-shaded un-uv’d base model and contestants are responsible for layout, texturing, shading, lighting, additional modeling of supporting elements and surrounding environment, and producing a final image. I thought the most recent RenderMan art challenge, “Woodville”, would make a great excuse for playing with RenderMan 22 for Maya; here’s the final image I came up with:
One big lesson I have learned since entering the rendering world is that there is no such thing as the absolute best overall renderer- there are only renderers that are the best suited for particular workflows, tasks, environments, people, etc. Every in-house renderer is the best renderer in the world for the particular studio that built that renderer, and every commercial renderer is the best renderer in the world for the set of artists that have chosen that renderer as their tool of choice. Another big lesson that I have learned is that even though the Hyperion team at Disney Animation has some of the best rendering engineers in the world, so do all of the other major rendering teams, both commercial and in-house. These lessons are humbling to learn, but also really cool and encouraging if you think about it- these lessons means that for any given problem that arises in the rendering world, as an academic field and as an industry, we get multiple attempts to solve it from many really brilliant minds from a variety of background and a variety of different contexts and environments!
As a result, something I’ve come to strongly believe is that for rendering engineers, there is enormous value in learning to use outside renderers that are not the one we work on day-to-day ourselves. At any given moment, I try to have at least a working familiarity with the latest versions of Pixar’s RenderMan, Solid Angle (Autodesk)’s Arnold, and Chaos Group’s Vray and Corona renderers. All of these renderers are excellent, cutting edge tools, and when new artists join our studio, these are the most common commercial renderers that new artists tend to know how to use. Therefore, knowing how these four renderers work and what vocabulary is associated with them tends to be useful when teaching new artists how to use our in-house renderer, and for providing a common frame of reference when we discuss potential improvements and changes to our in-house renderer. All of the above is the mindset I went into this project with, so this post is meant to be something of a breakdown of what I did, along with some thoughts and observations made along the way. This was a really fun exercise, and I learned a lot!
Layout and Framing
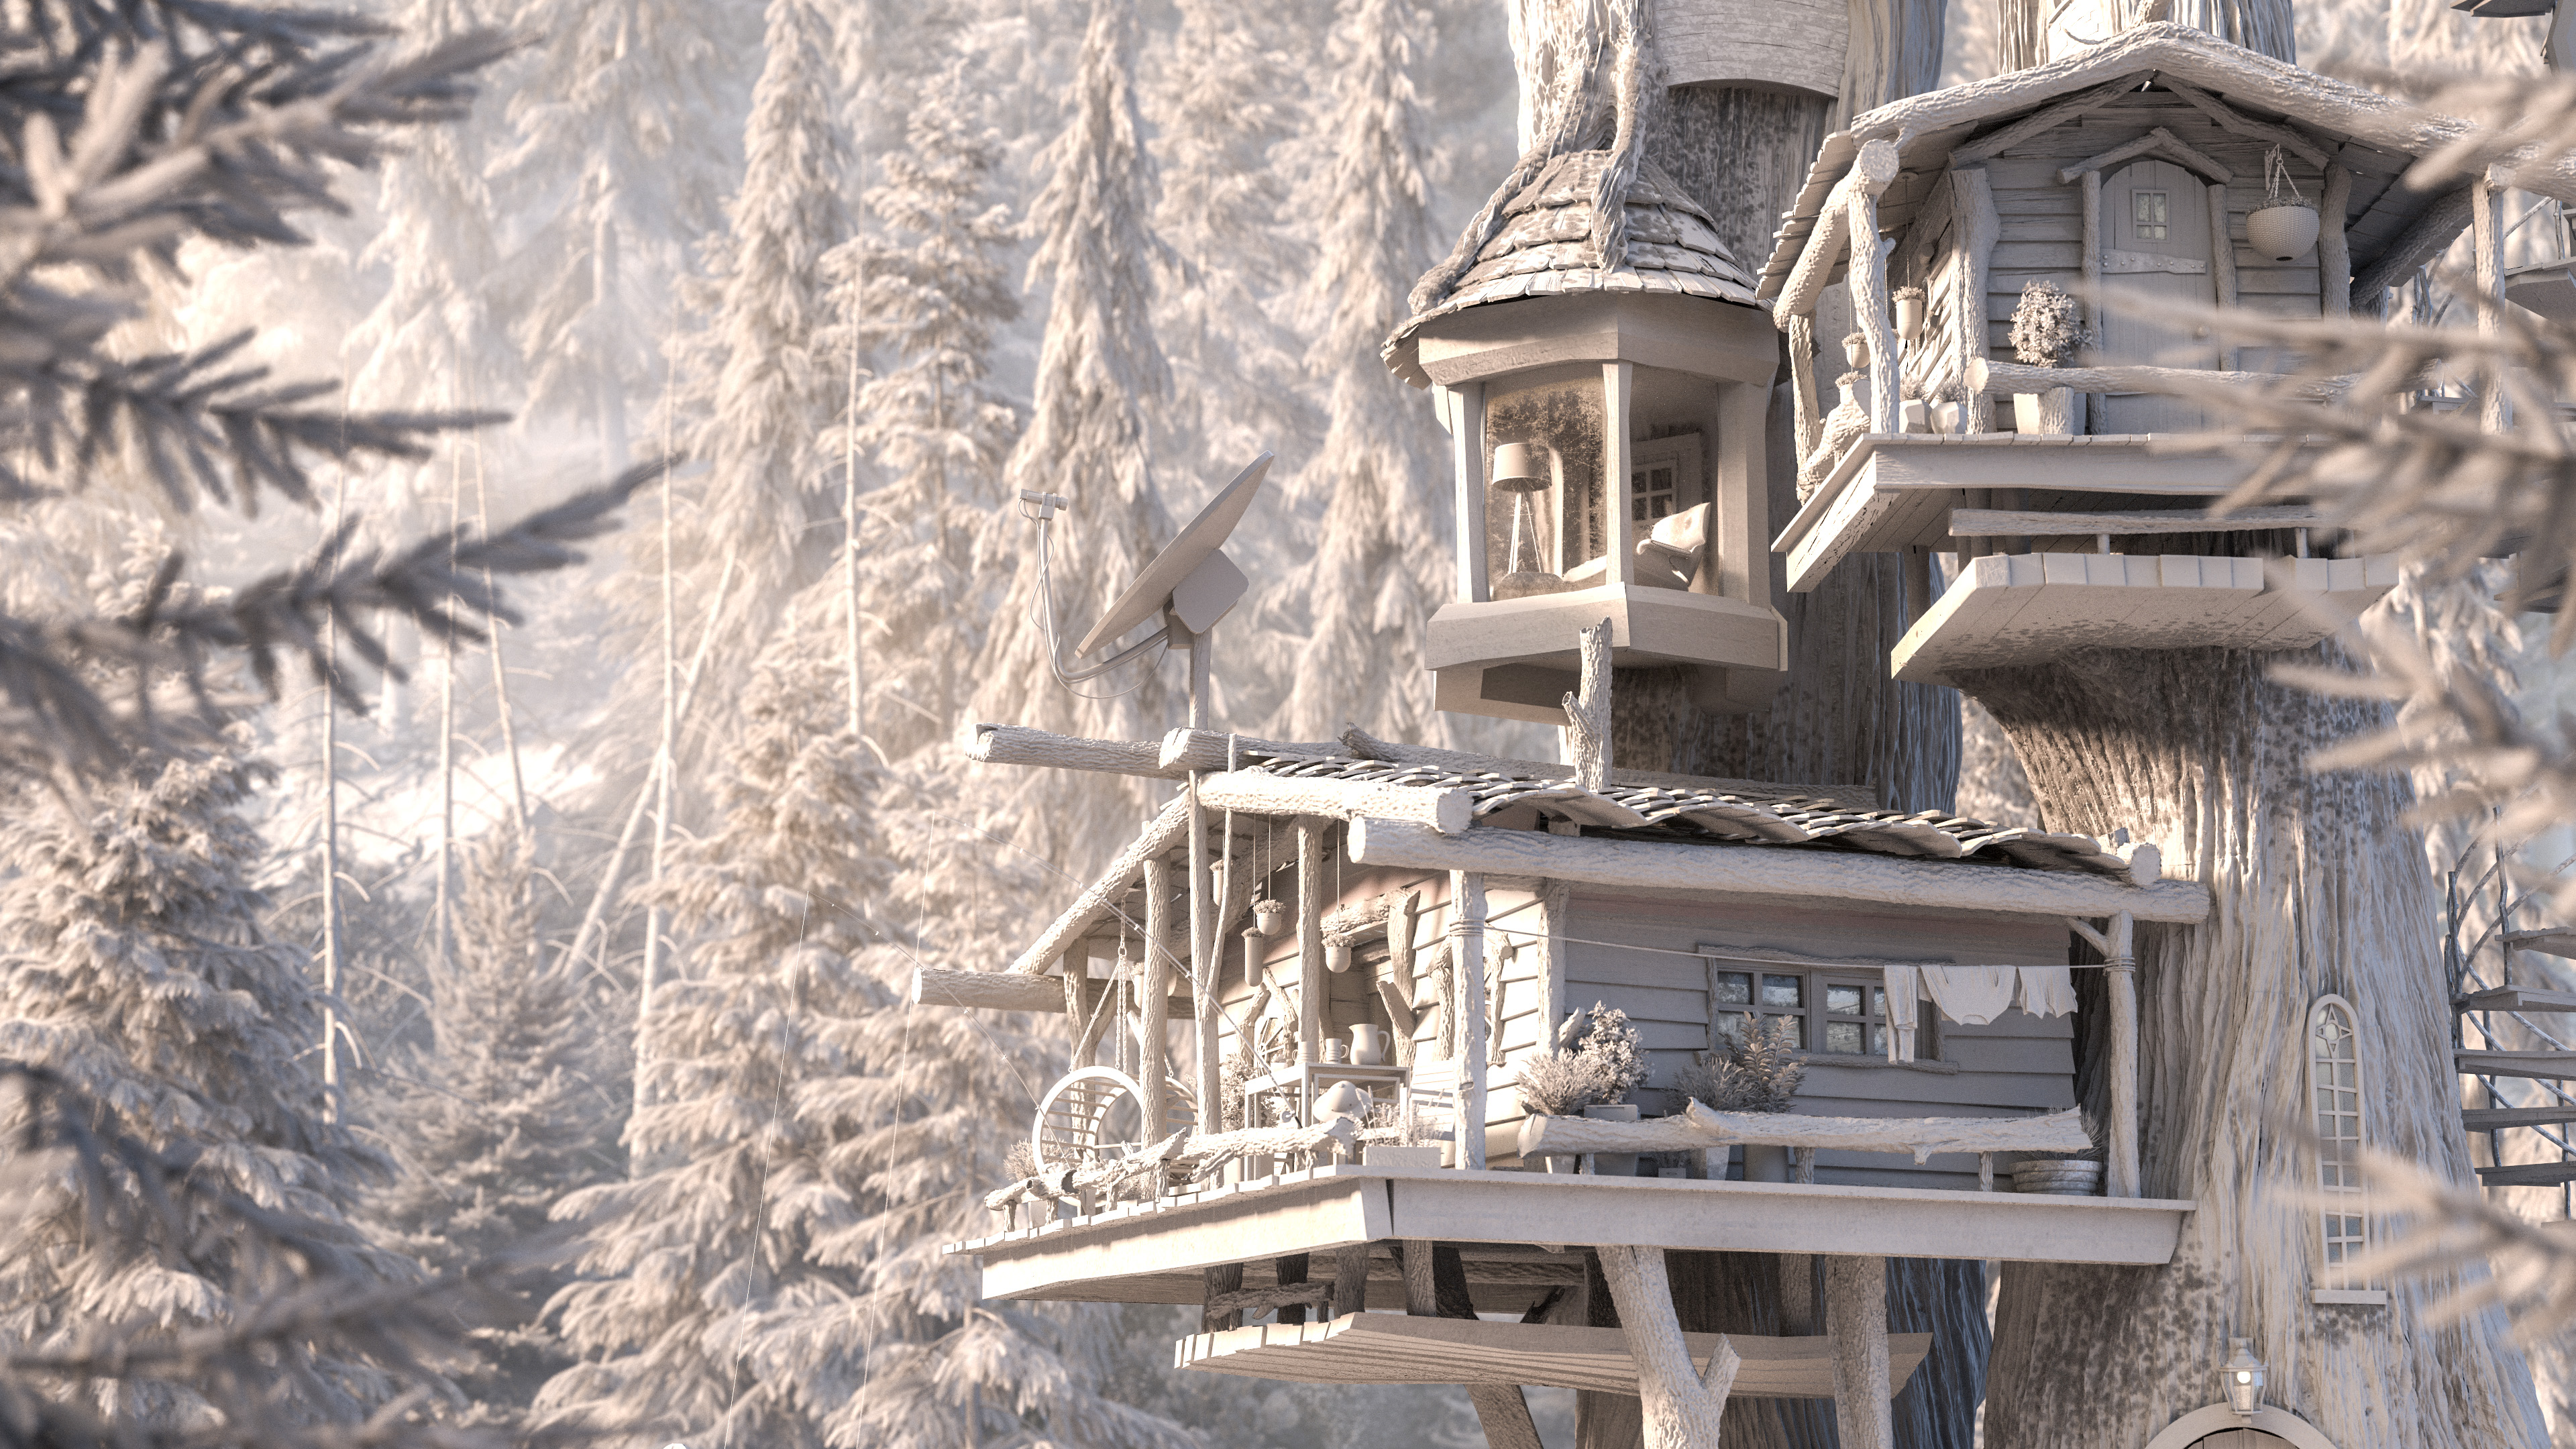
For this art challenge, Pixar supplied a base model without any sort texturing or shading or lighting or anything else. The model is by Alex Shilt, based on a concept by Vasylina Holod. Here is a simple render showing what is provided out of the box:

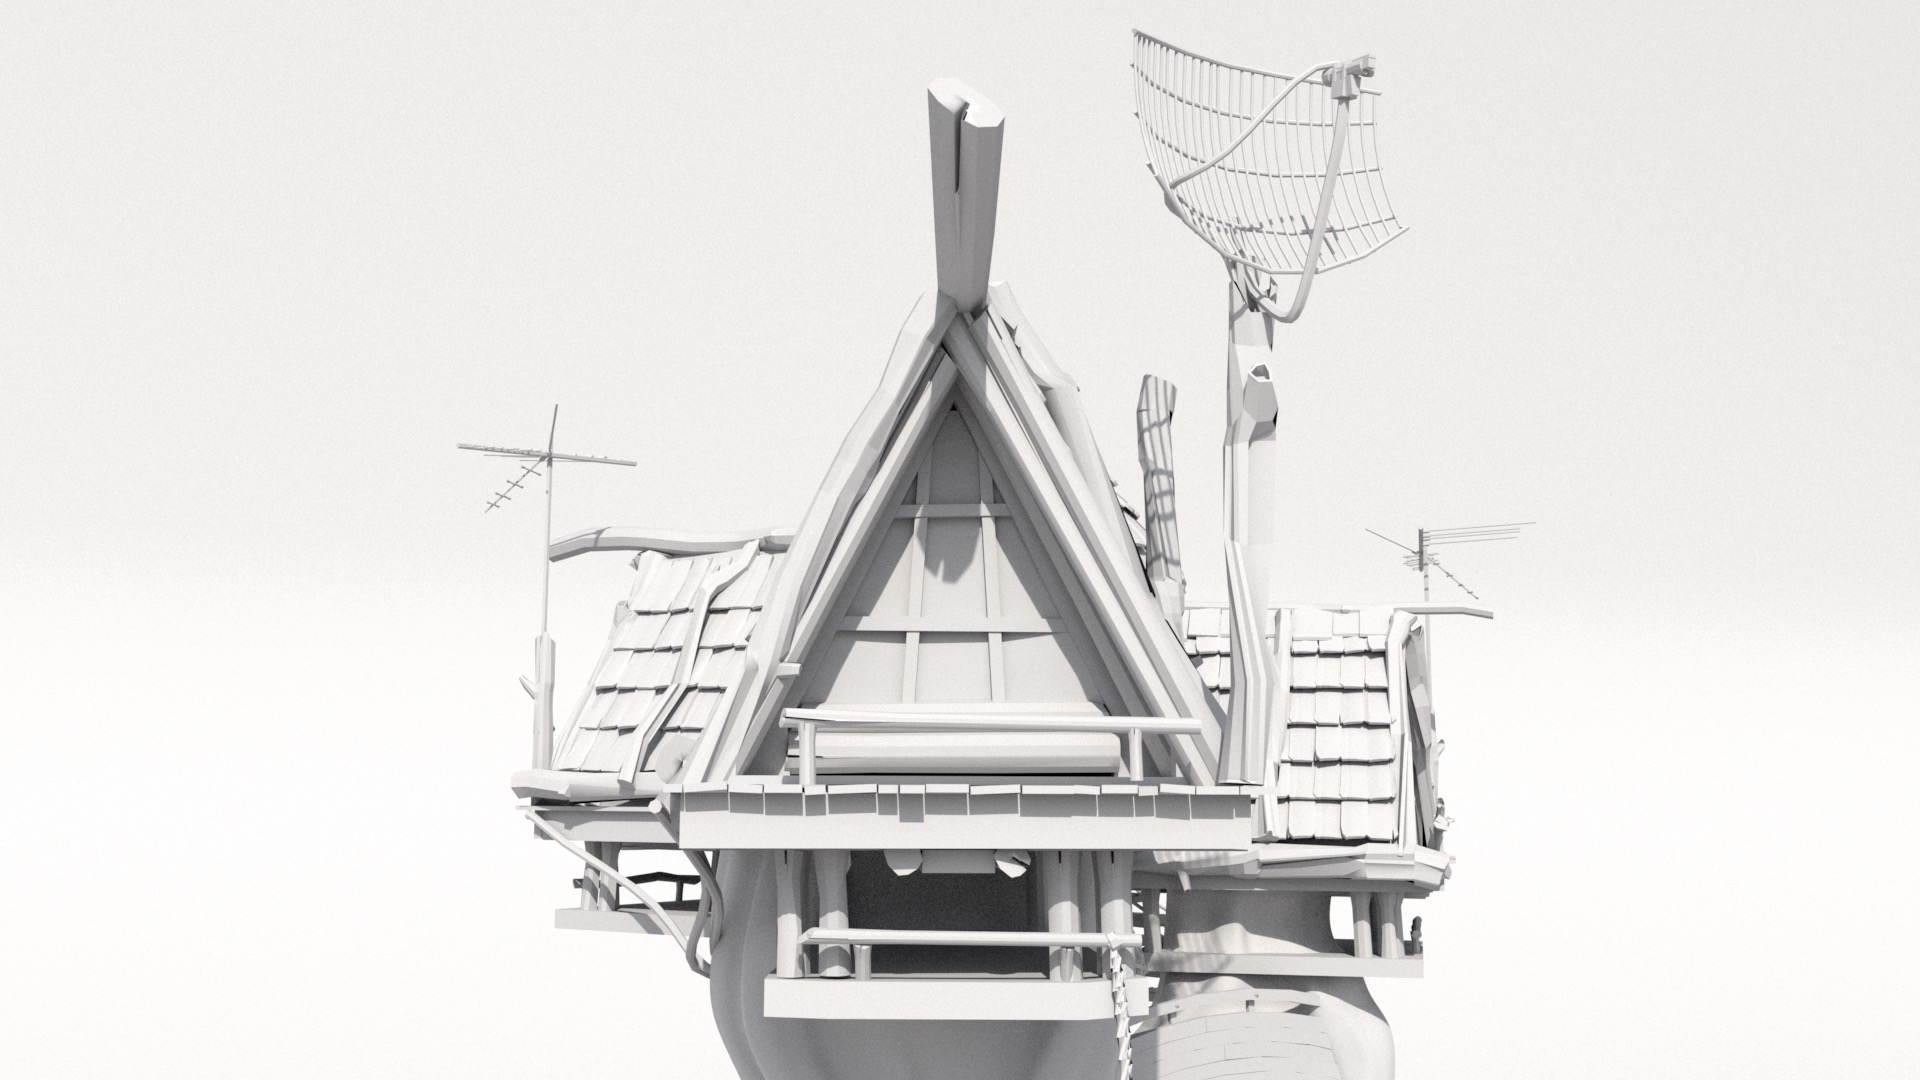
I started with just scouting for some good camera angles. Since I really wanted to focus on high-detail shading for this project, I decided from close to the beginning to pick a close-up camera angle that would allow for showcasing shading detail, at the trade-off of not depicting the entire treehouse. A nice (lazy) bonus is that picking a close-up camera angle meant that I didn’t need to shade the entire treehouse; just the parts in-frame. Instead of scouting using just the GL viewport in Maya, I tried using RenderMan for Maya 22’s IPR mode, which replaces the Maya viewport with a live RenderMan render. This mode wound up being super useful for scouting; being able to interactively play with depth of field settings and see even basic skydome lighting helped a lot in getting a feel for each candidate camera angle. Here are a couple of different white clay test renders I did while trying to find a good camera position and framing:

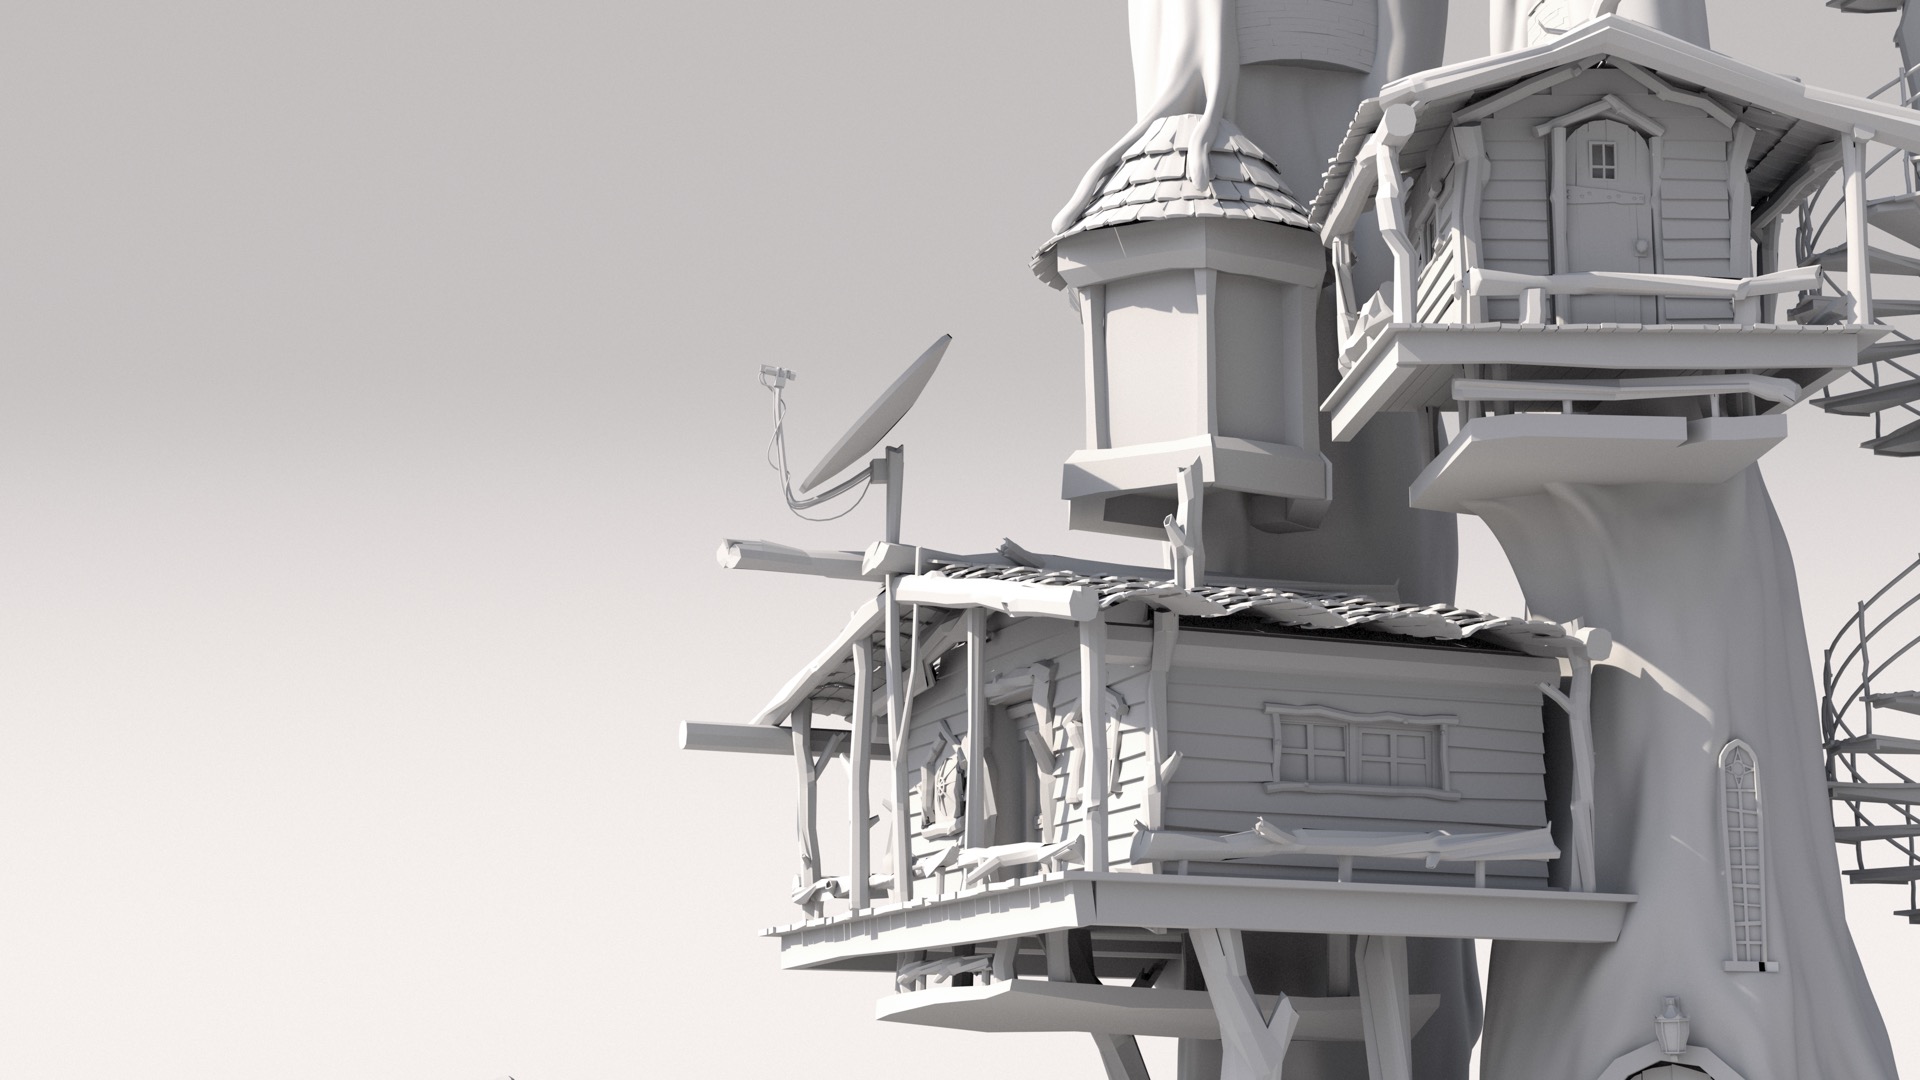
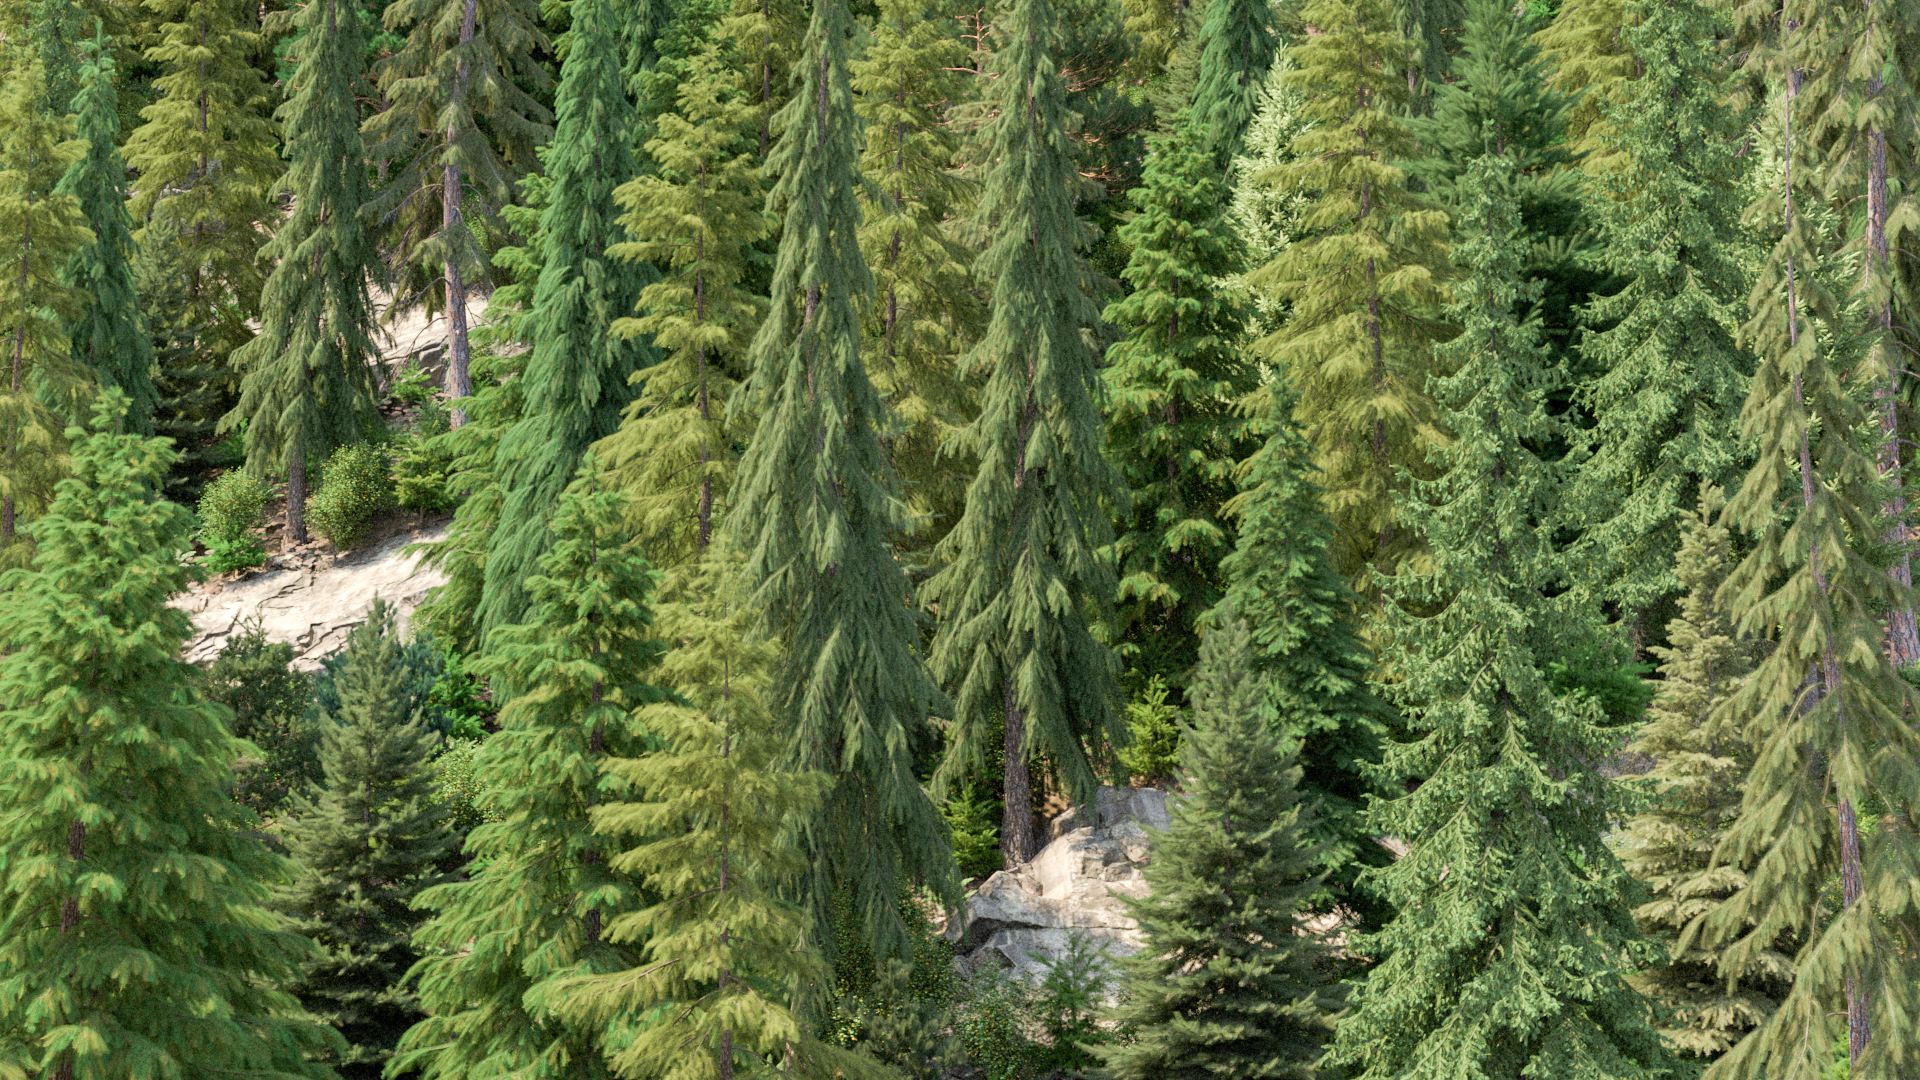
I wound up deciding to go with the camera angle and framing in Figure 6 for several reasons. First off, there are just a lot of bits that looked fun to shade, such as the round tower cabin on the left side of the treehouse. Second, I felt that this angle would allow me to limit how expansive of an environment I would need to build around the treehouse. I decided around this point to put the treehouse in a big mountainous mixed coniferous forest, with the reasoning being that tree trunks as large as the ones in the treehouse could only come from huge redwood trees, which only grow in mountainous coniferous forests. With this camera angle, I could make the background environment a single mountainside covered in trees and not have to build a wider vista.
UVs and Geometry
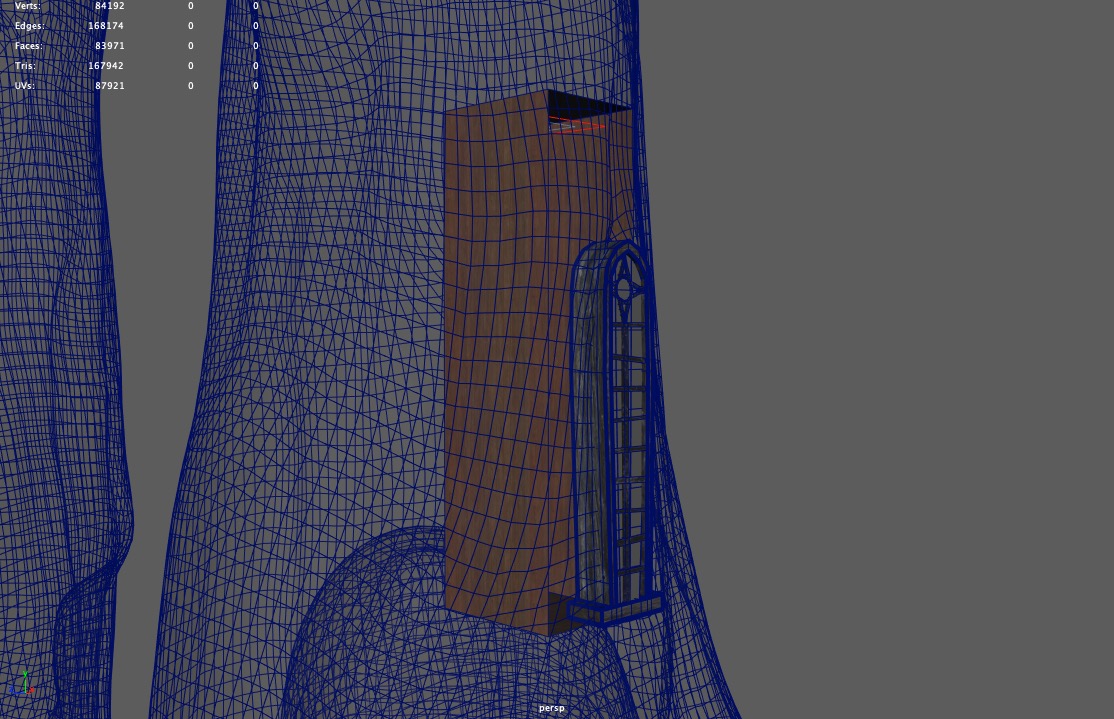
The next step that I took was to try to shade the main tree trunks, since the scale of the tree trunks worried me the most about the entire project. Before I could get to texturing and shading though, I first had to UV-map the tree trunks, and I quickly discovered that before I could even UV-map the tree trunks, I would have to retopologize the meshes themselves, since the tree trunk meshes came with some really messy topology that was basically un-UV-able. I retoplogized the mesh in ZBrush and exported it lower res than the original mesh, and then brought it back into Maya, where I used a shrink-wrap deformer to conform the lower res retopologized mesh back onto the original mesh. The reasoning here was that a lower resolution mesh would be easier to UV unwrap and that displacement later would restore missing detail. Figure 7 shows the wireframe of the original mesh on the left, and the wireframe of my retopologized mesh on the right:
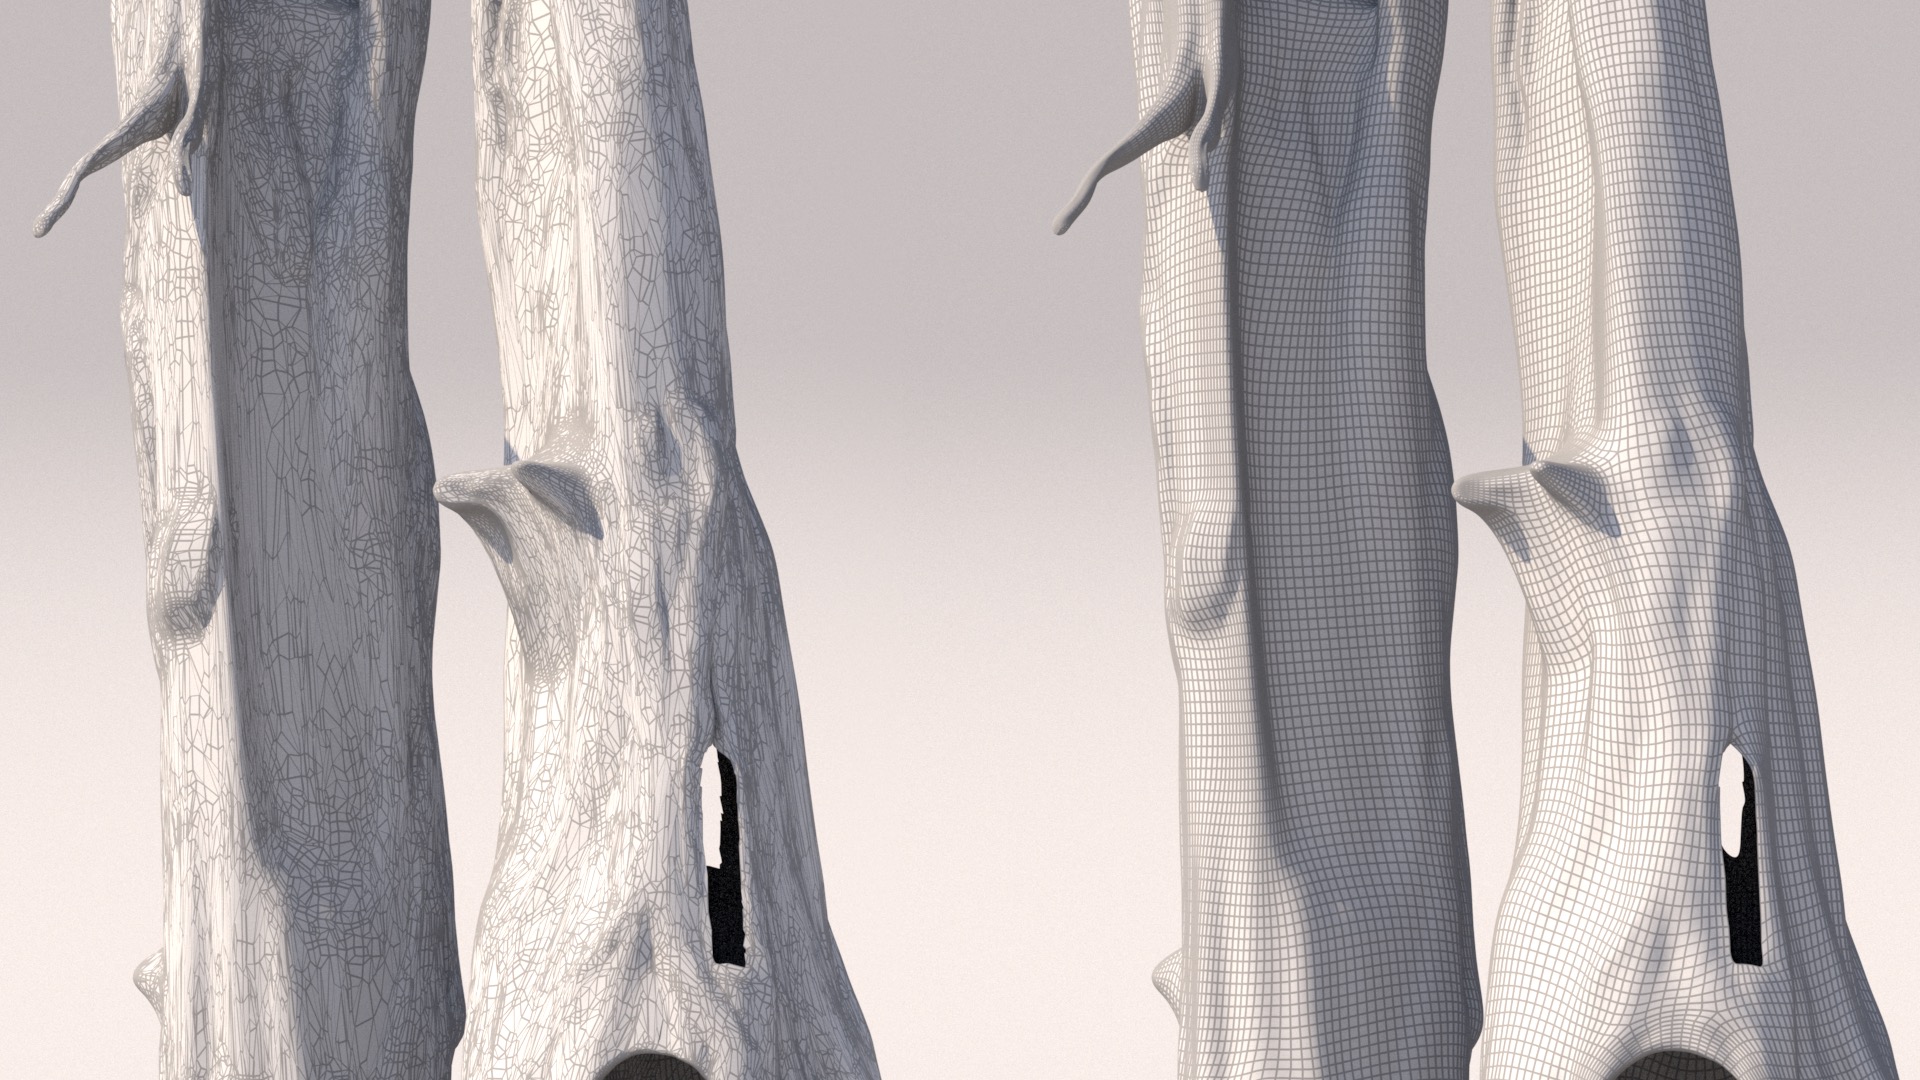
In previous projects, I’ve found a lot of success in using Wenzel Jakob’s Instance Meshes application to retopologize messy geometry, but this time around I used ZBrush’s ZRemesher tool since I wanted as perfect a quad grid as possible (at the expense of losing some mesh fidelity) to make UV unwrapping easier. I UV-unwrapped the remeshed tree trunks by hand; the general approach I took was to slice the tree trunks into a series of stacked cylinders and then unroll each cylinder into as rectangular of a UV shell as I could. For texturing, I started with some photographs of redwood bark I found online, turned them greyscale in Photoshop and adjusted levels and contrast to produce height maps, and then took the height maps and source photographs into Substance Designer, where I made the maps tile seamlessly and also generated normal maps. I then took the tileable textures into Substance Painter and painted the tree trunks using a combination of triplanar projections and manual painting. At this point, I had also blocked in a temporary forest in the background made from just instancing two or three tree models all over the place, which I found useful for being able to help get a sense of how the shading on the treehouse was working in context:
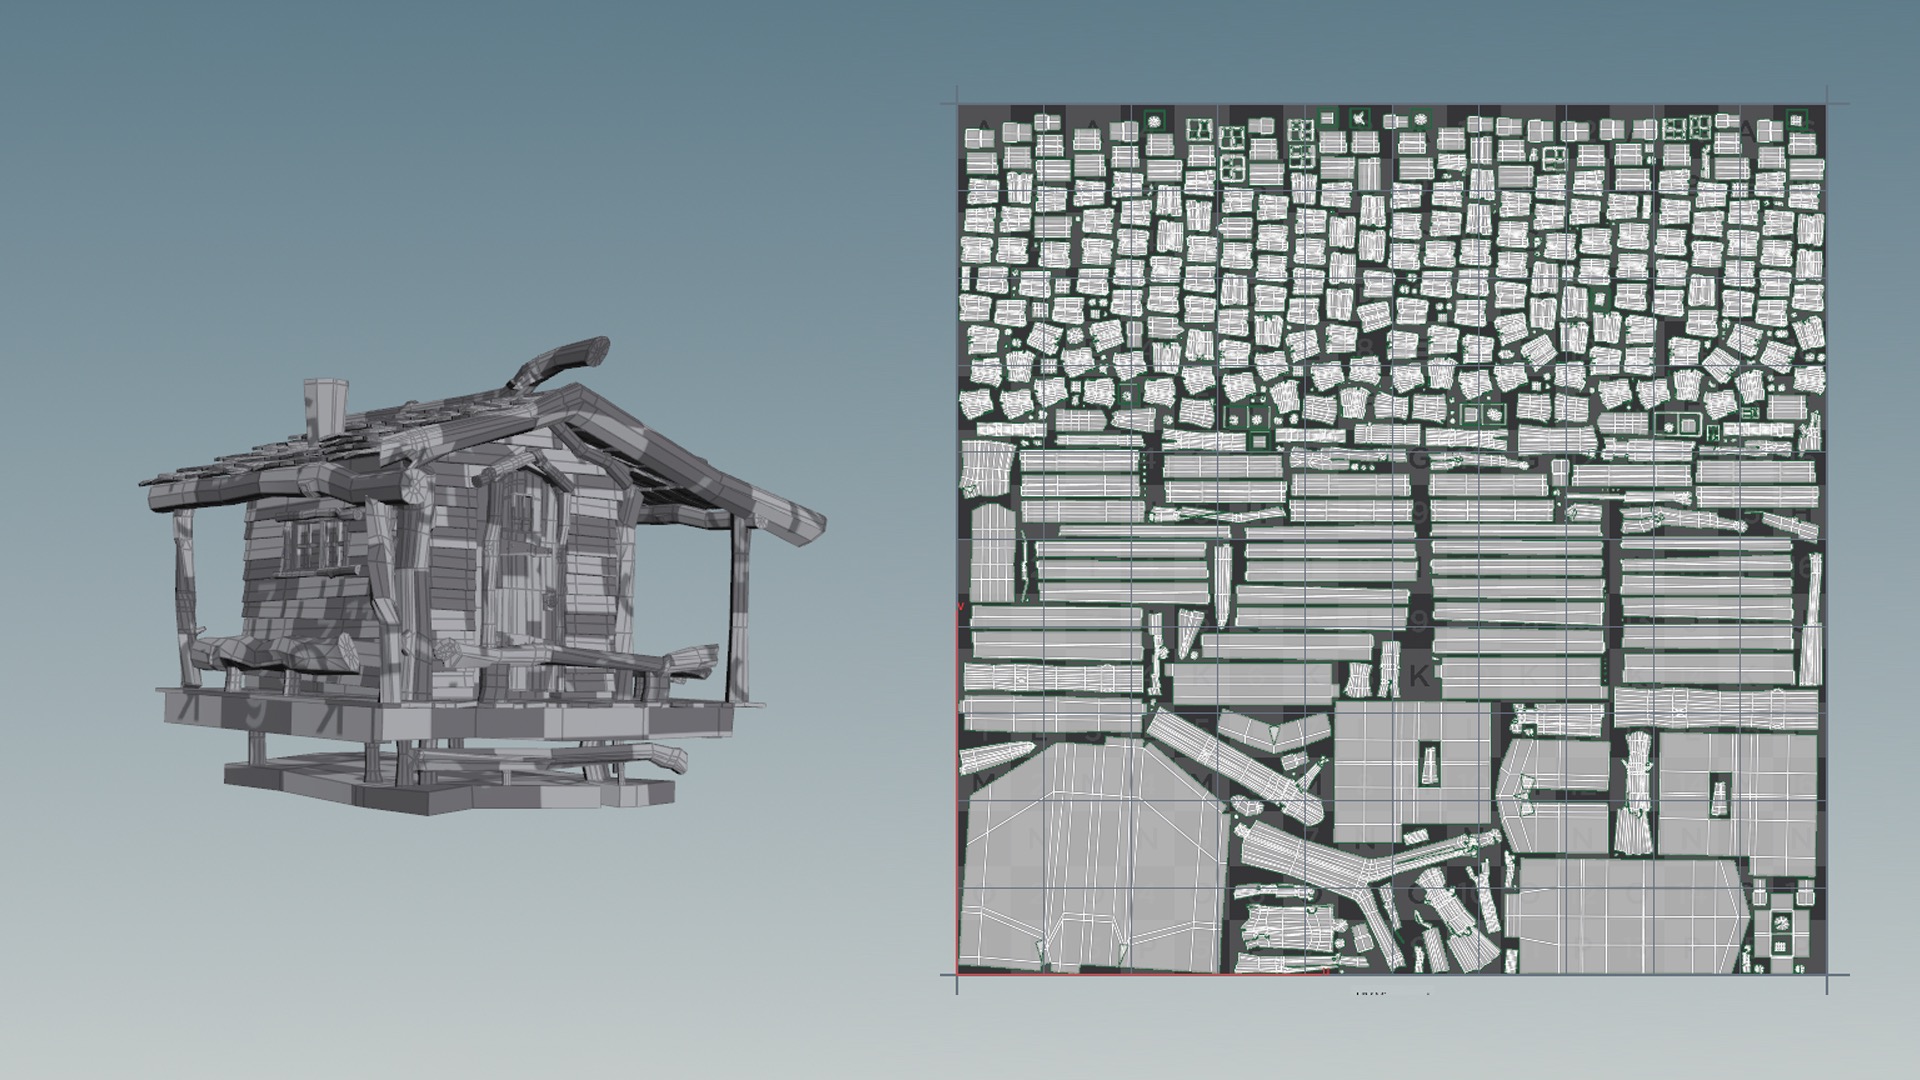
Next up, I worked on getting base shading done for the cabins and various bits and bobs on the treehouse. The general approach I took for the entire treehouse was to do base texturing and shading in Substance Painter, and then add wear and tear, aging, and moss in RenderMan through procedural PxrLayerSurface layers driven by a combination of procedural PxrRoundCube and PxrDirt nodes and hand-painted dirt and wear masks. First though, I had to UV-unwrap all of the cabins and stuff. I tried using Houdini’s Auto UV SOP that comes with Houdini’s Game Tools package… the result (for an example, see Figure 9) was really surprisingly good! In most cases I still had to do a lot of manual cleanup work, such as re-stitching some UV shells together and re-laying-out all of the shells, but the output from Houdini’s Auto UV SOP provided a solid starting point. For each cabin, I grouped surfaces that were going to have a similar material into a single UDIM tile, and sometimes I split similar materials across multiple UDIM tiles if I wanted more resolution. This entire process was… not really fun… it took a lot of time and was basically just busy-work. I vastly prefer being able to paint Ptex instead of having to UV-unwrap and lay out UDIM tiles, but since I was using Substance Painter, Ptex wasn’t an option on this project.
Texturing in Substance Painter and Shading
In Substance Painter, the general workflow I used was to start with multiple triplanar projections of (heavily edited) Quixel Megascans surfaces masked and oriented to different sections of a surface, and then paint on top. Through this process, I was able to get bark to flow with the curves of each log and whatnot. Then, in RenderMan for Maya, I took all of the textures from Substance Painter and used them to drive the base layer of a PxrLayeredSurface shader. All of the textures were painted to be basically greyscale or highly desaturated, and then in Maya I used PxrColorCorrect and PxrVary nodes to add in color. This way, I was able to iteratively play with and dial in colors in RenderMan’s IPR mode without having to roundtrip back to Substance Painter too much. Since the camera in my frame is relatively close to the treehouse, having lots of detail was really important. I put high-res displacement and normal maps on almost everything, which I found helpful for getting that extra detail in. I found that setting micropolygon length to be greater than 1 polygon per pixel was useful for getting extra detail in with displacement, at the cost of a bit more memory usage (which was perfectly tolerable in my case).
One of the unfortunate things about how I chose to UV-unwrap the tree trunks is that UV seams cut across parts of the tree trunks that are visible to the camera; as a result, if you zoom into the final 4K renders, you can see tiny line artifacts in the displacement where UV seams meet. These artifacts arise from displacement values not interpolating smoothly across UV seams when texture filtering is in play; this problem can sometimes be avoided by very carefully hiding UV seams, but sometimes there is no way. The problem in my case is somewhat reduced by expanding displacement values beyond the boundaries of each UV shell in the displacement textures (most applications like Substance Painter can do this natively), but again, this doesn’t completely solve the problem, since expanding values beyond boundaries can only go so far until you run into another nearby UV shell and since texture filtering widths can be variable. This problem is one of the major reasons why we use Ptex so heavily at Disney Animation; Ptex’s robust cross-face filtering functionality sidesteps this problem entirely. I really wish Substance Painter could output !
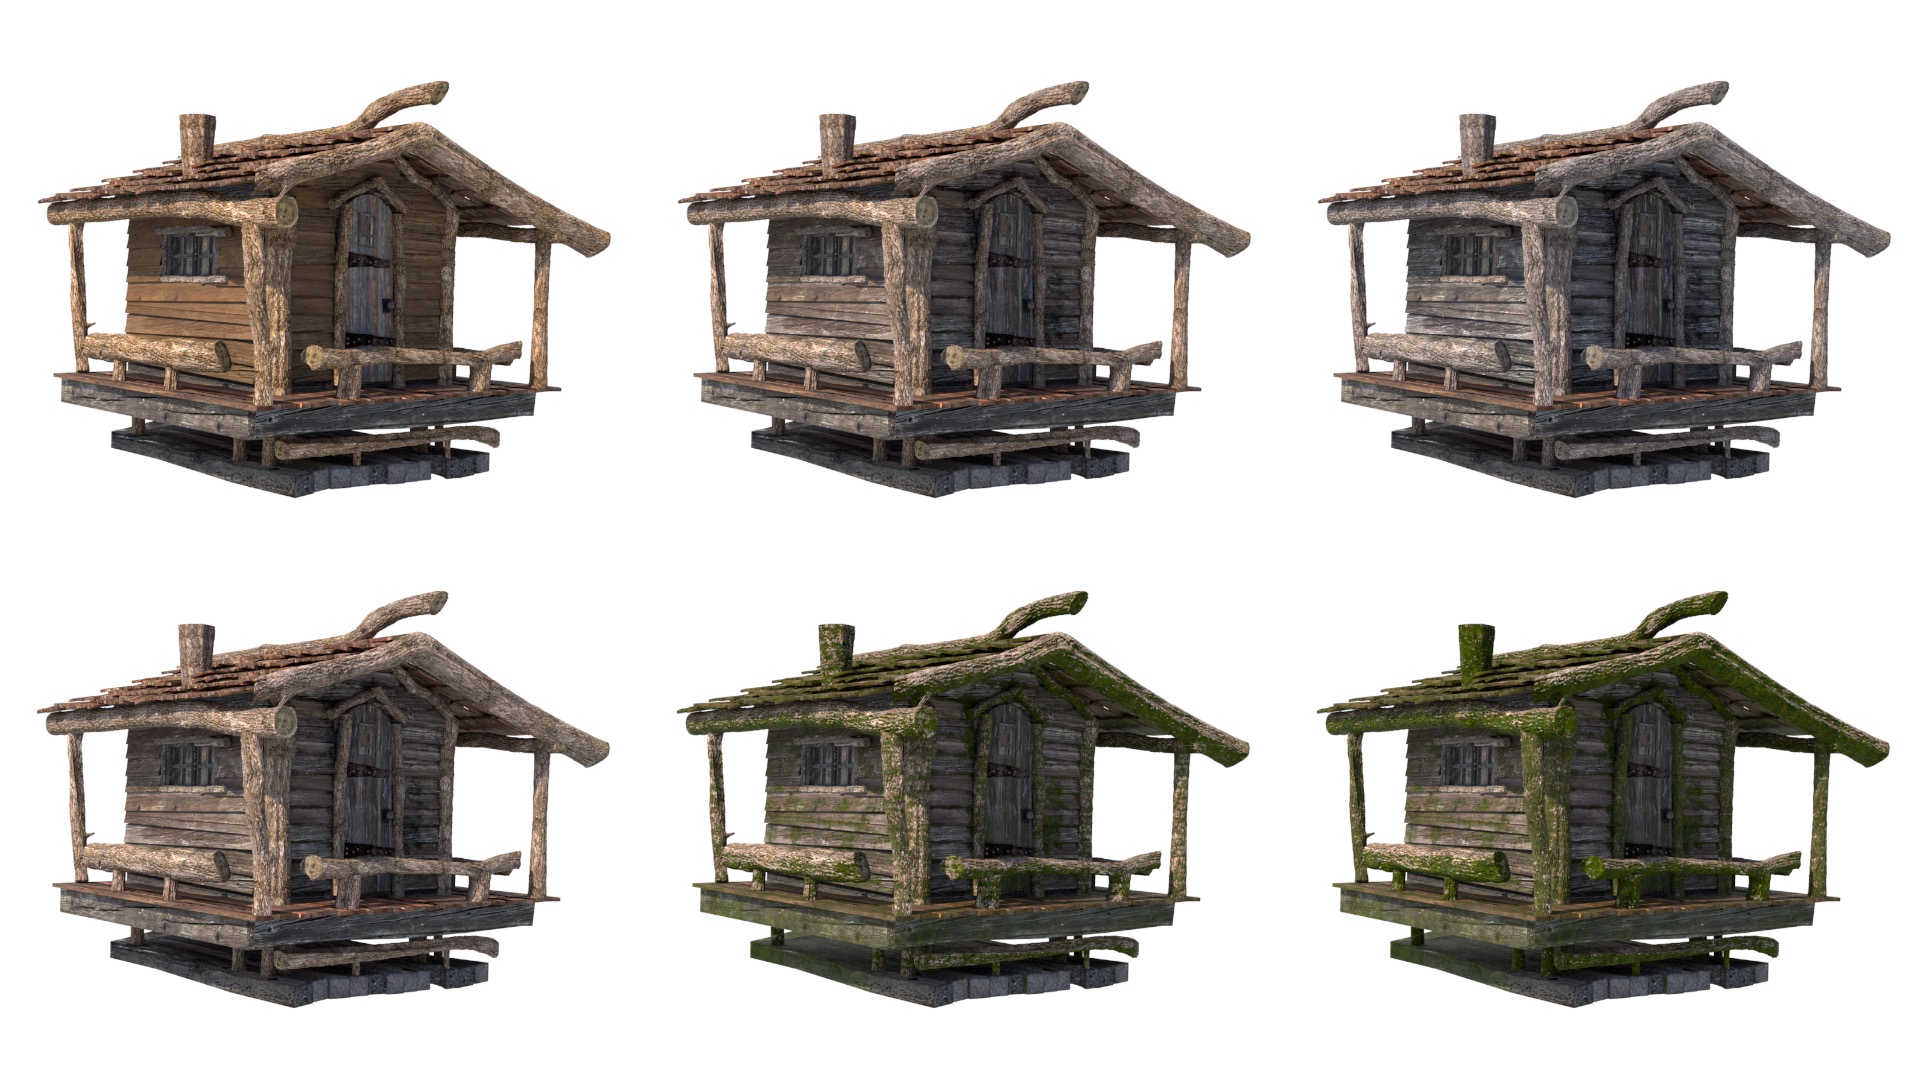
For dialing in the colors of the base wood shaders, I created versions of the wood shader base color textures that looked like newer wood and older sun-bleached wood, and then I used a PxrBlend node in each wood shader to blend between the newer and older looking wood, along with procedural wear to make sure that the blend wasn’t totally uniform. Across all of the various wood shaders in the scene, I tied all of the blend values to a single PxrToFloat node, so that I could control how aged all wood across the entire scene looks with a single value. For adding moss to everything, I used a PxrRoundCube triplanar to set up a base mask for where moss should go. The triplanar mask was set up so that moss appears heavily on the underside of objects, less on the sides, and not at all on top. The reasoning for making moss appear on undersides is because in the type of conifer forest I set my scene in, moss tends to grow where moisture and shade are available, which tends to be on the underside of things. The moss itself was also driven by a triplanar projection and was combined into each wood shader as a layer in PxrLayerSurface. I also did some additional manual mask painting in Substance Painter to get moss into some more crevices and corners and stuff on all of the wooden sidings and the wooden doors and whatnot. Finally, the overall amount of moss across all of the cabins is modulated by another single PxrToFloat node, allowing me to control the overall amount of moss using another single value. Figure 10 shows how I could vary the age of the wood on the cabins, along with the amount of moss.
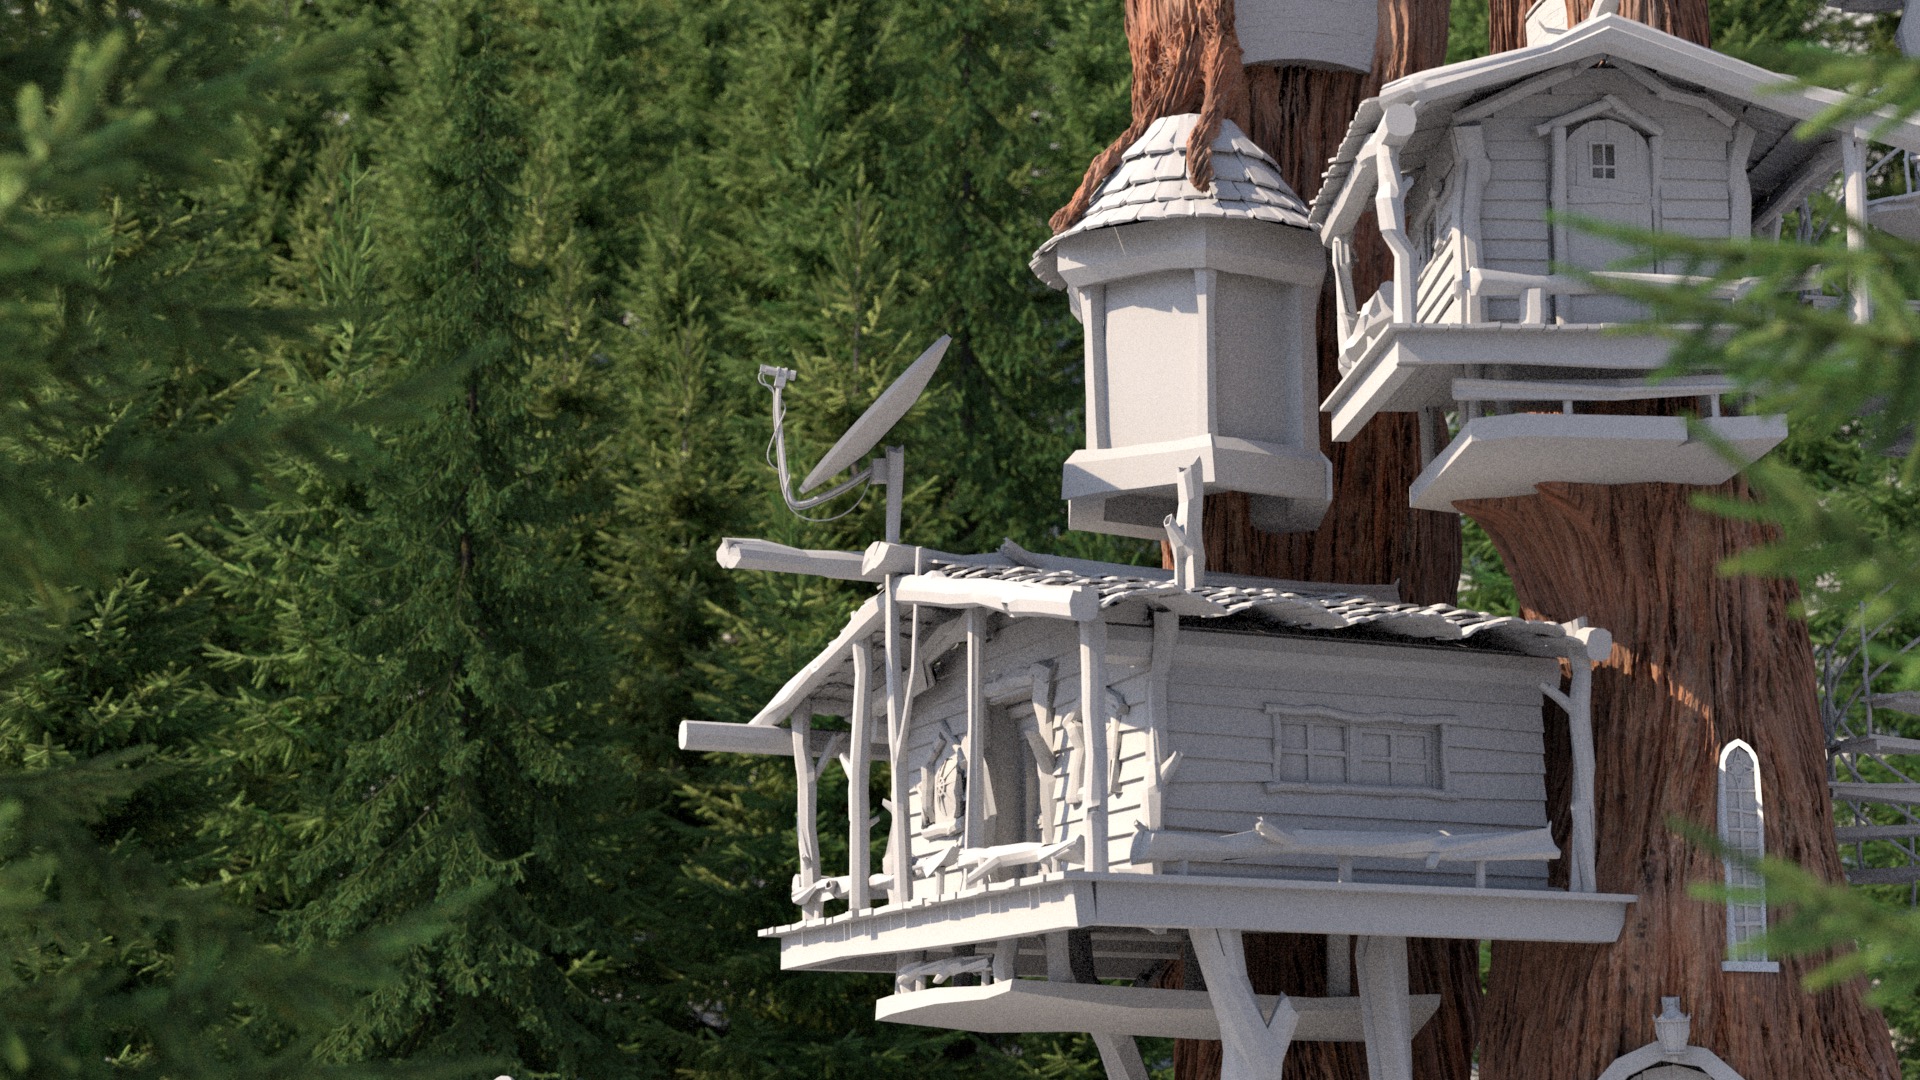
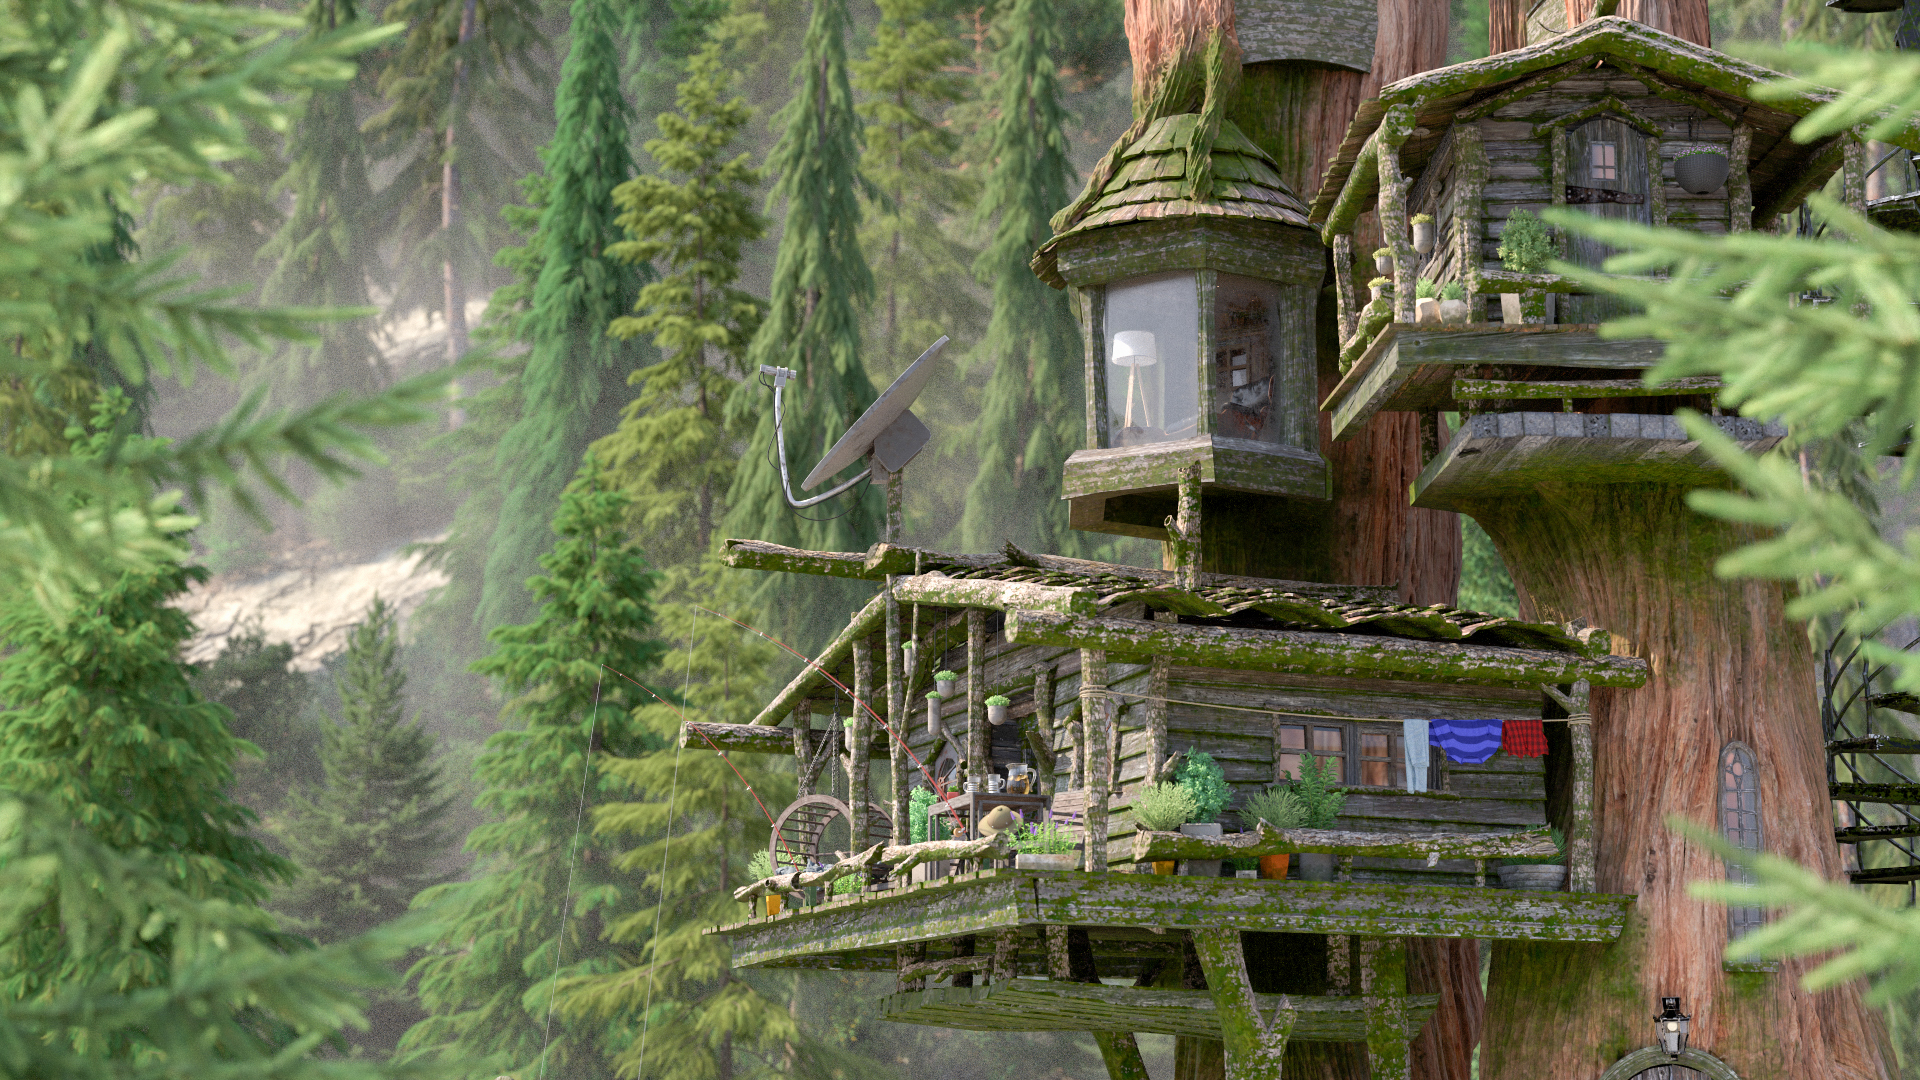
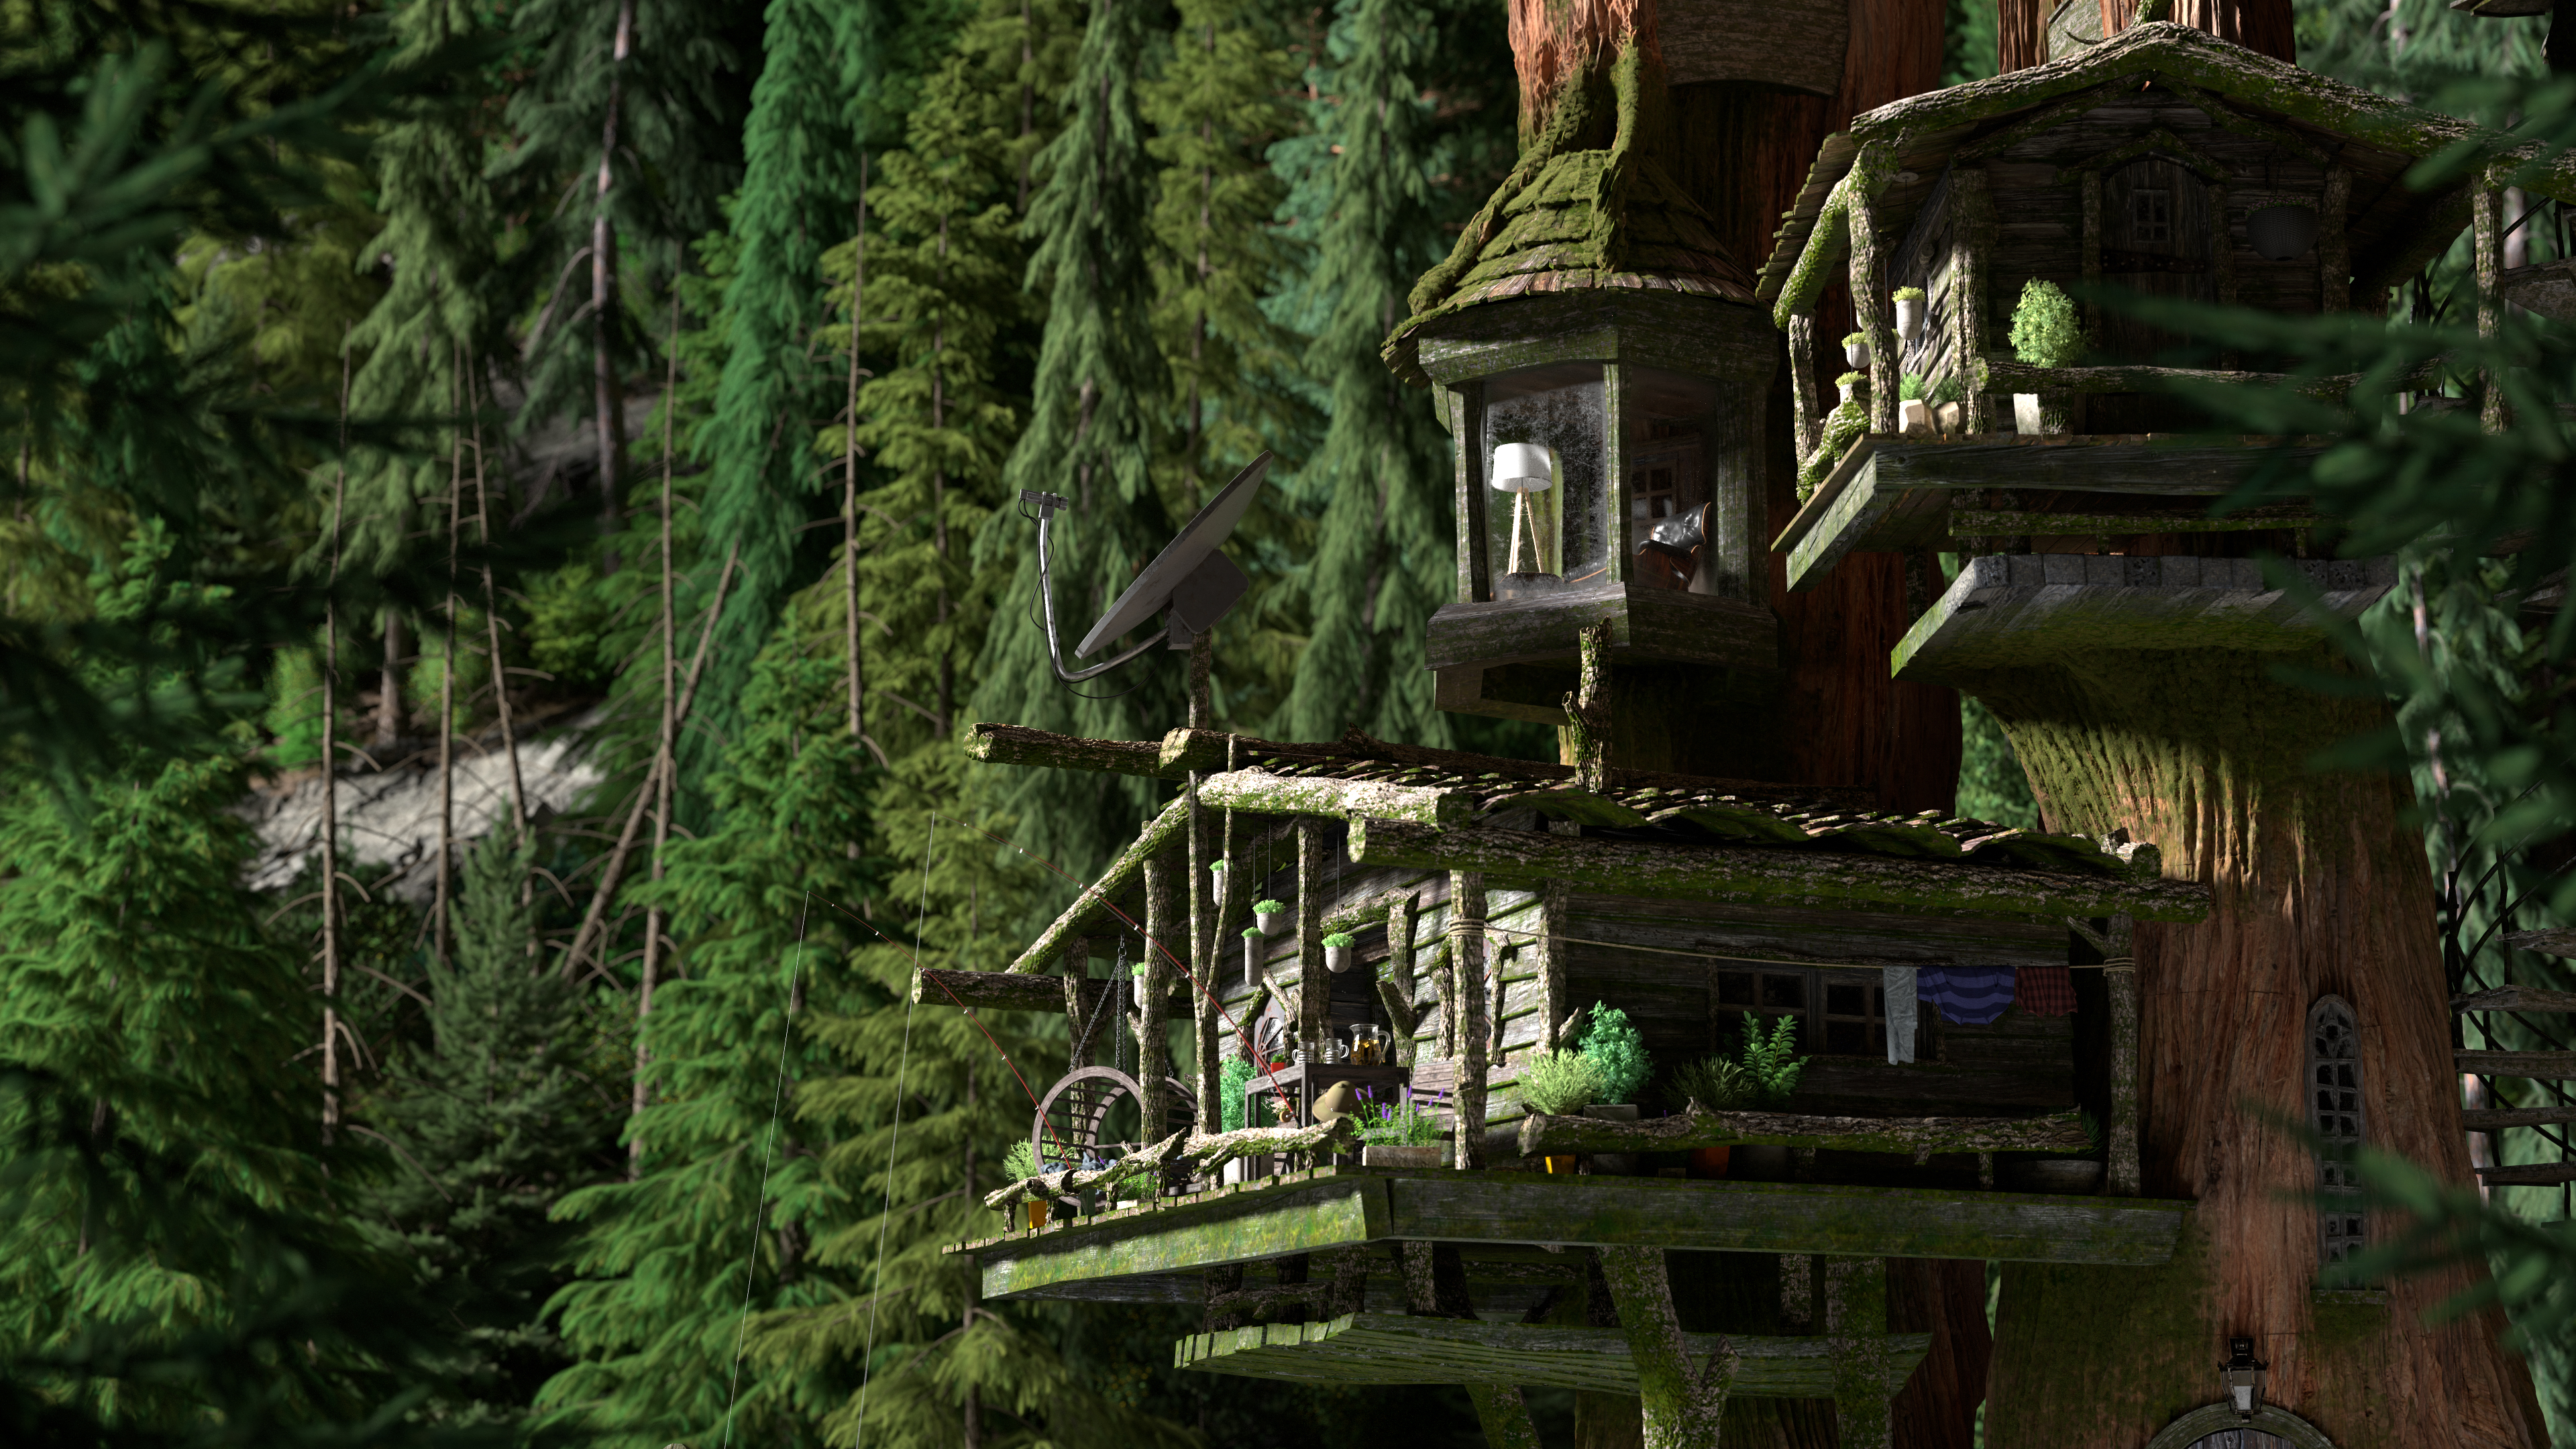
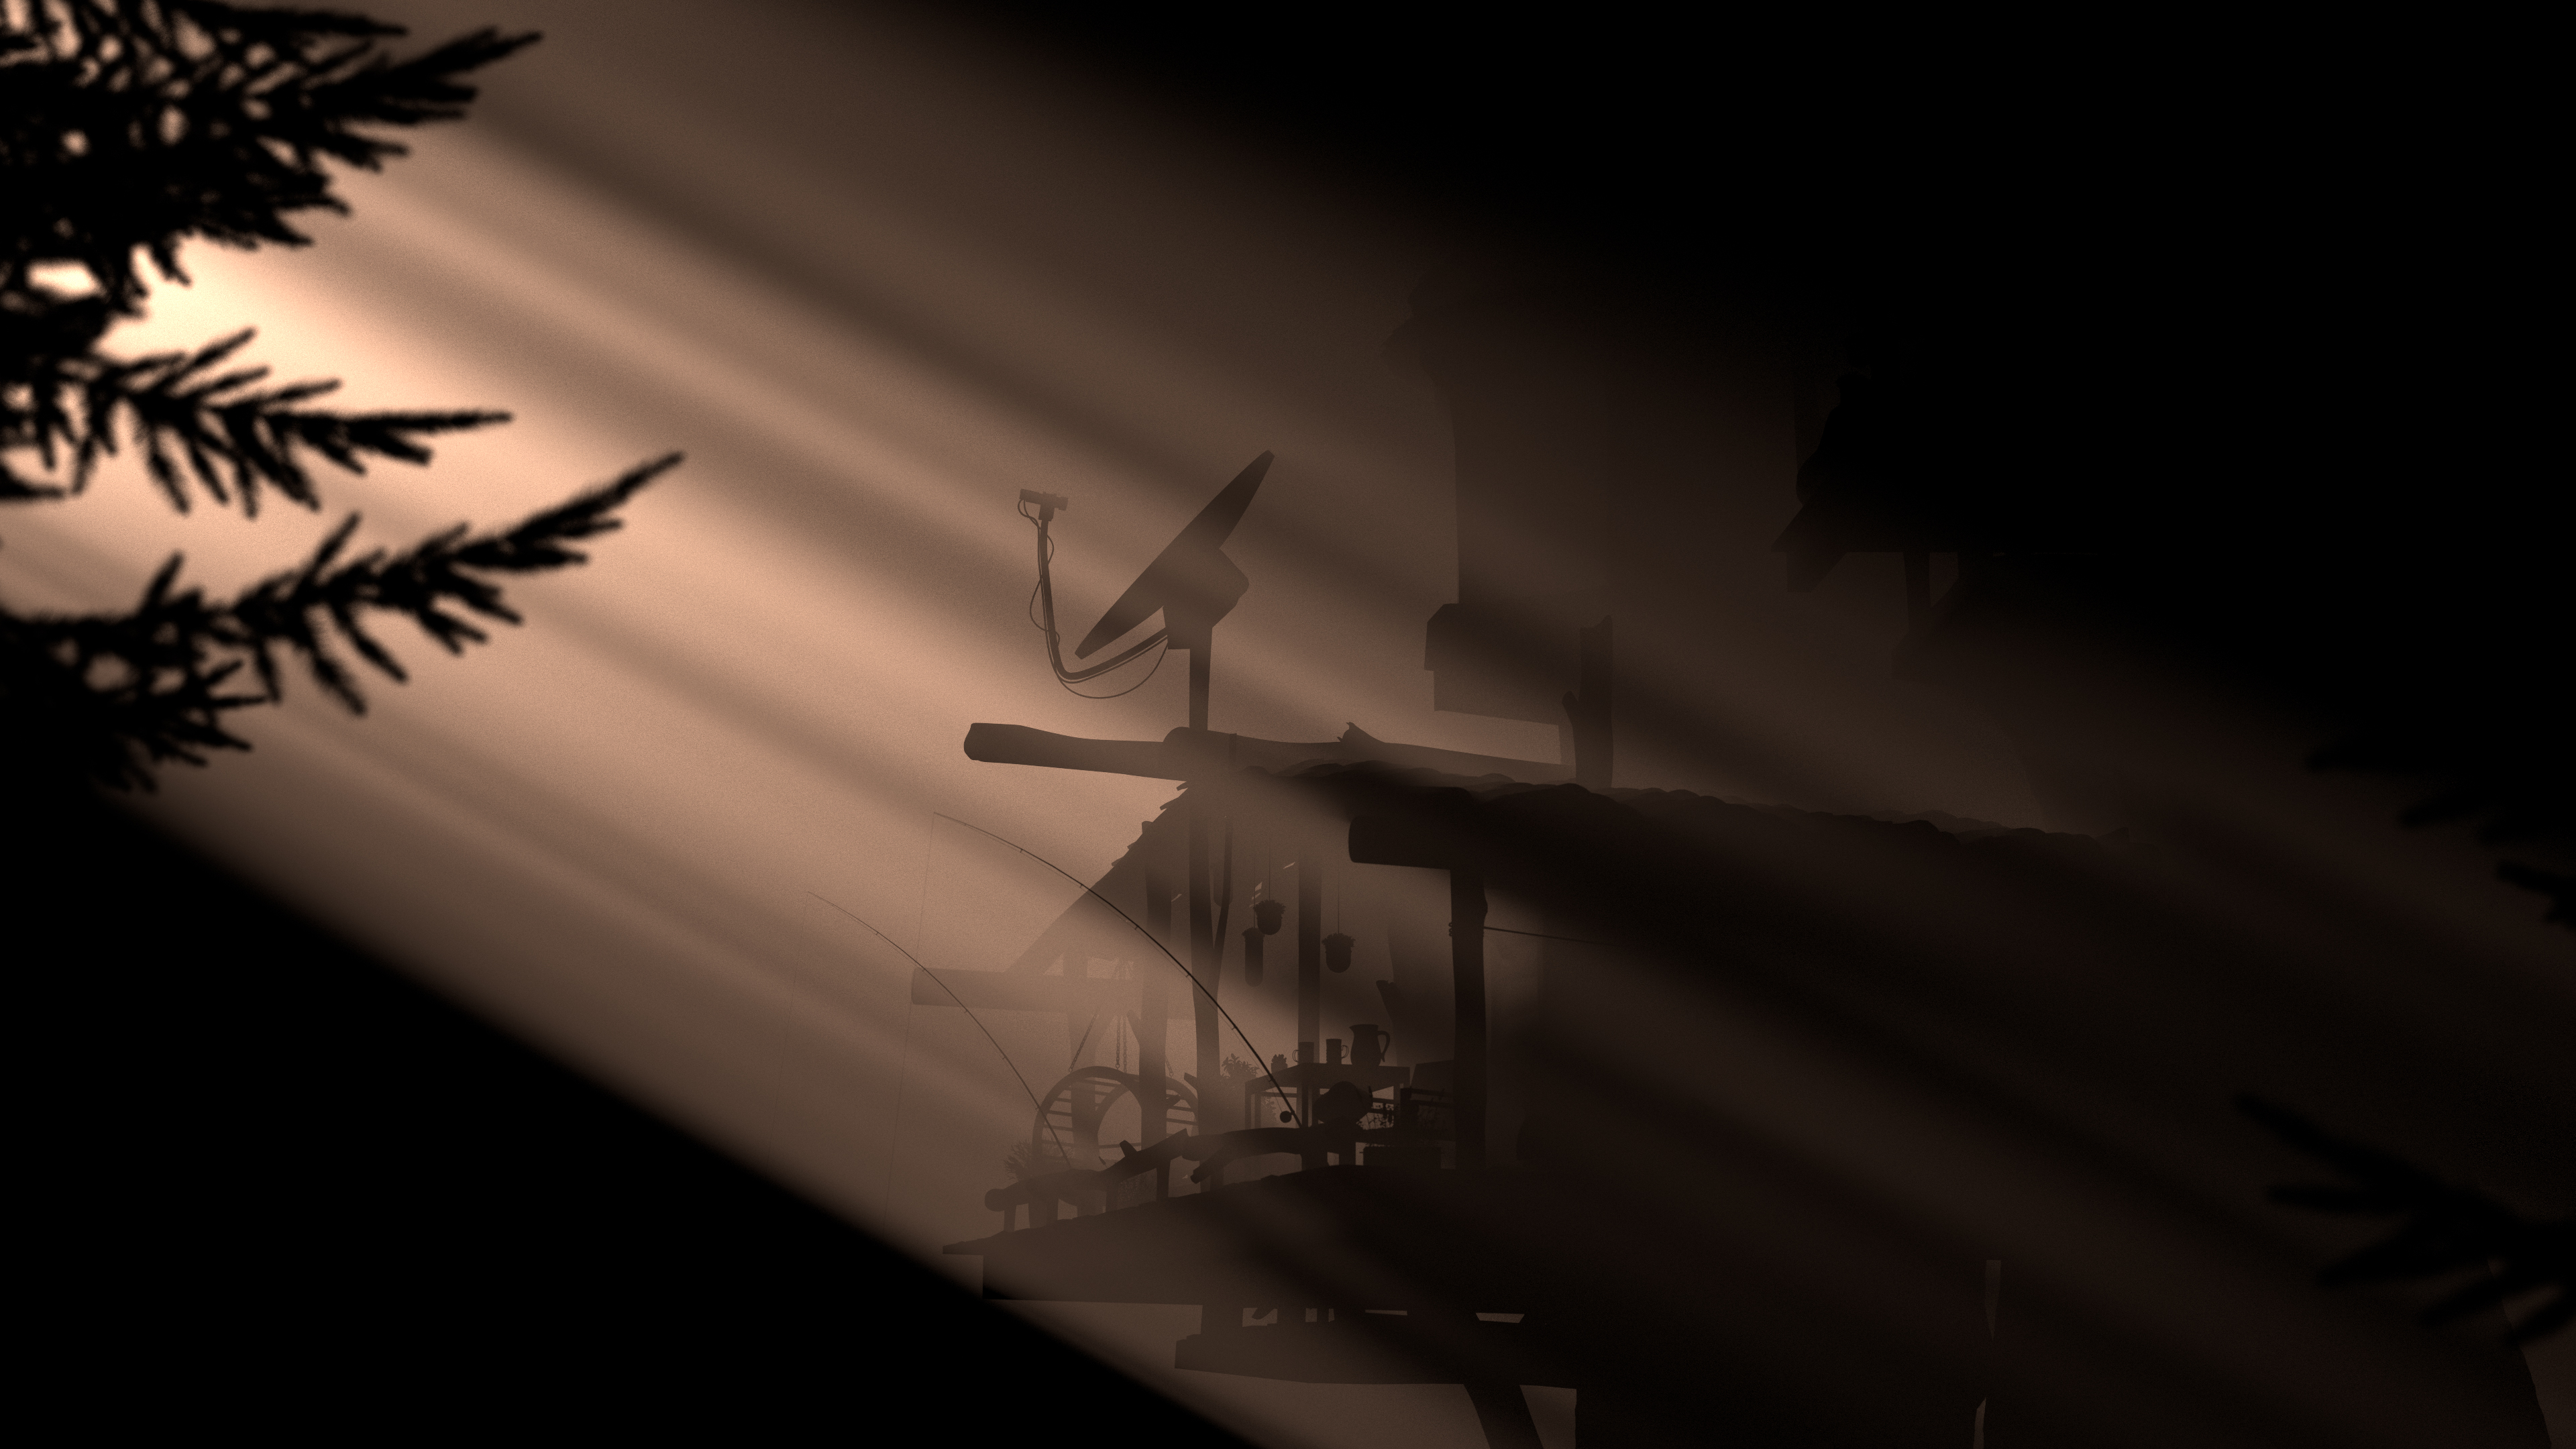
The spiral staircase initially made me really worried; I originally thought I was going to have to UV unwrap the whole thing, and stuff like the railings are really not easy to unwrap. But then, after a bit of thinking, I realized that the spiral staircase is likely a fire escape staircase, and so it could be wrought iron or something. Going with a wrought iron look allowed me to handle the staircase mostly procedurally, which saved a lot of time. Going along with the idea of the spiral staircase being a fire escape, I figured that the actual main way to access all of the different cabins in the treehouse must be through staircases internal to the tree trunks. This idea informed how I handled that long skinny window above the front door; I figured it must be a window into a stairwell. So, I put a simple box inside the tree behind that window, with a light at the top. That way, a hint of inner space would be visible through the window:
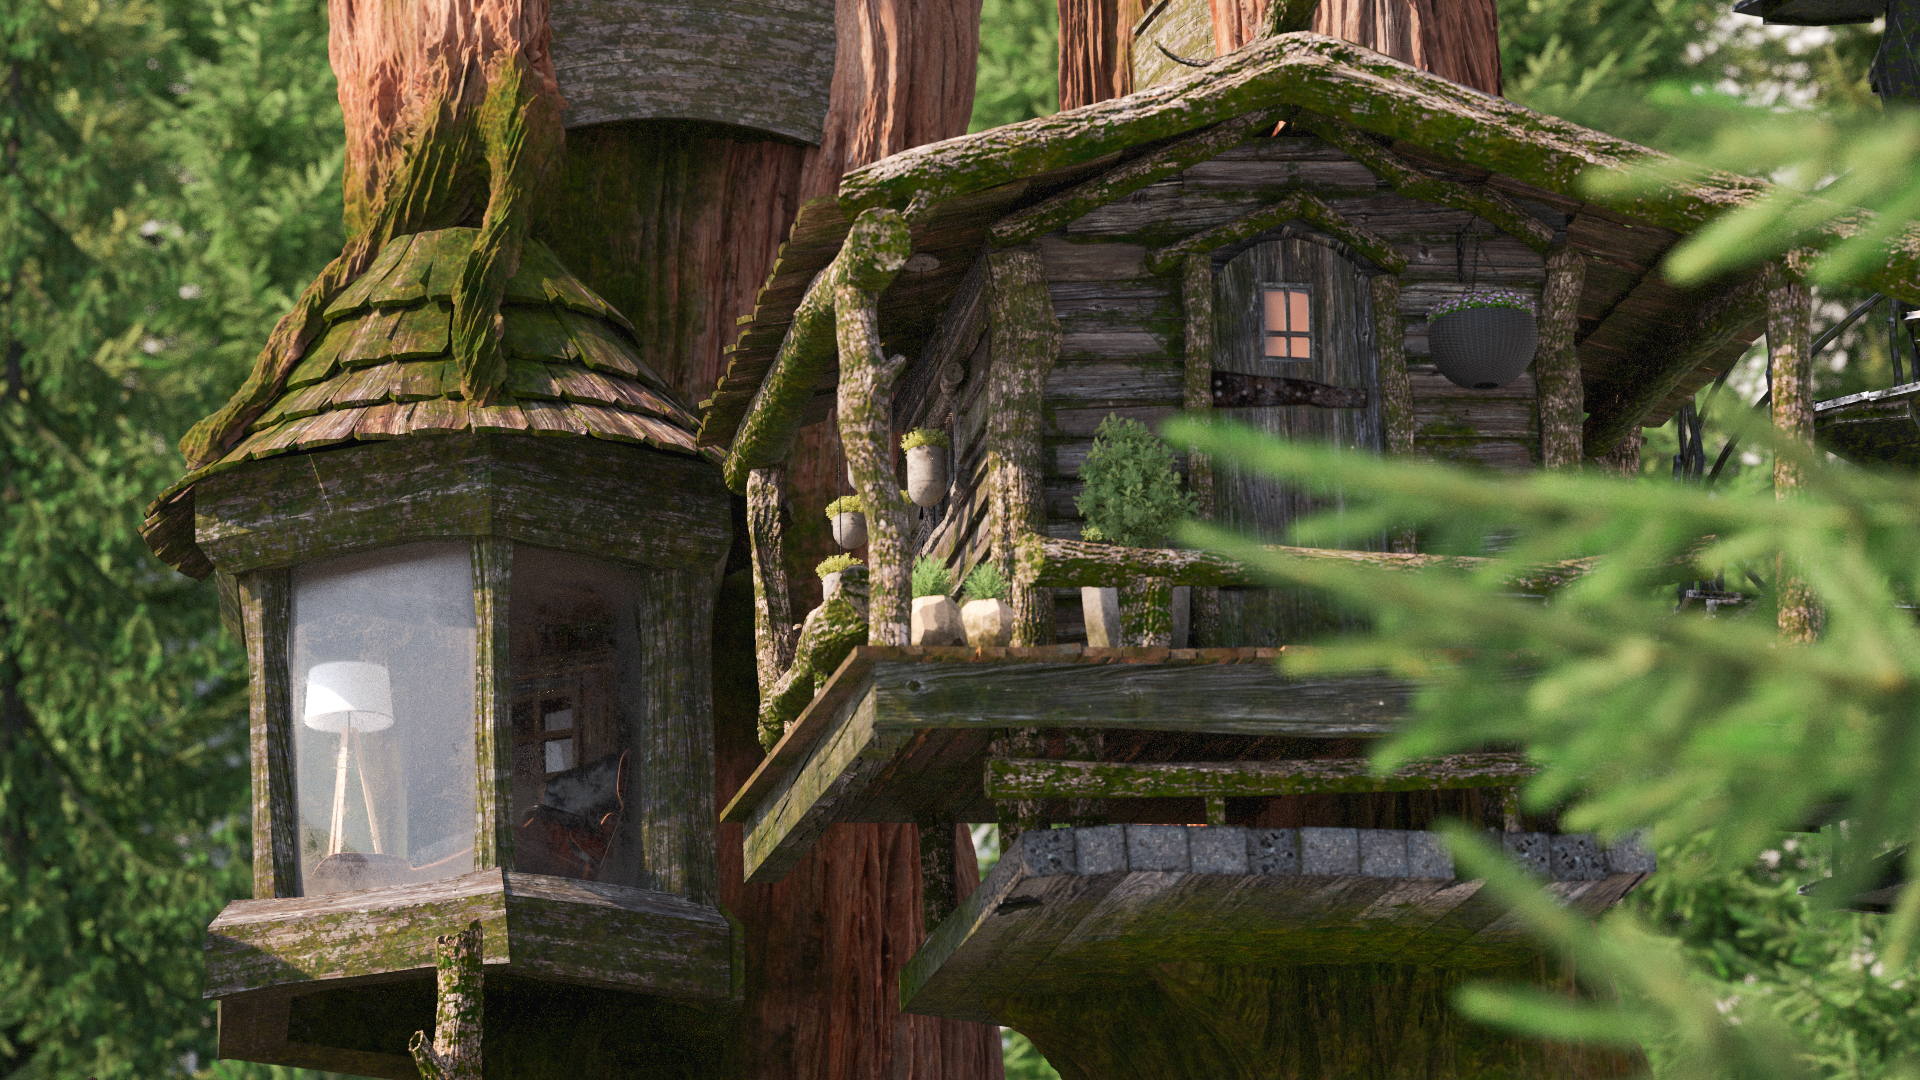
In addition to shading everything, I also had to make some modifications to the provided treehouse geometry. I that in the provided model, the satellite dish floats above its support pole without any actual connecting geometry, so I modeled a little connecting bit for the satellite dish. Also, I thought it would be fun to put some furniture in the round cabin, so I decided to make the walls into plate glass. Once I made the walls into plate glass, I realized that I needed to make a plausible interior for the round cabin. Since the only way into the round cabin must be through a staircase in the main tree trunk, I modeled a new door in the back of the round cabin. With everything shaded and the geometric modifications in place, here is how everything looked at this point:
Set Dressing the Treehouse
The next major step was adding some story elements. I wanted the treehouse to feel lived in, like the treehouse is just somebody’s house (a very unusual house, but a house nonetheless). To help convey that feeling, my plan was to rely heavily on set dressing to hint at the people living here. So the goal was to add stuff like patio furniture, potted plants, laundry hanging on lines, furniture visible through windows, the various bits and bobs of life, etc.
I started by adding a nice armchair and a lamp to the round tower thing. Of course the chair is an Eames Lounge Chair, and to match, the lamp is a modern style tripod floor lamp type thing. I went with a chair and a lamp because I think that round tower would be a lovely place to sit and read and look out the window at the surrounding nature. I thought it would be kind of fun to make all of the furniture kind of modern and stylish, but have all of the modern furniture be inside of a more whimsical exterior. Next, I extended the front porch part of the main cabin, so that I could have some room to place furniture and props and stuff. Of course any good front porch should have some nice patio furniture, so I added some chairs and a table. I also put in a hanging round swing chair type thing with a bit poofy blue cushion; this entire area should be a fun place to sit around and talk in. Since the entire treehouse sits on the edge of a pond, I figured that maybe the people living here like to sit out on the front porch, relax, shoot the breeze, and fish from the pond. Since my scene is set in the morning, I figured maybe it’s late in the morning and they’ve set up some fishing lines to catch some fish for dinner later. To help sell the idea that it’s a lazy fishing morning, I added a fishing hat on one of the chairs and put a pitcher of ice tea and some glasses on the table. I also added a clothesline with some hanging drying laundry, along with a bunch of potted and hanging plants, just to add a bit more of that lived-in feel. For the plants and several of the furniture pieces that I knew I would want to tweak later, I built in controls to their shading graphs using PxrColorCorrect nodes to allow me to adjust hue and saturation later. Many of the furniture, plant and prop models are highly modified, kitbashed, re-textured versions of assets from Evermotion and CGAxis, although some of them (notably the Eames Lounge Chair) are entirely my own.

Building the Background Forest
The last step before final lighting was to build a more proper background forest, as a replacement for the temporary forest I had used up until this point for blocking purposes. For this step, I relied heavily on Maya’s MASH toolset, which I found to provide a great combination of power and ease-of-use; for use cases involving tons of instanced geometry, I certainly found it much easier than Maya’s older Xgen toolset. MASH felt a lot more native to Maya, as opposed to Xgen, which requires a bunch of specific external file paths and file formats and whatnot. I started with just getting some kind of reasonable base texturing down onto the groundplane. In all of the in-progress renders up until this point, the ground plane was just white… you can actually tell if you look closely enough! I eventually got to a place I was happy with using a bunch of different PxrRoundCubes with various rotations, all blended on top of each other using various noise projections. I also threw in some rocks from Quixel Megascans, just to add a bit of variety. I then laid down some low-level ground vegetation, which was meant to peek through the larger trees in various areas. The base vegetation was made up of various ferns, shrubs, and small sapling-ish young conifers placed using Maya’s MASH Placer node:

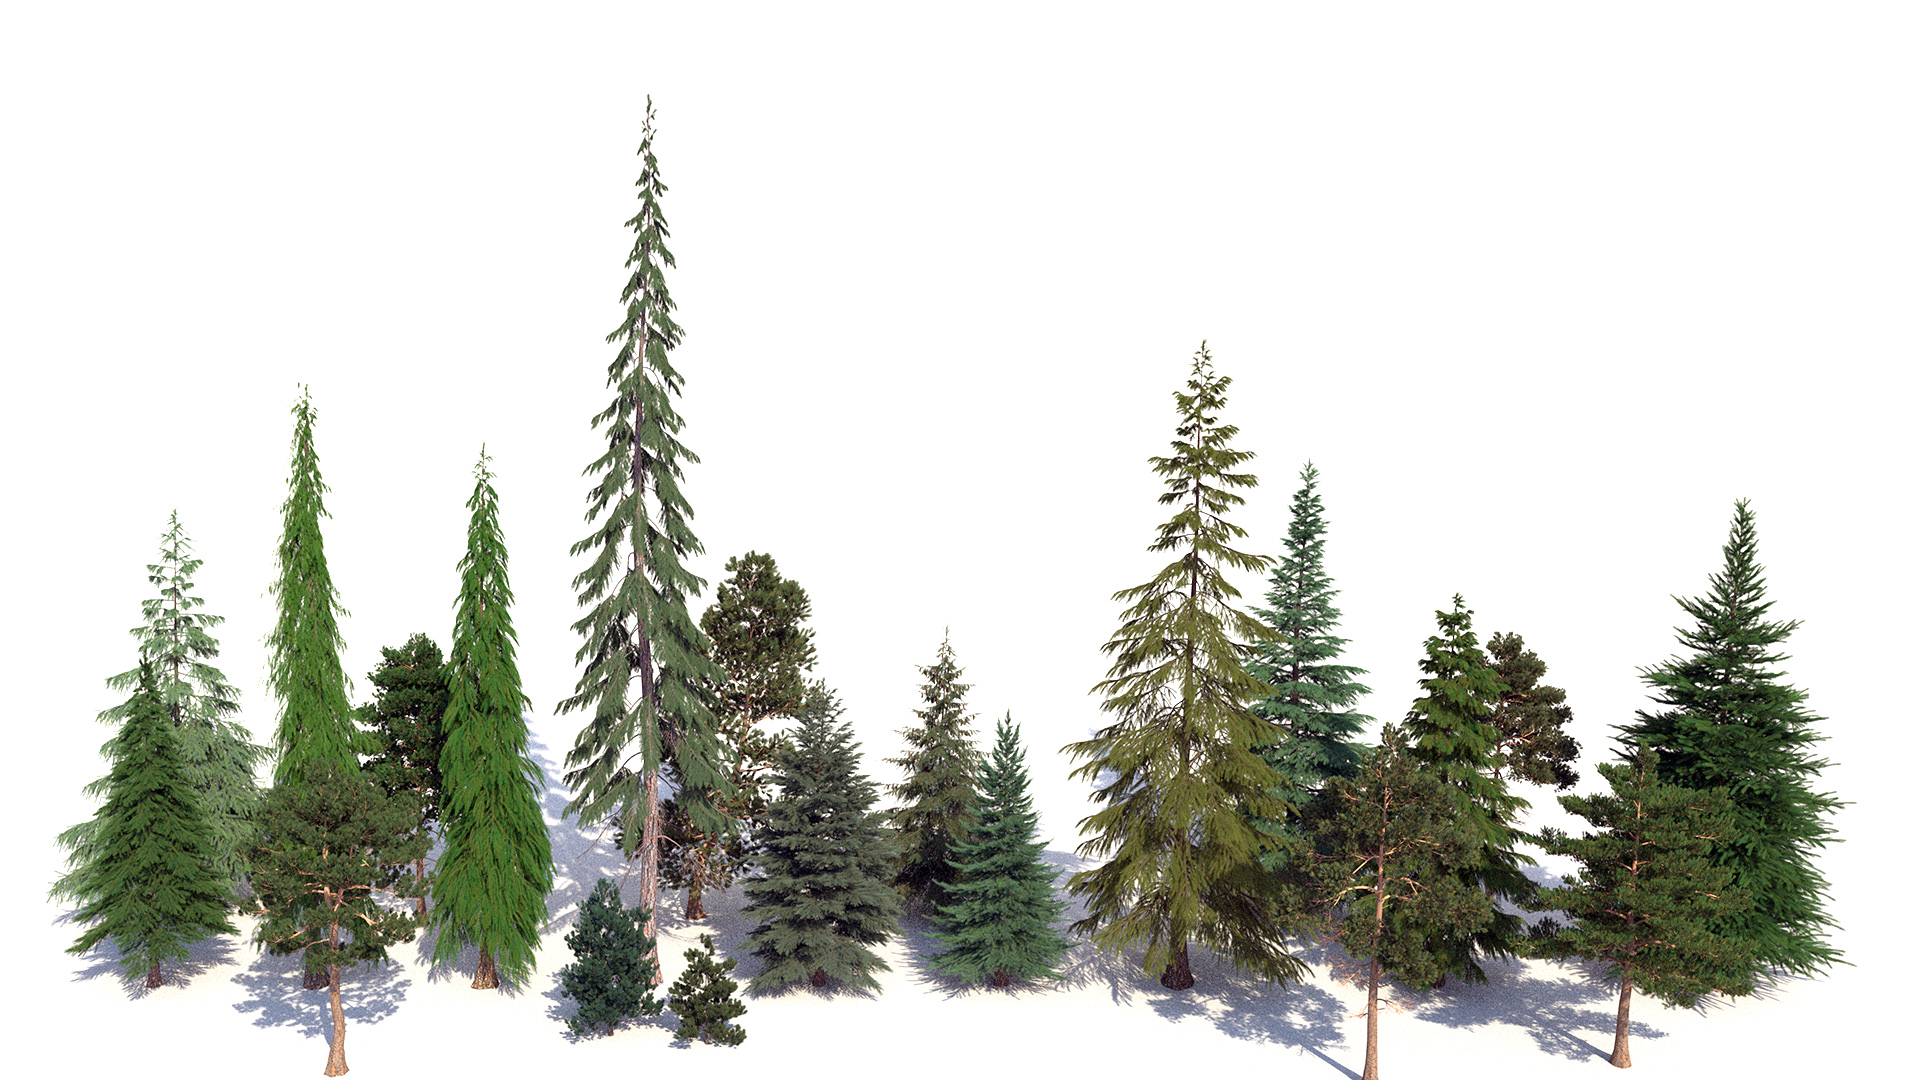
In the old temporary background forest, the entire forest is made up of only three different types of trees, and it really shows; there was a distinct lack of color variation or tree diversity. So, for the new forest, I decided to use a lot more types of trees. Here is a rough lineup (not necessarily to scale with each other) of how all of the new tree species looked:
For the main forest, I hand-placed trees onto the mountain slope as instanced. One cool thing I built in to the forest was PxrColorCorrect nodes in all of the tree shading graphs, with all controls wired up to single master controls for hue/saturation/value so that I could shift the entire forest’s colors easily if necessary. This tool proved to be very useful for tuning the overall vegetation colors later while still maintaining a good amount of variation. I also intentionally left gaps in the forest around the rock formations to give some additional visual variety. Building up the entire under-layer of shrubs and saplings and stuff also paid off, since a lot of that stuff wound up peeking through various gaps between the larger trees:
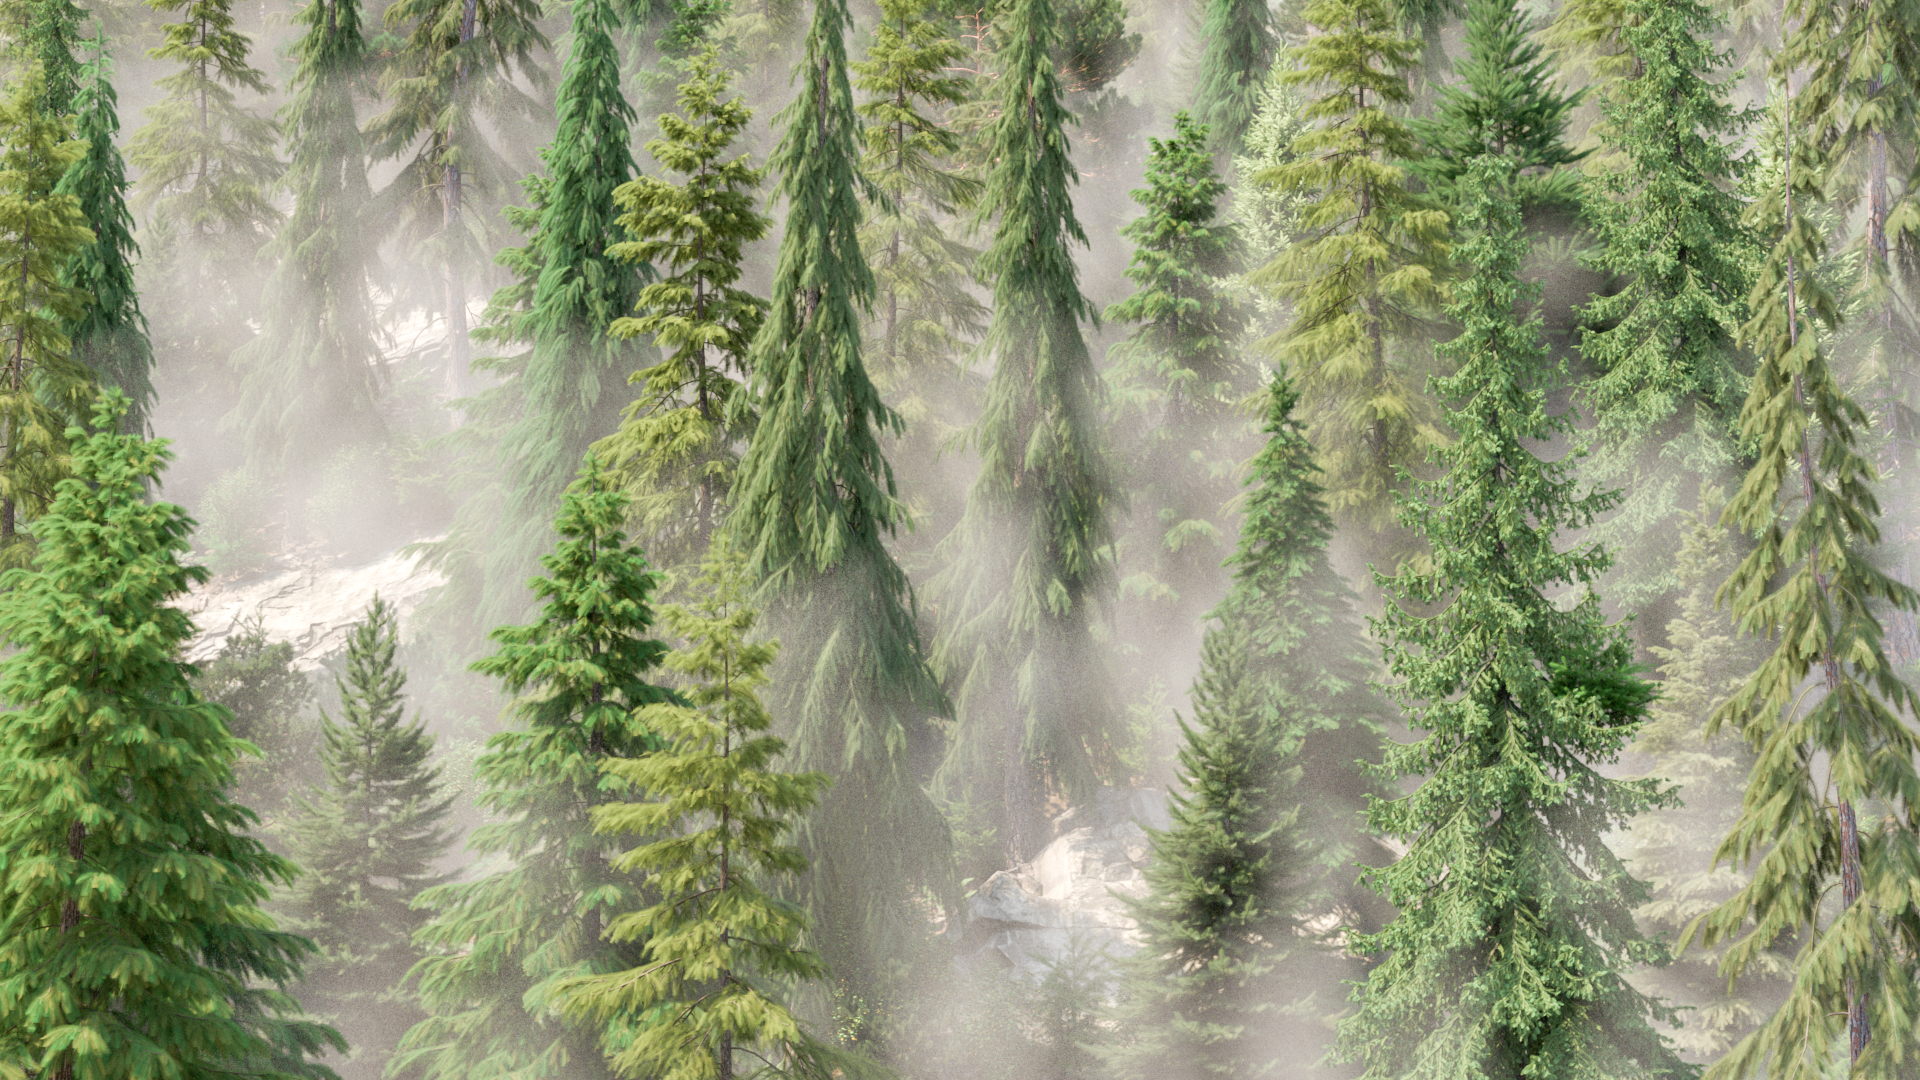
The last step for the main forest was adding some mist and fog, which is common in Pacific Northwest type mountainous conifer forests in the morning. I didn’t have extensive experience working with volumes in RenderMan before this, so there was definitely something of a learning curve for me, but overall it wasn’t too hard to learn! I made the mist by just having a Maya Volume Noise node plug into the density field of a PxrVolume; this isn’t anything fancy, but it provided a great start for the mist/fog:
Lighting and Compositing
At this point, I think the entire image together was starting to look pretty good, although, without any final shot lighting, the overall vibe felt more like a spread out of an issue of National Geographic than a more cinematic still out of a film. Normally my instinct is to go with a more naturalistic look, but since part of the objective for this project was to learn to use RenderMan’s lighting toolset for more cinematic applications, I wanted to push the overall look of the image beyond this point:
From this point onwards, following a tutorial made by Jeremy Heintz, I broke out the volumetric mist/fog into a separate layer and render pass in Maya, which allowed for adjusting the mist/fog in comp without having to re-render the entire scene. This strategy proved to be immensely useful and a huge time saver in final lighting. Before starting final lighting, I made a handful of small tweaks, which included reworking the moss on the front cabin’s lower support frame to get rid of some visible repetition, tweaking and adding dirt on all of the windows, and dialing in saturation and hue on the clothesline and potted plants a bit more. I also changed the staircase to have aged wooden steps instead of all black cast iron, which helped blend the staircase into the overall image a bit more, and finally added some dead trees in the background forest. Finally, in a last-minute change, I wound up upgrading a lot of the moss on the main tree trunk and on select parts of the cabins to use instanced geometry instead of just being a shading effect. The geometric moss used atlases from Quixel Megascans, bunched into little moss patches, and then hand-scattered using the Maya MASH Placer tool. Upgrading to geometric moss overall provided only a subtle change to the overall image, but I think helped enormously in selling some of the realism and detail; I find it interesting how small visual details like this often can have an out-sized impact on selling an overall image.
For final lighting, I added an additional uniform atmospheric haze pass to help visually separate the main treehouse from the background forest a bit more. I also added a spotlight fog pass to provide some subtle godrays; the spotlight is a standard PxrRectLight oriented to match the angle of the sun. The PxrRectLight also has the cone modified enabled to provide the spot effect, and also has a PxrCookieLightFilter applied with a bit of a cucoloris pattern applied to provide the breakup effect that godrays shining through a forest canopy should have. To provide a stronger key light, I rotated the skydome until I found something I was happy with, and then I split out the sun from the skydome into separate passes. I split out the sun by painting the sun out of the skydome texture and then creating a PxrDistantLight with an exposure, color, and angle matched to what the sun had been in the skydome. Splitting out the sun then allowed me to increase the size of the sun (and decrease the exposure correspondingly to maintain overall the same brightness), which helped soften some otherwise pretty harsh sharp shadows. I also used a good number of PxrRodLightFilters to help take down highlights in some areas, lighten shadows in others, and provide overall light shaping to areas like the right hand side of the right tree trunk. I’ve conceptually known why artists like rods for some time now (especially since rods are heavily used feature in Hyperion at my day job at Disney Animation), but I think this project helped me really understand at a more hands-on level why rods are so great for hitting specific art direction.
After much iteration, here is the final set of render passes I wound up with going into final compositing:
In final compositing, since I had everything broken out into separate passes, I was able to quickly make a number of adjustments that otherwise would have been much slower to iterate on if I had done them in-render. I tinted the sun pass to be warmer (which is equivalent to changing the sun color in-render and re-rendering) and tweaked the exposures of the sun pass up and some of the volumetric passes down to balance out the overall image. I also applied a color tint to the mist/fog pass to be cooler, which would have been very slow to experiment with if I had changed the actual fog color in-render. I did all of the compositing in Photoshop, since I don’t have a Nuke license at home. Not having a node-based compositing workflow was annoying, so next time I’ll probably try to learn DaVinci Resolve Fusion (which I hear is pretty good).
For color grading, I mostly just fiddled around in Lightroom. I also added in a small amount of bloom by just duplicating the sun pass, clipping it to only really bright highlight values by adjusting levels in Photoshop, applying a Gaussian blur, exposing down, and adding back over the final comp. Finally, I adjusted the gamma by 0.8 and exposed up by half a stop to give some additional contrast and saturation, which helped everything pop a bit more and feel a bit more moody and warm. Figure 25 shows what all of the lighting, comp, and color grading looks like applied to a 50% grey clay shaded version of the scene, and if you don’t want to scroll all the way back to the top of this post to see the final image, I’ve included it again as Figure 26.
Conclusion
Overall, I had a lot of fun on this project, and I learned an enormous amount! This project was probably the most complex and difficult art project I’ve ever done. I think working on this project has shed a lot of light for me on why artists like certain workflows, which is an incredibly important set of insights for my day job as a rendering engineer. I won’t grumble as much about having to support rods in production rendering now!
Here is a neat progression video I put together from all of the test and in-progress renders that I saved throughout this entire project:
I owe several people an enormous debt of thanks on this project. My wife, Harmony Li, deserves all of my gratitude for her patience with me during this project, and also for being my art director and overall sanity checker. My coworker at Disney Animation, lighting supervisor Jennifer Yu, gave me a lot of valuable critiques, advice, and suggestions, and acted as my lighting director during the final lighting and compositing stage. Leif Pederson from Pixar’s RenderMan group provided a lot of useful tips and advice on the RenderMan contest forum as well.
Finally, my final image somehow managed to score an honorable mention in Pixar’s Art Challenge Final Results, which was a big, unexpected, pleasant surprise, especially given how amazing all of the other entries in the contest are! Since the main purpose of this project for me was as a learning exercise, doing well in the actual contest was a nice bonus, and kind of makes me think I’ll likely give the next RenderMan Art Challenge a shot too with a more serious focus on trying to put up a good showing. If you’d like to see more about my contest entry, check out the work-in-progress thread I kept up in Pixar’s Art Challenge forum; some of the text for this post was adapted from updates I made in my forum thread.