Rendering on the Apple M1 Max Chip
Table of Contents
Introduction
Over the past year, I ported my hobby renderer, Takua Renderer, to 64-bit ARM. I wrote up the entire process and everything I learned as a three-part blog post series covering topics ranging from assembly-level comparison between x86-64 and arm64, to deep dives into various aspects of Apple Silicon, to a comparison of x86-64’s SSE and arm64’s Neon vector instructions. In the intro to part 1 of my arm64 series, I wrote about my motivation for exploring arm64, and in the conclusion to part 2 of my arm64 series, I wrote the following about the Apple M1 chip:
There’s really no way to understate what a colossal achievement Apple’s M1 processor is; compared with almost every modern x86-64 processor in its class, it achieves significantly more performance for much less cost and much less energy. The even more amazing thing to think about is that the M1 is Apple’s low end Mac processor and likely will be the slowest arm64 chip to ever power a shipping Mac; future Apple Silicon chips will only be even faster.
Well, those future Apple Silicon chips are now here! Last week (relative to the time of posting), Apple announced new 14 and 16-inch MacBook Pro models, powered by the new Apple M1 Pro and Apple M1 Max chips. Apple reached out to me last week immediately after the announcement of the new MacBook Pros, and as a result, for the past week I’ve had the opportunity to use a prerelease M1 Max-equipped 2021 14-inch MacBook Pro as my daily computer. So, to my extraordinary surprise, this post is the unexpected Part 4 to what was originally supposed to be a two-part series about Takua Renderer on arm64. This post will serve as something of a coda to my Takua Renderer on arm64 series, but will also be fairly different in structure and content to the previous three parts. While the previous three parts dove deep into extremely technical details about arm64 assembly and Apple Silicon and such, this post will focus on a single question: now that professional-grade Apple Silicon chips exist in the wild, how well do high-end rendering workloads run on workstation-class arm64?
Disclaimers
Before we dive in, I want to get a few important details out of the way. First, this post is not really a product review or anything like that, and I will not be making any sort of endorsement or recommendation on what you should or should not buy; I’ll just be writing about my experiences so far. Many amazing tech reviewers exist out there, and if what you are looking for is a general overview and review of the new M1 Pro and M1 Max based MacBook Pros, I would suggest you go check out reviews by The Verge, Anandtech, MKBHD, Dave2D, LinusTechTips, and so on. Second, as with everything in this blog, the contents of this post represent only my personal opinion and do not in any way represent any kind of official or unofficial position, endorsement, or opinion on any matter from my employer, Walt Disney Animation Studios. When Apple reached out to me, I received permission from Disney Animation to go ahead on a purely personal basis, and beyond that nothing with this entire process involves Disney Animation. Finally, Apple is not paying me or giving me anything for this post; the 14-inch MacBook Pro I’ve been using for the past week is strictly a loaner unit that has to be returned to Apple at a later point. Similarly, Apple has no say over the contents of this post; Apple has not even seen any version of this post before publishing. What is here is only what I think!
The M1 Max Chip
Now that a year has passed since the first Apple Silicon arm64 Macs were released, I do have my hobby renderer up and running on arm64 with everything working, but I’ve only rendered relatively small scenes so far on arm64 processors. The reason I’ve stuck to smaller scenes is because high-end workstation-class arm64 processors so far just have not existed; while large server-class arm64 processors with large core counts and tons of memory do exist, these server-class processors are mostly found in huge server farms and supercomputers and are not readily available for general use. For general use, the only arm64 options so far have been low-power single-board computers like the Raspberry Pi 4 that are nowhere near capable of running large rendering workloads, or phones and tablets that don’t have software or operating systems or interfaces suitable for professional 3D applications, or M1-based Macs. I have been using an M1 Mac Mini for the past year, but while the M1 performance-wise punches way above what a 15 watt TDP typically would suggest, the M1 only supports up to 16 GB of RAM and only represents Apple’s entry into Apple Silicon based Macs. The M1 Pro and M1 Max, however, are are Apple’s first high powered arm64-based chips targeted at professional workloads, meant for things like high-end rendering and many other creative workloads; by extension, the M1 Pro and M1 Max are also the first arm64 chips of their class in the world with wide general availability. So, in this post, answering the question “how well do high-end rendering workloads run on workstation-class arm64” really means examining how well the M1 Pro and M1 Max can do rendering.
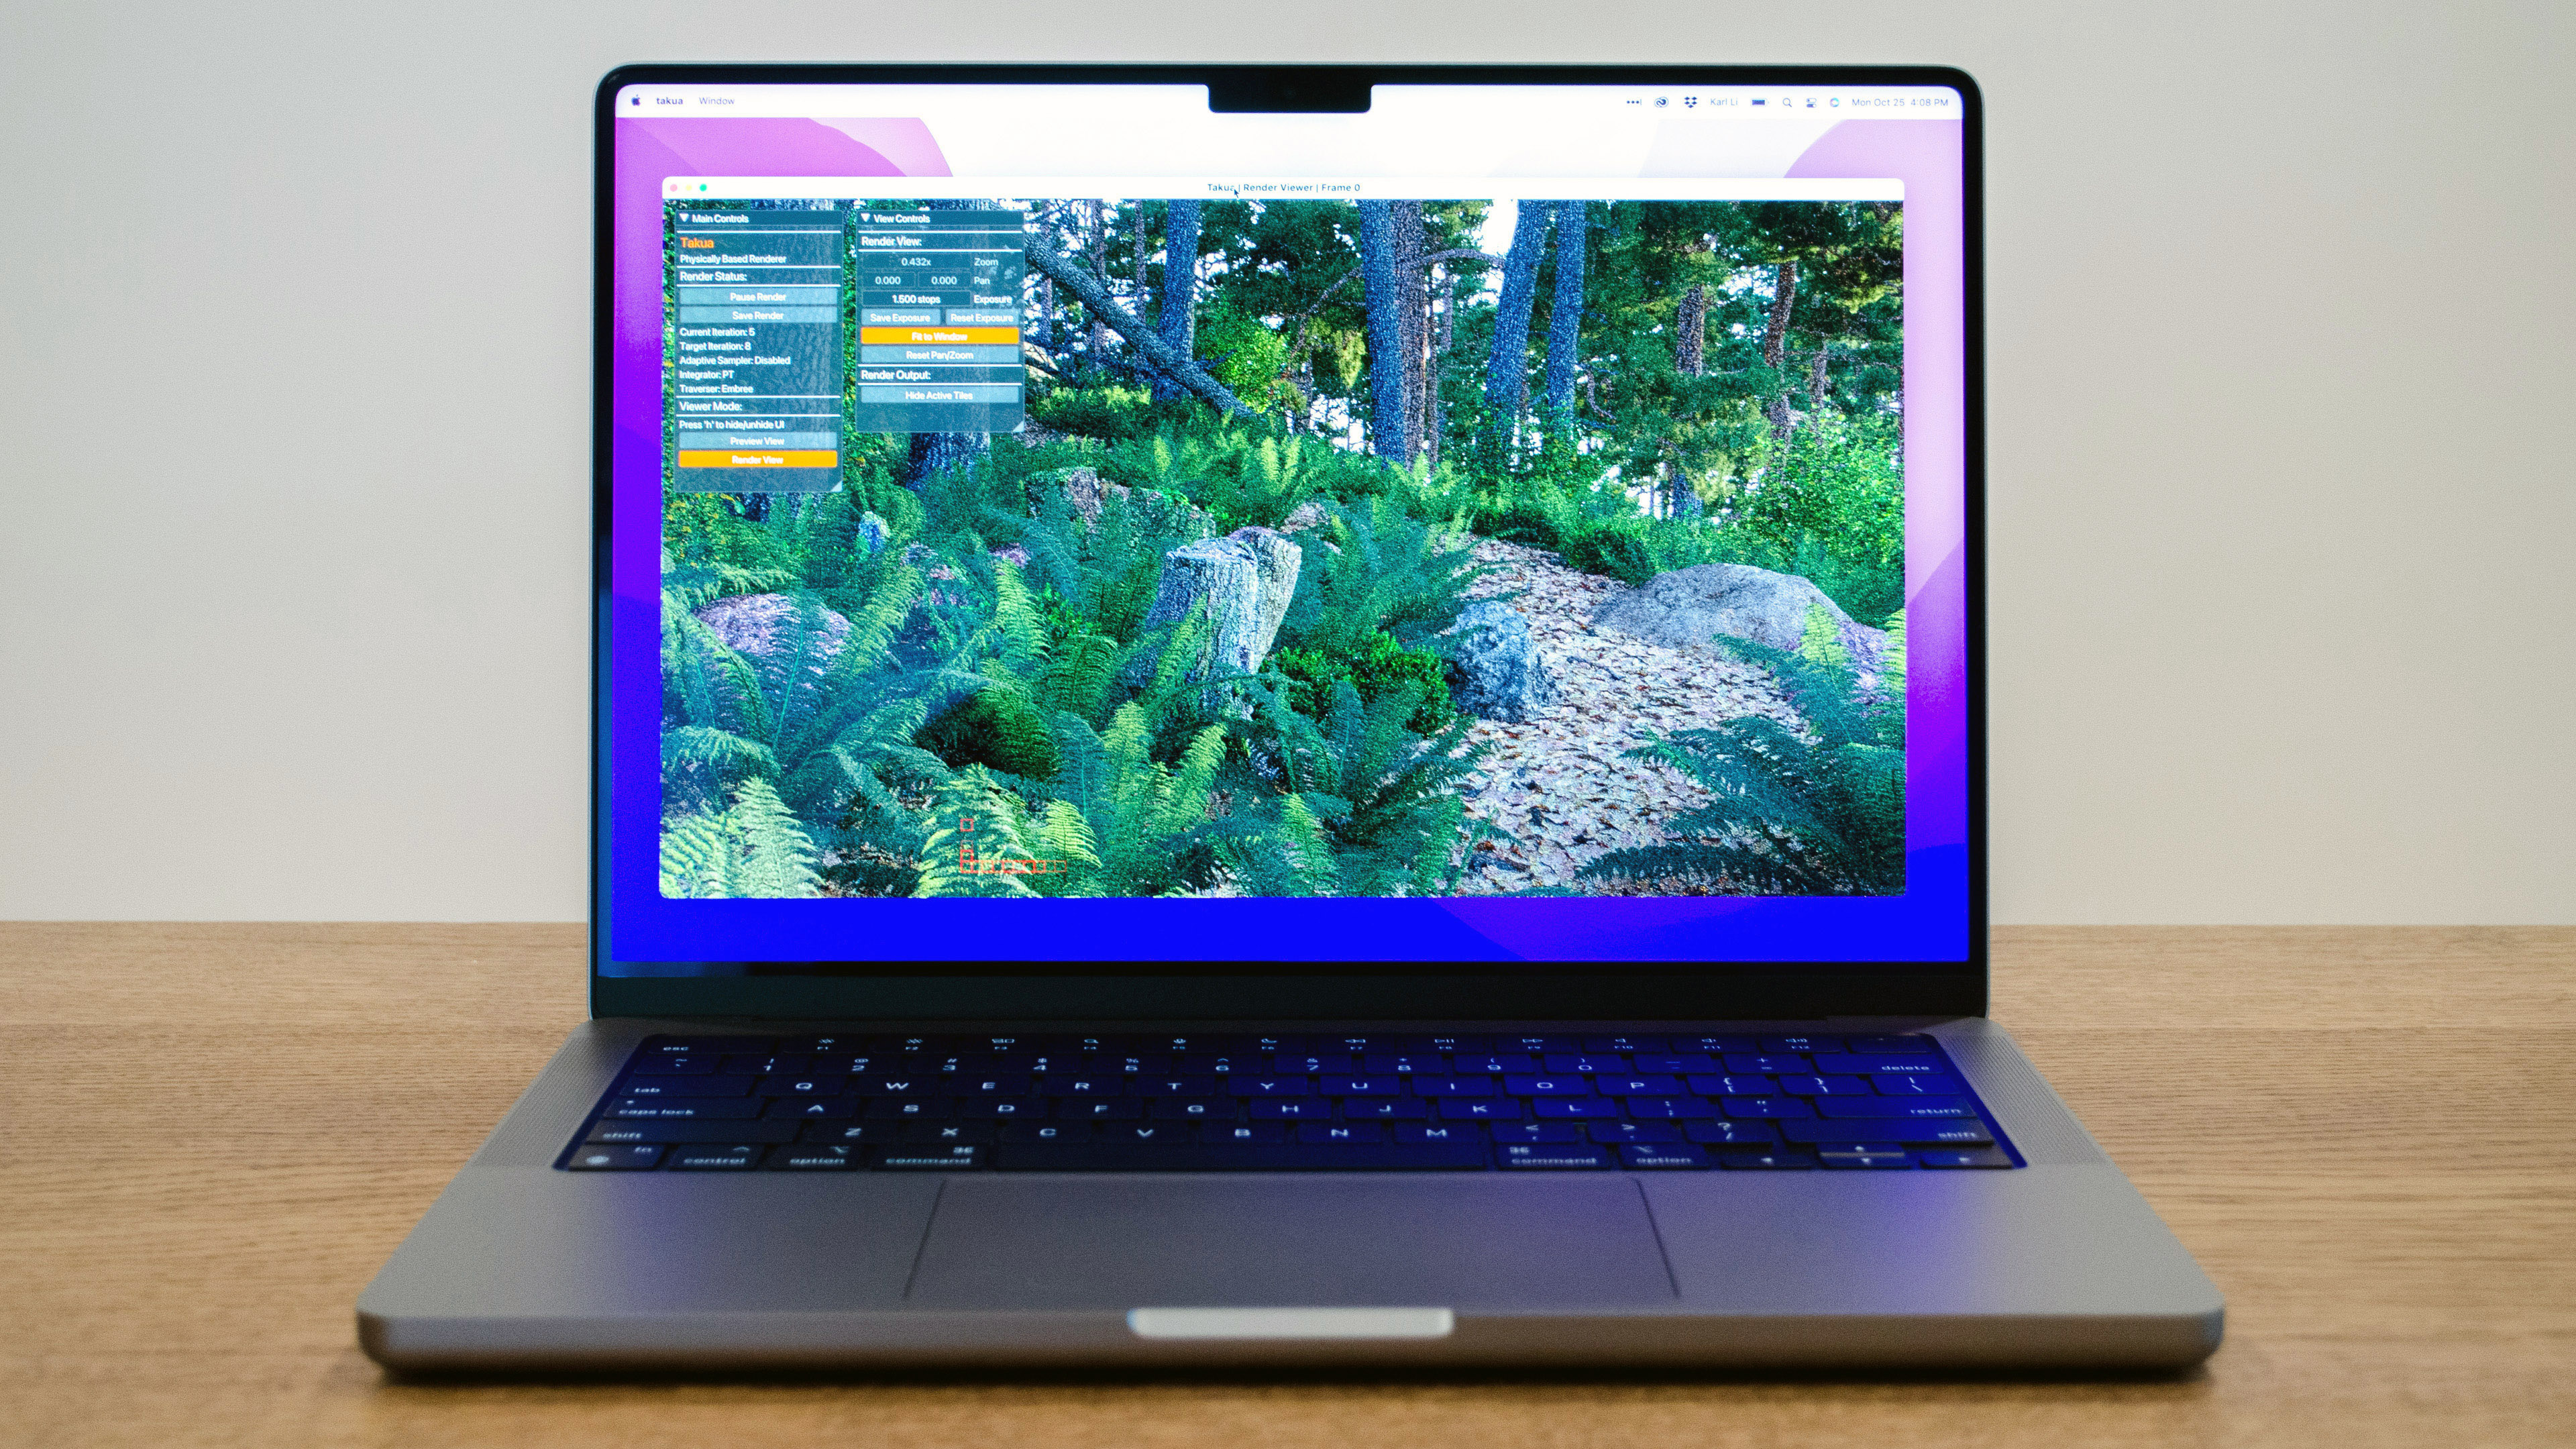
Spoiler: the answer is extremely well; all of the renders in the post were rendered on the 14-inch MacBook Pro with an M1 Max chip. Here is a screenshot of Takua Renderer running on the 14-inch MacBook Pro with an M1 Max chip:
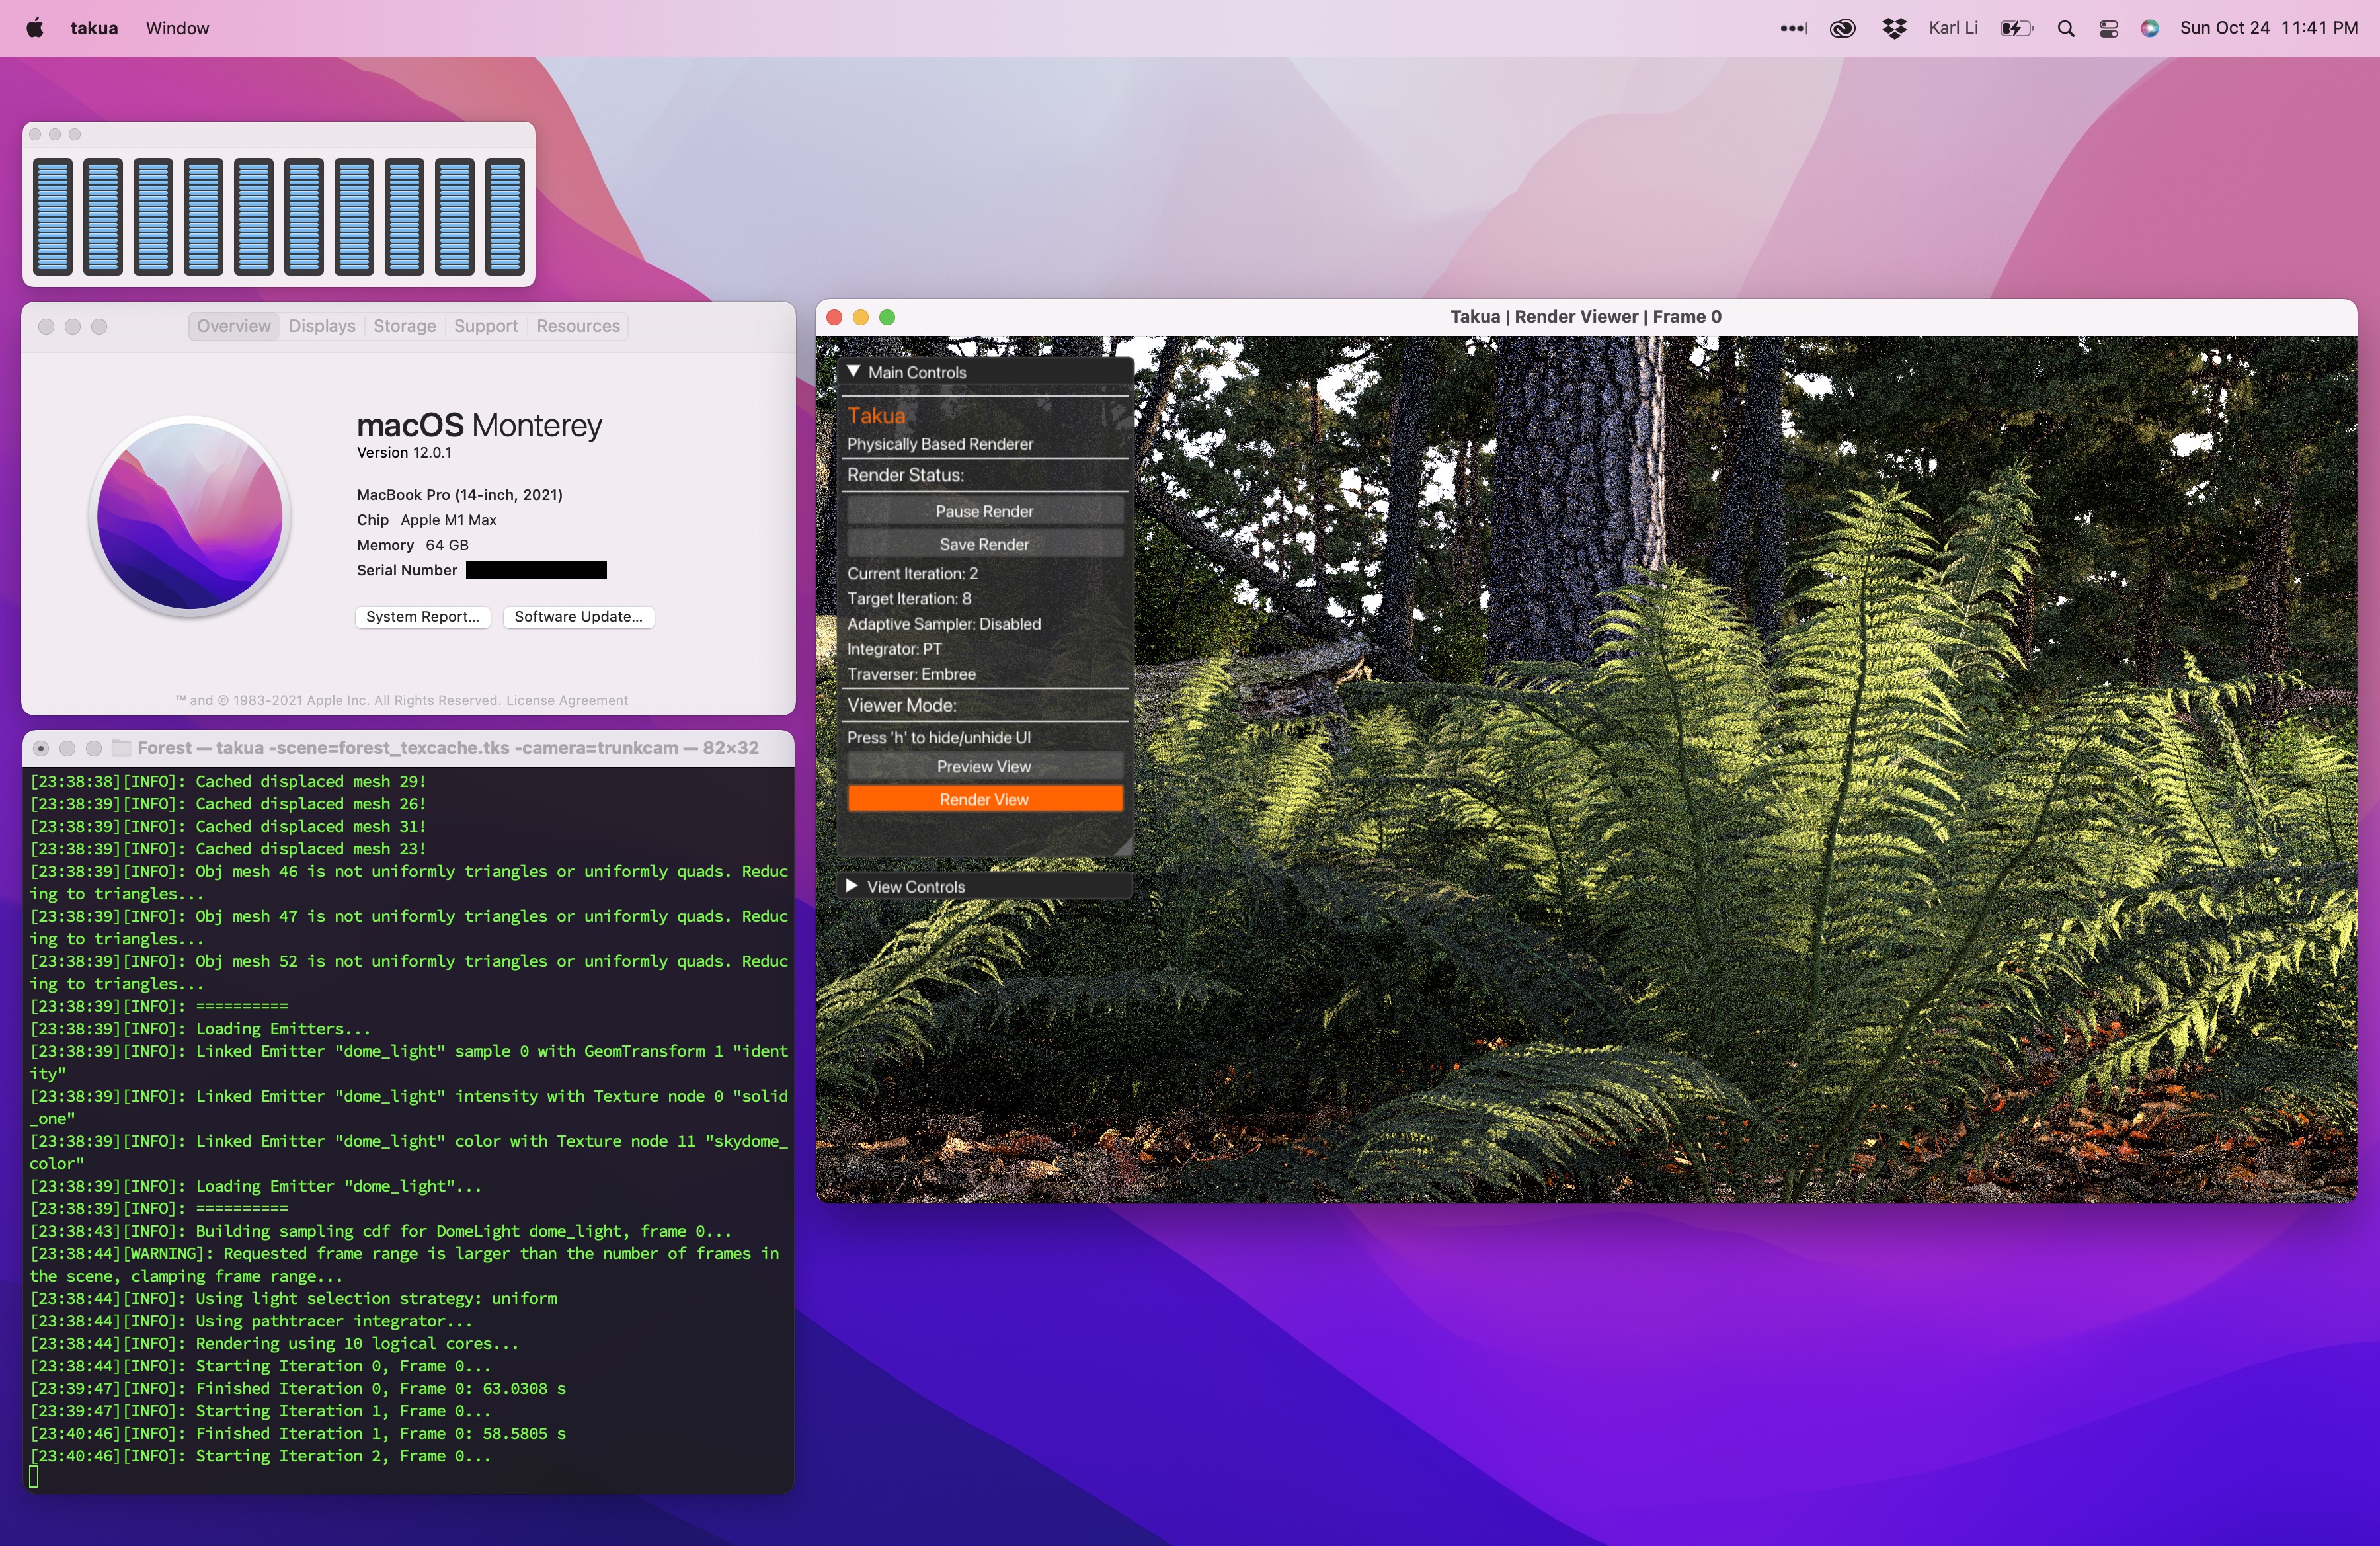
The 14-inch MacBook Pro I’ve been using for the past week is equipped with the maximum configuration in every category: a full M1 Max chip with a 10-core CPU, 32-core GPU, 64 GB of unified memory, and 8 TB of SSD storage. However, for this post, I’ll only focus on the 10-core CPU and 64 GB of RAM, since Takua Renderer is currently CPU-only (more on that later); for a deep dive into the M1 Pro and M1 Max’s entire system-on-a-chip, I’d suggest taking a look at Anandtech’s great initial impressions and later in-depth review.
The first M1 Max spec that jumped out at me is the 64 GB of unified memory; having this amount of memory meant I could finally render some of the largest scenes I have for my hobby renderer. To test out the M1 Max with 64 GB of RAM, I chose the forest scene from my Mipmapping with Bidirectional Techniques post. This scene has enormous amounts of complex geometry; almost every bit of vegetation in this scene has highly detailed displacement mapping that has to be stored in memory, and the large amount of textures in this scene is what drove me to implement a texture caching system in my hobby renderer in the first place. In total, this scene requires just slightly under 30 GB of memory just to store all of the subdivided, tessellated, and displaced scene geometry, and requires an additional few more GB for the texture caching system (the scene can render with just a 1 GB texture cache, but having a larger texture cache helps significantly with performance).
I have only ever published two images from this scene: the main forest path view in the mipmapping blog post, and a closeup of a tree stump as the title image on my personal website. I originally had several more camera angles set up that I wanted to render images from, and I actually did render out 1080p images. However, to showcase the detail of the scene better, I wanted to wait until I had 4K renders to share, but unfortunately I never got around to doing the 4K renders. The reason I never did the 4K renders is because I only have one large personal workstation that has both enough memory and enough processing power to actually render images from this scene in a reasonable amount of time, but I needed this workstation for other projects. I also have a few much older spare desktops that do have just barely enough memory to render this scene, but unfortunately, those machines are so loud and so slow and produce so much heat that I prefer not to run them at all if possible, and I especially prefer not running them on long render jobs when I have to work-from-home in the same room! However, over the past week, I have been able to render a bunch of 4K images from my forest scene on the M1 Max 14-inch MacBook Pro; quite frankly, being able to do this on a laptop is incredible to me. Here is the title image from my personal website, but now rendered at 4K resolution on the M1 Max 14-inch MacBook Pro:

The M1 Max-based MacBook Pro is certainly not the first laptop to ever ship with 64 GB of RAM; the previous 2019 16-inch MacBook Pro was also configurable up to 64 GB of RAM, and there are crazy PC laptops out there that can be configured up even higher. However, this is where the M1 Max and M1 Pro’s CPU performance comes into play: while previous laptops could support 64 GB of RAM and more, actually utilizing large amounts of RAM was difficult since previous laptop CPUs often couldn’t keep up! Being able to fit a large data set into memory is one thing, but being able to run processing fast enough to actually make use of large data sets in a reasonable amount of time is the other half of the puzzle. My wife has a 2019 16-inch MacBook Pro with 32 GB of memory, which is just enough to render my forest scene. However, as seen in the benchmark results later in this post, the 2019 16-inch MacBook Pro’s Intel Core-i7 9750H CPU with 6 cores and 12 threads is over twice as slow as the M1 Max at rendering this scene at best, and can be even slower depending on thermals, power, and more. Rendering each of the images in this post took a few hours on the M1 Max, but on the Core-i7 9750H, the renders have to become overnight jobs with the 16-inch MacBook Pro’s fans running at full speed. With only a week to write this post, a few hours per image versus an overnight job per image made the difference between having images ready for this post versus not having any interesting renders to show at all!
Actually, the M1 Max isn’t just fast for a chip in a laptop; the M1 Max is stunningly competitive even with desktop workstation CPUs. For the past few years, the large personal workstation that I offload large projects onto has been a machine with dual Intel Xeon E5-2680 workstation processors with 8 cores / 16 threads each for a total of 16 cores and 32 threads. Even though the Xeon E5-2680s are ancient at this point, this workstation’s performance is still on-par with that of the current Intel-based 2020 27-inch iMac. The M1 Max is faster then the dual-Xeon E5-2680 workstation at rendering my forest scene, and considerably so. But of course, a comparison with aging Sandy Bridge era Xeons isn’t exactly a fair sporting competition; the M1 Max has almost a decade of improved processor design and die shrinks to give it an advantage. So, I also tested the M1 Max against… the current generation 2019 Mac Pro, which uses a Intel Xeon W-3245 CPU with 16 cores and 32 threads. As expected, the M1 Max loses to the 2019 Mac Pro… but not by a lot, and for a fraction of the power used. The Intel Xeon W-3245 has a 205 watt TDP just for the CPU alone and has to be utilized in a huge desktop tower with an extremely elaborate custom-engineered cooling solution, whereas the M1 Max 14-inch MacBook Pro has a reported whole-system TDP of just 60 watts!
How does Apple pack so much performance with such little energy consumption into their arm64 CPU designs? A number of factors come into play here, ranging from partnering with TSMC to manufacture on cutting-edge 5 nm process nodes to better microarchitecture design to better software and hardware integration; outside of Apple’s processor engineering labs, all anyone can really do is just hypothesize and guess. However, there are some good guesses out there! Several plausible theories have to do with the choice to use the arm64 instruction set; the argument goes that having been originally designed for low-power use cases, arm64 is better suited for efficient energy consumption than x86-64, and scaling up a more efficient design to huge proportions can mean more capable chips that use less power than their traditional counterparts. Another theory revolving around the arm64 instruction set has to do with microarchitecture design considerations. The M1, M1 Pro, and M1 Max’s high-performance “Firestorm” cores have been observed to have an absolutely humongous reorder buffer, which enables extremely deep out-of-order execution capabilities; modern processors attain a lot of their speed by reordering incoming instructions to do things like hide memory latency and bypass stalled instruction sequences. The M1 family’s high-performance cores posses an out-of-order window that is around twice as large as that in Intel’s current Willow Cove microarchitecture and around three times as large as that in AMD’s current Zen3 microarchitectures. Having a huge reordering buffer supports the M1 family’s high-performance cores also having a high level of instruction-level parallelism enabled by extremely wide instruction execution and extremely wide instruction decoding. While wide instruction decoding is certainly possible on x86-64 and other architectures, scaling wide instruction-issue designs in a low power budget is generally accepted to be a very challenging chip design problem. The theory goes that arm64’s fixed instruction length and relatively simple instructions make implementing extremely wide decoding and execution far more practical for Apple, compared with what Intel and AMD have to do in order to decode x86-64’s variable length, often complex compound instructions.
Application to Ray Tracing
So what does any of the above have to do with ray tracing? One concrete application has to do with opacity mapping in a ray tracing renderer. Opacity maps are used to produce finer geometric detail on surfaces by using a texture map to specify whether a part of a given surface should actually exist or not. Implementing opacity mapping in a ray tracer creates a surprisingly large number of design considerations that need to be solved for. For example, texture lookups are usually done as part of a renderer’s shading system, which in a ray tracer only runs after ray intersection has been carried out. However, evaluating whether or not a given hit point against a surface should be ignored or not after exiting the entire ray traversal system leads to massive inefficiencies due to the need to potentially re-enter the entire ray traversal system from scratch again. As an example: imagine a tree where all of the leaves are modeled as rectangular cards, and the shape of each leaf is produced using an opacity map on each card. If the renderer wants to test if a ray hits any part of the tree, and the renderer is architected such that opacity map lookups only happen in the shading system, then the renderer may need to cycle back and forth between the traversal and shading systems for every leaf encountered in a straight line path through the tree (and trees have a lot of leaves!). An alternative way to handle opacity hits is to allow for direct texture map lookups or to evaluate opacity procedurally from within the traversal system itself, such that the renderer can immediately decide whether to accept a hit or not without having to exit out and run the shading system; this approach is what most renderers use and is what ray tracing libraries like Embree and Optix largely expect. However, this method produces a different problem: tight inner loop ray traversal code is now potentially dependent on slow texture fetches from memory! Both of these approaches to implementing opacity mapping have downsides and potential performance impacts, which is why often times just modeling detail into geometry instead of using opacity mapping can actually result in faster ray tracing performance, despite the heavier geometry memory footprint. However, opacity mapping is often a lot easier to set up compared with modeling detail into geometry, and this is where a deep out-of-order buffer coupled with good branch prediction can make a big difference in ray tracing performance; these two tools combined can allow the processor to proceed with a certain amount of ray traversal work without having to wait for opacity map decisions. Problems similar to this, coupled with the lack of out-of-order and speculative execution on GPUs, play a large role in why GPU ray tracing renderers often have to be architecture fairly differently from CPU ray tracing renderers, but that’s a topic for another day.
I give the specific example above because it turns out that the M1 Max’s deep reordering capabilities seem to make a fairly noticeable difference in my Takua Renderer’s performance when opacity maps are used extensively! In the following rendered image, the ferns have an extremely detailed, complex appearance that depends heavily on opacity maps to cut out leaf shapes from simple underlying geometry. In this case, I found that the slowdown introduced by using opacity maps in a render on the M1 Max is proportionally much lower than the slowdown introduced when using opacity maps in a render on the x86-64 machines that I tested. Of course, I have no way of knowing if the above theory for why the M1 Max seems to handle renders that use opacity maps better is correct, but whichever way, the end results look very nice and renders faster than on any other computer that I have!

In terms of whether the M1 Pro or the M1 Max is better for CPU rendering, I only have the M1 Max to test, but my guess is that there shouldn’t actually be too large of a difference as long as the scene fits in memory. However, the above guess comes with a major caveat revolving around memory bandwidth. Where the M1 Pro and M1 Max differ is in the maximum number of GPU cores and maximum amount of unified memory configurable; the M1 Pro can go up to 16 GPU cores and 32 GB of RAM, while the M1 Max can go up to 32 GPU cores and 64 GB of RAM. Outside of the GPU and maximum amount of memory, the M1 Pro and M1 Max chips actually share identical CPU configurations: both of them have a 10-core arm64 CPU with 8 high-performance cores and 2 energy-efficient cores, implementing a custom in-house Apple-designed microarchitecture. However, for some workloads, I would not be surprised if the M1 Max is actually slightly faster since the M1 Max also has twice the memory bandwidth over the M1 Pro (400 GB/s on M1 Max versus 200 GB/s M1 Pro); this difference comes from the M1 Max having twice the number of memory controllers. While consumer systems such as game consoles and desktop GPUs often do ship with memory bandwidth numbers comparable or even better than the M1 Max’s 400 GB/s, seeing these levels of memory bandwidth in even workstation CPUs is relatively unheard of. For example, AMD’s monster flagship Ryzen Threadripper 3990X is currently the most powerful high-end desktop CPU on the planet (outside of server processors), but the 3990X’s maximum memory bandwidth tops out at 95.37 GiB/s, or 165.944 GB/s; seeing the M1 Max MacBook Pro ship with over twice the memory bandwidth compared to the Threadripper 3990X is pretty wild. The M1 Max also has twice the amount of system-level cache as the M1 Pro; on the M1 family of chips, the system-level cache is loosely analogous to L3 cache on other processors, but serves the entire system instead of just the CPU cores.
Production-grade CPU ray tracing is a process that depends heavily on being able to pin fast CPU cores at close to 100% utilization for long periods of time, while accessing extremely large datasets from system memory. In an ideal world, intensive computational tasks should be structured in such a way that data can be pulled from memory in a relatively coherent, predictable manner, allowing the CPU cores to rely on data in cache over fetching from main memory as much as possible. Unfortunately, making ray tracing coherent enough to utilize cache well is an extremely challenging problem. Operations such as BVH traversal, which finds the closest point in a scene that a ray intersects, essentially represent an arbitrarily random walk through potentially vast amounts of geometry stored in memory, and any kind of incoherent walk through memory makes overall CPU performance dependent on memory performance. As a result, operations like BVH traversal tend to be heavily bottlenecked by memory latency and memory bandwidth. I expect that the M1 Max’s strong memory bandwidth numbers should provide a some performance boost for rendering compared to the M1 Pro. A complicating factor, however, is how the additional memory bandwidth on the M1 Max is utilized; not all of it is available to just the CPU, since the M1 Max’s unified memory needs to also serve the system’s GPU, neural processing systems, and other custom onboard logic blocks. The actual real-world impact should be easily testable by rendering the same scene on a M1 Pro and a M1 Max chip both with 32 GB of RAM, but in the week that I’ve had to test the M1 Max so far, I haven’t had the time or ability to be able to carry out this test on my own. Stay tuned; I’ll update this post if I am able to try this test soon!
I’m very curious to see if the increased memory bandwidth on the M1 Max will make a difference over the M1 Pro on this forest scene in particular, due to how dense some of the geometry is and therefore how deep some of the BVHs have to go. For example, every single pine needle in this next image is individually modeled geometry, and every tree trunk has sub-pixel-level tessellation and displacement; being able to render this image on a MacBook Pro instead of a giant workstation is incredible:

In the previous posts about running Takua Renderer on arm64 processors, I included performance testing results across a wide variety of machines ranging from the Raspberry Pi 4B to the M1 Mac Mini all the way up to my dual Intel Xeon E5-2680 workstation. However, all of those tests weren’t necessarily indicative of what real world rendering performance on huge scenes would be like, since all of those tests had to use scenes that were small enough to fit in to a M1 Mac Mini’s 16 GB memory footprint. Now that I have access to a M1 Max MacBook Pro with 64 GB of memory, I can present some initial performance comparisons with larger machines rendering my forest scene. I think these results are likely more indicative of what real-world production rendering performance looks like, since the forest scene is the closest thing I have to true production complexity (I haven’t ported the Disney’s Moana Island data set to work in my renderer yet).
The machines I tested this time are a 2021 14-inch MacBook Pro with an Apple M1 Max chip with 10 cores (8 performance, 2 efficiency) and 10 threads, a 2019 16-inch MacBook Pro with an Intel Core i7-9750H CPU with 6 cores and 12 threads, a 2019 Mac Pro with an Intel Xeon W-3245 CPU with 16 cores and 32 threads, and a Linux workstation with dual Intel Xeon E5-2680 CPUs with 8 cores and 16 threads per CPU for a total of 16 cores and 32 threads. The Xeon E5-2680 workstation is, quite franky, ancient, and makes for something of a strange comparison point, but it’s the main workstation that I use for personal rendering projects at the moment, so I included it. I don’t exactly have piles of the latest server and workstation chips just laying around my house, so I had to work with what I got! However, I was also able to borrow access to a Windows workstation with an AMD Threadripper 3990X CPU, which weighs in with 64 cores and 128 threads. I figured that the Threadripper 3990X system is not at all a fair comparison point for the exact opposite reason why the Xeon E5-2680 is not a fair comparison point, but I thought I’d throw it in anyway out of sheer curiosity. Notably, the regular Apple M1 chip does not make an appearance in these tests, since the forest scene doesn’t fit in memory on the M1. I also borrowed a friend’s Razer Blade 15 to test, but wound up not using it since I discovered that it has the same Intel Core i7-9750H CPU as the 2019 16-inch MacBook Pro, but only has half the memory and therefore can’t fit the scene.
In the case of the two MacBook Pros, I did all tests twice: once with the laptops plugged in, and once with the laptops running entirely on battery power. I wanted to compare plugged-in versus battery performance because of Apple’s claim that the new M1 Pro/Max based MacBook Pros perform the same whether plugged-in or on battery. This claim is actually a huge deal; laptops traditionally have had to throttle down CPU performance when unplugged to conserve battery life, but the energy efficiency of Apple Silicon allows Apple to no longer have to do this on M1-family laptops. I wanted to verify this claim for myself!
Results
In the results below, I present three tests using the forest scene. The first test measures how long Takua Renderer takes to run subdivision, tessellation, and displacement, which has to happen before any pixels can actually be rendered. The subdivision/tessellation/displacement process has an interesting performance profile that looks very different from the performance profile of the main path tracing process. Subdivision within a single mesh is not easily parallelizable, and even with a parallel implementation, scales very poorly beyond just a few threads. Takua Renderer attempts to scale subdivision widely by running subdivision on multiple meshes in parallel, with each mesh’s subdivision task only receiving an allocation of at most four threads. As a result, the subdivision step actually benefits slightly more from single-threaded performance over a larger number of cores and greater multi-threaded performance. The second test is rendering the main view of the forest scene from my mipmapping blog post, at 1920x1080 resolution. I chose to use 1920x1080 resolution since most of the time this is a more common maximum resolution to be using while working on artistic iteration. The third test is rendering the fern view of the forest scene from Figure 2 of this post, at final 4K 3840x2160 resolution. For both of the main rendering tests, I only ran the renderer for 8 samples per pixel, since I didn’t want to sit around for days to collect all of the data. For each test, I did five runs, discarded the highest and lowest results, and averaged the remaining three results to get the numbers below. Wall time (as in a clock on a wall) measures the actual amount of real-world time that each test took, while core-seconds is an approximation of how long each test would have taken running on a single core. So, wall time can be thought of as a measure of total computation power, whereas core-seconds is more a measure of computational efficiency; in both cases, lower numbers are better:
| Forest Subdivision/Displacement | ||
|---|---|---|
| Processor: | Wall Time: | Core-Seconds: |
| Apple M1 Max (Plugged in): | 128 s | approx 1280 s |
| Apple M1 Max (Battery): | 128 s | approx 1280 s |
| Intel Core i7-9750H (Plugged in): | 289 s | approx 3468 s |
| Intel Core i7-9750H (Battery): | 307 s | approx 3684 s |
| Intel Xeon W-3245: | 179 s | approx 5728 s |
| Intel Xeon E5-2680 x2: | 222 s | approx 7104 s |
| AMD Threadripper 3990X: | 146 s | approx 18688 s |
| Forest Rendering (Main Camera) | ||
|---|---|---|
| 1920x1080, 8 spp, PT | ||
| Processor: | Wall Time: | Core-Seconds: |
| Apple M1 Max (Plugged in): | 127.143 s | approx 1271.4 s |
| Apple M1 Max (Battery): | 126.421 s | approx 1264.2 s |
| Intel Core i7-9750H (Plugged in): | 288.089 s | approx 3457.1 s |
| Intel Core i7-9750H (Battery): | 347.898 s | approx 4174.8 s |
| Intel Xeon W-3245: | 106.332 s | approx 3402.6 s |
| Intel Xeon E5-2680 x2: | 158.255 s | approx 5064.2 s |
| AMD Threadripper 3990X: | 38.887 s | approx 4977.5 s |
| Forest Rendering (Fern Camera) | ||
|---|---|---|
| 3840x2160, 8 spp, PT | ||
| Processor: | Wall Time: | Core-Seconds: |
| Apple M1 Max (Plugged in): | 478.247 s | approx 4782.5 s |
| Apple M1 Max (Battery): | 496.384 s | approx 4963.8 s |
| Intel Core i7-9750H (Plugged in): | 1084.504 s | approx 13014.0 s |
| Intel Core i7-9750H (Battery): | 1219.59 s | approx 14635.1 s |
| Intel Xeon W-3245: | 345.292 s | approx 11049.3 s |
| Intel Xeon E5-2680 x2: | 576.279 s | approx 18440.9 s |
| AMD Threadripper 3990X: | 108.2596 s | approx 13857.2 s |
When rendering the main camera view, the 2021 14-inch MacBook Pro used on average about 7% of its battery charge, while the 2019 16-inch MacBook Pro used on average about 39% of its battery charge. When rendering the fern view, the 2021 14-inch MacBook Pro used on average about 19% of its battery charge, while the 2019 16-inch MacBook Pro used on average about 48% of its battery charge. Overall by every metric, the 2021 14-inch MacBook Pro achieves an astounding victory over the 2019 16-inch MacBook Pro: a little over twice the performance for a fraction of the total power consumption. The 2021 14-inch MacBook Pro also lives up to Apple’s claim of identical performance plugged in and on battery power, whereas in the results above, the 2019 16-inch MacBook Pro suffers anywhere between a 25% to 50% performance hit just from switching to battery power. The 2021 14-inch MacBook Pro’s performance win is even more astonishing when considering that the 2019 16-inch MacBook Pro is the previous flagship that the new M1 Pro/Max MacBook Pros are the direct successors to. Seeing this kind of jump in a single hardware generation is unheard of in modern tech and represents a massive win for both Apple and for the arm64 ISA. The M1 Max also handily beats the old dual Intel Xeon E5-2680 that I am currently using by a comfortable margin; for my personal workflow, this means that I can now do everything that I previously needed a large loud power-hungry workstation for on the 2021 14-inch MacBook Pro, and I can do everything faster on the 2021 14-inch MacBook Pro too.
The real surprises to me came with the 2019 Mac Pro and the Threadripper 3990X workstation. In both of those cases, I expected the M1 Max to lose, but the 2021 14-inch MacBook Pro came surprisingly close to the 2019 Mac Pro’s performance in terms of wall time. Even more importantly as a predictor of future scalability, the M1 Max’s efficiency as measured by core-seconds comes in at far far superior to both the Intel Xeon W-3245 and the AMD Threadripper 3900X. Imagining what a hypothetical future Apple Silicon iMac or Mac Pro with an even more scaled up M1 variant, or perhaps some kind of multi-M1 Max chiplet or multisocket solution, is extremely exciting! I think that with the upcoming Apple Silicon based large iMac and Mac Pro, Apple has a real shot at beating both Intel and AMD’s highest end CPUs to win the absolute workstation performance crown.
Of course, what makes the M1 Max’s performance numbers possible is the M1 Max’s energy efficiency; this kind of performance-per-watt is simply unparalleled in the desktop (meaning non-mobile, not desktop form factor) processor world. The M1 architecture’s energy efficiency is what allows Apple to scale the design out into the M1 Pro and M1 Max and hopefully beyond. Below is a breakdown of energy utilization for each of the rendering tests above; the total energy used for each render is the wall clock render time multiplied by the maximum TDP of each processor to get watt-seconds, which is then translated to watt-hours. I assume maximum TDP for each processor since I ran Takua Renderer with processor utilization set to 100%. For the two MacBook Pros, I’m just reporting the plugged-in results.
| Forest Rendering (Main Camera) | ||
|---|---|---|
| 1920x1080, 8 spp, PT | ||
| Processor: | Max TDP: | Total Energy Used: |
| Apple M1 Max: | 60 W | 2.1191 Wh |
| Intel Core i7-9750H: | 45 W | 3.6011 Wh |
| Intel Xeon W-3245: | 205 W | 6.0550 Wh |
| Intel Xeon E5-2680 x2: | 260 W | 11.4295 Wh |
| AMD Threadripper 3990X: | 280 W | 3.0246 Wh |
| Forest Rendering (Fern Camera) | ||
|---|---|---|
| 3840x2160, 8 spp, PT | ||
| Processor: | Max TDP: | Total Energy Used: |
| Apple M1 Max: | 60 W | 7.9708 Wh |
| Intel Core i7-9750H: | 45 W | 13.5563 Wh |
| Intel Xeon W-3245: | 205 W | 19.6625 Wh |
| Intel Xeon E5-2680 x2: | 260 W | 41.6202 Wh |
| AMD Threadripper 3990X: | 280 W | 8.4202 Wh |
At least for my rendering use case, the Apple M1 Max is easily the most energy efficient processor, even without taking into account that the 60 W TDP of the M1 Max is for the entire system-on-a-chip including CPU, GPU, and more, while the TDPs for all of the other processors are just for a CPU and don’t take into account the rest of the system. The M1 Max manages to beat the 2019 16-inch MacBook Pro’s Intel Core i7-9750H in absolute performance by a factor of two whilst using anywhere between a two-thirds to half of the energy, and the M1 Max comes close to matching the 2019 Mac Pro’s absolute performance while using about a third of the energy. Of course the comparison with the Intel Xeon E5-2680 workstation isn’t exactly fair since the M1 Max is manufactured using a 5 nm process while the ancient Intel Xeon E5-2580s were manufactured on a 35 nm process a decade ago, but I think the comparison still underscores just how far processors have advanced over the past decade leading up to the M1 Max. The only processor that really comes near the M1 Max in terms of energy efficiency is the AMD Threadripper 3990X, which makes sense since the AMD Threadripper 3990X and the M1 Max are the closest cousins in this list in terms of manufacturing process; both are using leading-edge TSMC photolithography. However, on a whole, the M1 Max is still more efficient than the AMD Threadripper 3990X, and again, the AMD Threadripper 3990X TDP is for just a CPU, not an entire SoC! Assuming near-linear scaling, a hypothetical M1-derived variant that is scaled up 4.5 times to a 270 W TDP should be able to handily defeat the AMD Threadripper 3990X in absolute performance.
The wider takeaway here though is that in order to give the M1 Max some real competition, one has to skip laptop chips entirely and reach for not just high end desktop chips, but for server-class workstation hardware to really beat the M1 Max. For workloads that push the CPU to maximum utilization for sustained periods of time, such as production-quality path traced rendering, the M1 Max represents a fundamental shift in what is possible in a laptop form factor. Something even more exciting to think about is how the M1 Max really is the middle tier Apple Silicon solution; presumably the large iMac and Mac Pro will push things into even more absurd territory.
Conclusion
So those are my initial thoughts on the Apple M1 Max chip and my initial experiences with getting my hobby renderer up and running on the 2021 14-inch MacBook Pro. I’m extremely impressed, and not just with the chip! This post mostly focused on the chip itself, but the rest of the 2021 MacBook Pro lineup is just as impressive. For rendering professionals and enthusiasts alike, one aspect of the 2021 MacBook Pros that will likely be just as important as the processor is the incredible screen. The 2021 MacBook Pros ship with what I believe is an industry first: a micro-LED backlit 120 Hz display with an extended dynamic range that can go up to 1600 nits peak brightness. The screen is absolutely gorgeous, which is a must for anyone who spends their time generating pixels with a 3D renderer! One thing on my to-do list was to add extended dynamic range support to Thomas Müller’s excellent tev image viewer, which is a popular tool in the rendering research community. However, it turns out that Thomas already added extended dynamic range support, and it looks amazing on the 2021 MacBook Pro’s XDR display.
In this post I didn’t go into the M1 Max’s GPU at all, even though the GPU in many ways might actually be even more interesting than the CPU (which is saying a lot considering how interesting the CPU is). On paper at least, the M1 Max’s GPU aims for roughly mobile NVIDIA GeForce RTX 3070 performance, but how the M1 Max and a mobile NVIDIA GeForce RTX 3070 actually will compare for ray traced rendering is difficult to say without actually conducting some tests. On one hand, the M1 Max’s unified memory architecture grants its GPU far more memory than any NVIDIA mobile GPU by a huge margin, and the M1 Max’s unified memory architecture opens up a wide variety of interesting optimizations that are otherwise difficult to do when managing separate pools of CPU and GPU memory. On the other hand though, the M1 Max’s GPU lacks the dedicated hardware ray tracing acceleration that modern NVIDIA and AMD GPUs and the upcoming Intel discrete GPUs all have, and in my experience so far, dedicated hardware ray tracing acceleration makes a huge difference in GPU ray tracing performance. Maybe Apple will add hardware ray tracing acceleration in the future; Metal already has software ray tracing APIs, and there already is a precedent for Apple Silicon including dedicated hardware for accelerating relatively niche, specific professional workflows. As an example, the M1 Pro and M1 Max include hardware ProRes acceleration for high-end video editing. Over the next year, I am undertaking a large-scale effort to port the entirety of Takua Renderer to work on GPUs through CUDA on NVIDIA GPUs, and through Metal on Apple Silicon devices. Even though I’ve just gotten started on this project, I’ve already learned a lot of interesting things comparing CUDA and Metal compute; I’ll have much more to say on the topic hopefully soon!
Beyond the CPU and GPU and screen, there are still even more other nice features that the new MacBook Pros have for professional workflows like high-end rendering, but I’ll skip going through them in this post since I’m sure they’ll be thoroughly covered by all of the various actual tech reviewers out on the internet.
Bonus Images and Acknowledgements
To conclude for now, here are two more bonus images that I rendered on the M1 Max 14-inch MacBook Pro. I originally planned on just rendering the earlier three images in this post, but to my surprise, I found that I had enough time to do a few more! I think that kind of encapsulates the M1 Pro and M1 Max MacBook Pros in a nutshell: I expected incredible performance, but was surprised to find even my high expectations met and surpassed.


A huge thanks to everyone at Apple that made this post possible! Also a big thanks to Rajesh Sharma and Mark Lee for catching typos and making some good suggestions.